
1. Description
It is designed to add numbers that will be substituted when making outgoing calls through the line in case of using a SIP trunk gateway without registration. Such numbers will be displayed to the Subscriber during an Inbound call. If you set several numbers, the number will be randomly assigned.
It consists of the following elements:
-
Search field (Fig. 1.(1));
-
Creation tool (Fig. 1.(2));
-
Refresh button (Fig. 1.(3));
-
Registry (Fig. 1.(4));
-
Pagination (Fig. 1.(5)).
.png?cb=0cc223d13f10b96f492b29c2accdcdb1)
You can also influence the number through the following:
-
routing - a pre-executed scheme;
-
variables - send the original number to the Subscriber.
1.1. Search field
The search is performed on the Numbers column.
It consists of an input field and a close button ( 
1.2. Import Tool
Designed for loading numbers from a CSV file. Clicking the import button opens a file selection window.
After selecting the file, the Import CSV modal window opens (Fig. 2), which consists of the following elements:
-
Skip headers checkbox — allows skipping the file headers;
-
Char set field — the file encoding. UTF-8 is used by default;
-
Separator field — the separator used in the file. , is used by default;
-
preview block — displays column names and data from the imported file;
-
Number* field (required) — from the drop-down list in the CSV Column column, select the name of the column from the file corresponding to the numbers.
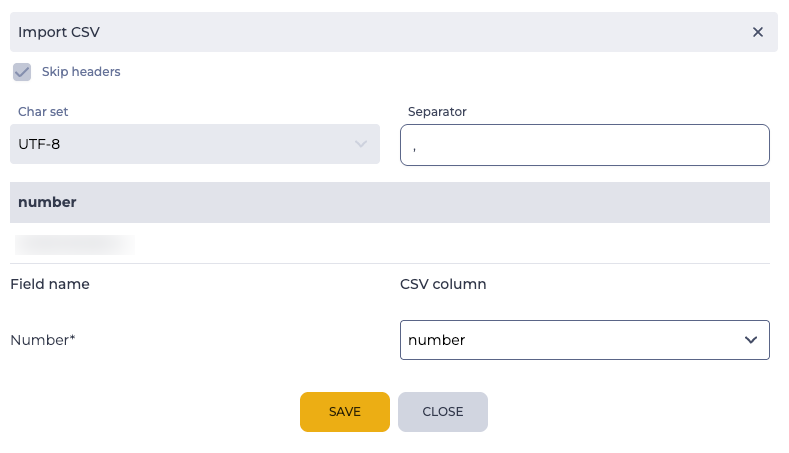
After configuring the required fields, click the Save button. The modal window closes and the numbers from the CSV file are added to the record registry.
1.3. Creation tool
Click the add button to add a Number. The Add number modal window (Fig. 3) opens after clicking the add button. It consists of the Number, field and the Add and Close buttons.
.png?cb=5521c08ae47381a9cca2f0c650738a7b)
1.4. Refresh button
Updating the register table is performed by clicking on the refresh button - 
1.5. Registry
The registry is a list of entries of existing objects in this section, each of which consists of a set of fields:
-
Checkbox;
-
Numbers;
-
Editing tool;
-
Removal tool.
1.5.1. Checkbox
Use to select one or more entries. An additional delete tool appears after selecting one or more entries. Information about the number of entries chosen for deletion appears when you hover over this tool.
1.5.2. Numbers
Numbers that will be substituted are displayed here.
1.5.3. Editing tool
The Edit number modal window opens (Fig. 4) after clicking the button.
.png?cb=abb4e042bf760abc74bd6e4109fbc7c8)
1.5.4. Removal tool
Used to remove an object with confirmation through a modal window. When hovering over the delete button ( 
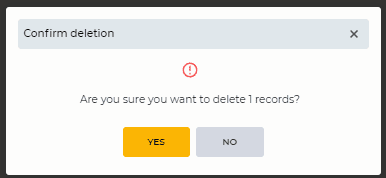
Fig. 5. Modal confirmation window
1.6. Pagination
It consists of the Rows per page field, which indicates the number of entries (it is possible to set from 1 to 1000) per page, and forward and backward buttons for switching pages.
2. Opportunities
2.1. Add a Number to the Resource
|
Goal |
Add a Number to the Resource |
|---|---|
|
Preconditions |
|
|
Steps
|
|
|
Result |
The Number added. |

2.2. Import Numbers from CSV
|
Goal |
Load numbers from a CSV file |
|---|---|
|
Preconditions |
|
|
Steps
|
|
|
Result |
The modal window closes. Numbers from the file are added to the record registry. |

2.3. Delete a Number from the Resource
|
Goal |
Delete the Number from the Resource |
|---|---|
|
Preconditions |
|
|
Steps
|
|
|
Result |
The modal window closes. The Number is removed. |

2.4. Delete several Numbers
|
Goal |
Delete several Numbers |
|---|---|
|
Preconditions |
|
|
Steps
|
|
|
Result |
The modal window closes. Numbers are removed. |
2.5. Edit a Number
|
Goal |
Edit a Number |
|---|---|
|
Preconditions |
|
|
Steps
|
|
|
Result |
The modal window closes. Data saved. |