
1. Description
Here, you enter information about the Triggers.
Consists of fields (Fig.1):
-
Name;
-
Type;
-
Schema;
-
Timezone;
-
Timeout;
-
Expression;
-
Description.
.png?cb=964408df31f9d6139b2933a3a7cab10b)
1.1. Name
Required field. Here the name of the Trigger is entered.
1.2. Type
The type of Trigger is selected here.
1.2.1 At Time
Used to launch a flow at a specified time or with a certain frequency. This type of trigger is suitable for regular automated actions — for example, daily report delivery, token refresh, or scheduled queue cleanup.
After selecting the At Time type, two required fields appear.
1.2.1.1 Time Zone field
Defines the time zone in which the time calculation based on the specified expression will be performed. This ensures the correct operation of the trigger in systems deployed across different countries or time zones.
1.2.1.2 Expression field
Contains a cron expression that specifies the exact time and frequency for triggering. The expression must follow the standard cron syntax.
For example, the expression 0 */1 12 * * * means execution every minute from 12:00 to 12:59. How to write a proper expression can be found here.
Below the field, a parsed version of the expression is automatically displayed, which helps verify the correctness of the configuration.
1.2.1.2.1 Usage examples
Typical usage examples include:
-
launching a flow to update an integration token every 30 minutes;
-
sending an email reminder every day at 9:00 AM;
-
nightly update of case statuses in the queue;
-
log cleanup or data archiving once a week.
1.2.2 On Event
Activated when a specific event occurs in the system. These can be user actions or system changes involving case objects, their files, comments, or linked cases.
After selecting the On Event type, two required fields appear.
1.2.2.1 Object field
A dropdown for selecting the entity whose change will trigger the action. Available values:
-
Case;
-
Case files;
-
Case comments;
-
Case links;
-
Linked cases.
1.2.2.2 Event field
The action that initiates the trigger execution.
The list of available events in the "Event" field depends on the selected value in the "Object" field.
-
If the “Object” field is not filled in, the “Event” field becomes inactive.
-
If the “Object” field is cleared, the “Event” field is also cleared.
Event options for each object:
-
Case → Create, Update, Delete, Planned resolution time;
-
Case files → Create, Delete;
-
Case comments → Create, Update, Delete;
-
Case links → Create, Update, Delete;
-
Related cases → Create, Delete.
Once triggered, the flow specified in the “Flow” field is executed. The flow must be previously created in the “Flows” section and match the type of event being processed.
Example:
If the selected object is “Case comments” and the event is “Update”, the trigger will be activated every time a case comment is edited. As a result, the specified flow will run — for example, to send a notification or update a status.
1.2.2.2.1 Usage examples
The table below shows typical scenarios for using such triggers:
|
Possible task |
Action (flow execution) |
Trigger |
Field to check |
Recipient |
Channel |
|---|---|---|---|---|---|
|
Automatically inform the client when a case is closed |
Email with case number and resolution details |
Case update |
Status |
Contact (client) |
|
|
Confirmation upon case creation |
Email with case number and introductory message |
Case creation |
– |
Contact (client) |
|
|
Logging to communication history |
Creating a record with event details |
Case update |
– |
Contact (client) |
|
|
Creating a task in an external system |
Sending data via API |
Case creation |
– |
External system |
API |
|
Closing a case in Sparta |
Sending an API request when the status changes |
Case update |
Status |
Sparta |
API |
|
Assigning a task to an agent |
Creating a task with case details |
Case update |
Status |
Agent |
Task-call |
|
Notifying the assignee |
Sending an email to the user |
Case update |
Assignee |
Contact (user) |
|
|
Notifying a group of assignees |
Mass message distribution |
Case update |
Assignee group |
Contact group |
|
1.3. Schema
Here, choose the scheme that will be processed when the Trigger fires.
Only Flow schemes with the Service type are suitable for selection.
When you click on the Schema field, a drop-down list opens from which the Flow schema is selected. If the required Flow schema is not in the drop-down list, use the Schema field as a search field.
How to create a new Flow schema can be found here.
1.4. Timezone
The time zone where the trigger will work is selected from the list.
1.5. Timeout
The maximum amount of time that is given to process the schema is set here.
1.6. Expression
Here you entered an expression according to which the time is set. How to write the expression correctly can be found here.
1.7. Description
The field for entering a description of the Trigger.
2. Opportunities
2.1. Change the Name/Timeout/Expression/Description
|
Goal |
Change the Trigger Name/Priority/Description |
|---|---|
|
Preconditions |
|
|
Steps
|
|
|
Result |
Data saved. |

2.2. Change the Trigger Type/Schema/Timezone
|
Goal |
Change the value in the Scheme field. |
|---|---|
|
Preconditions |
|
|
Steps
|
|
|
Result |
Data saved. |
3. Trigger configuration example
To automatically send a notification in Workspace after a case is created, follow these steps:
-
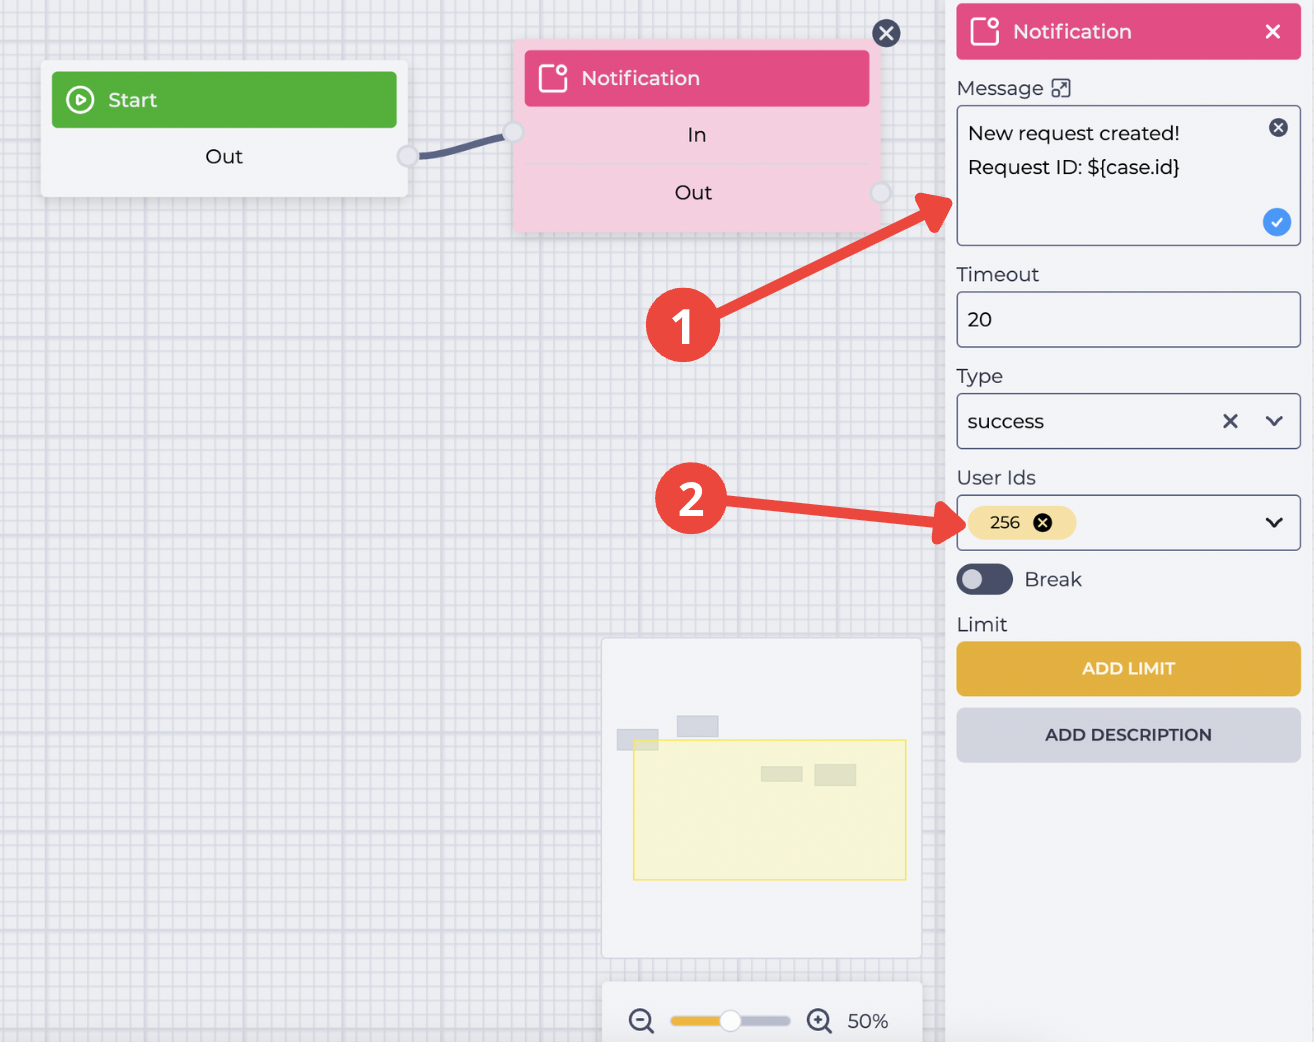
Create a flow in Admin → Routing → Flows and remember its name. Add the Notification component to the flow. Enter the desired display text, a variable into which the ID of the created case will be inserted (Fig. 3.(1)), and in the User IDs field, add the IDs of the users (Fig. 3.(2)) who should receive the notification in Workspace.
-
Create a trigger, for example of the On Event type. Go to Admin → Integrations → Triggers.
-
Click the “Add” button. On the General tab, fill in all the fields (in the Flow field, select the flow you just created).
-
Click the “Save” button.
-
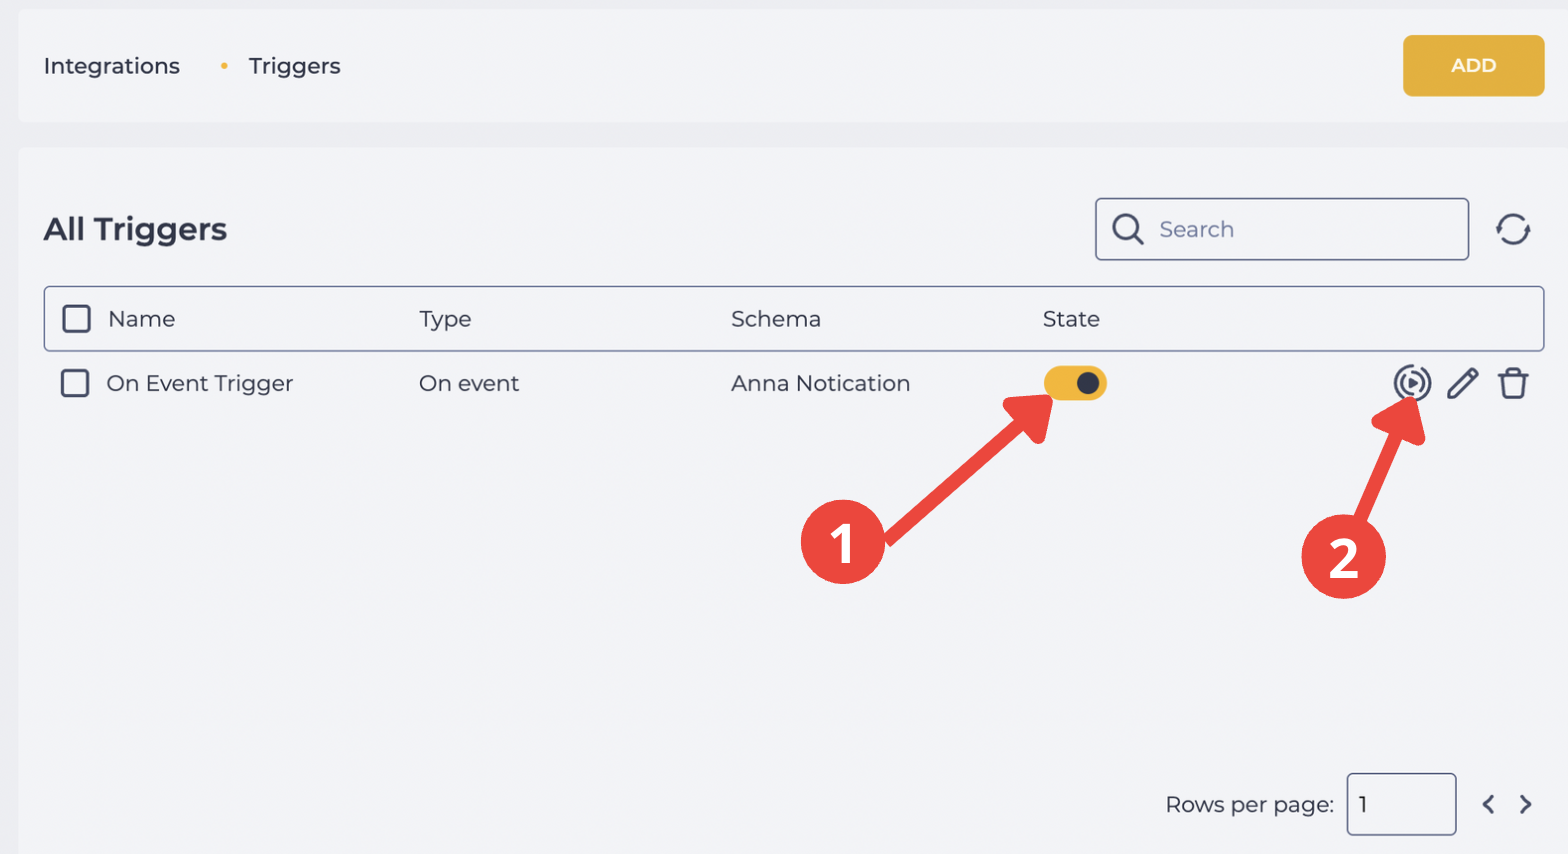
In the record list, find and enable the switch of the created trigger (Fig. 4.(1)). Then click the Start button (Fig. 4.(2)) to activate execution.
-
Go to Workspace.
-
At the same time, create a new case in CRM → Cases → click the Add icon

-
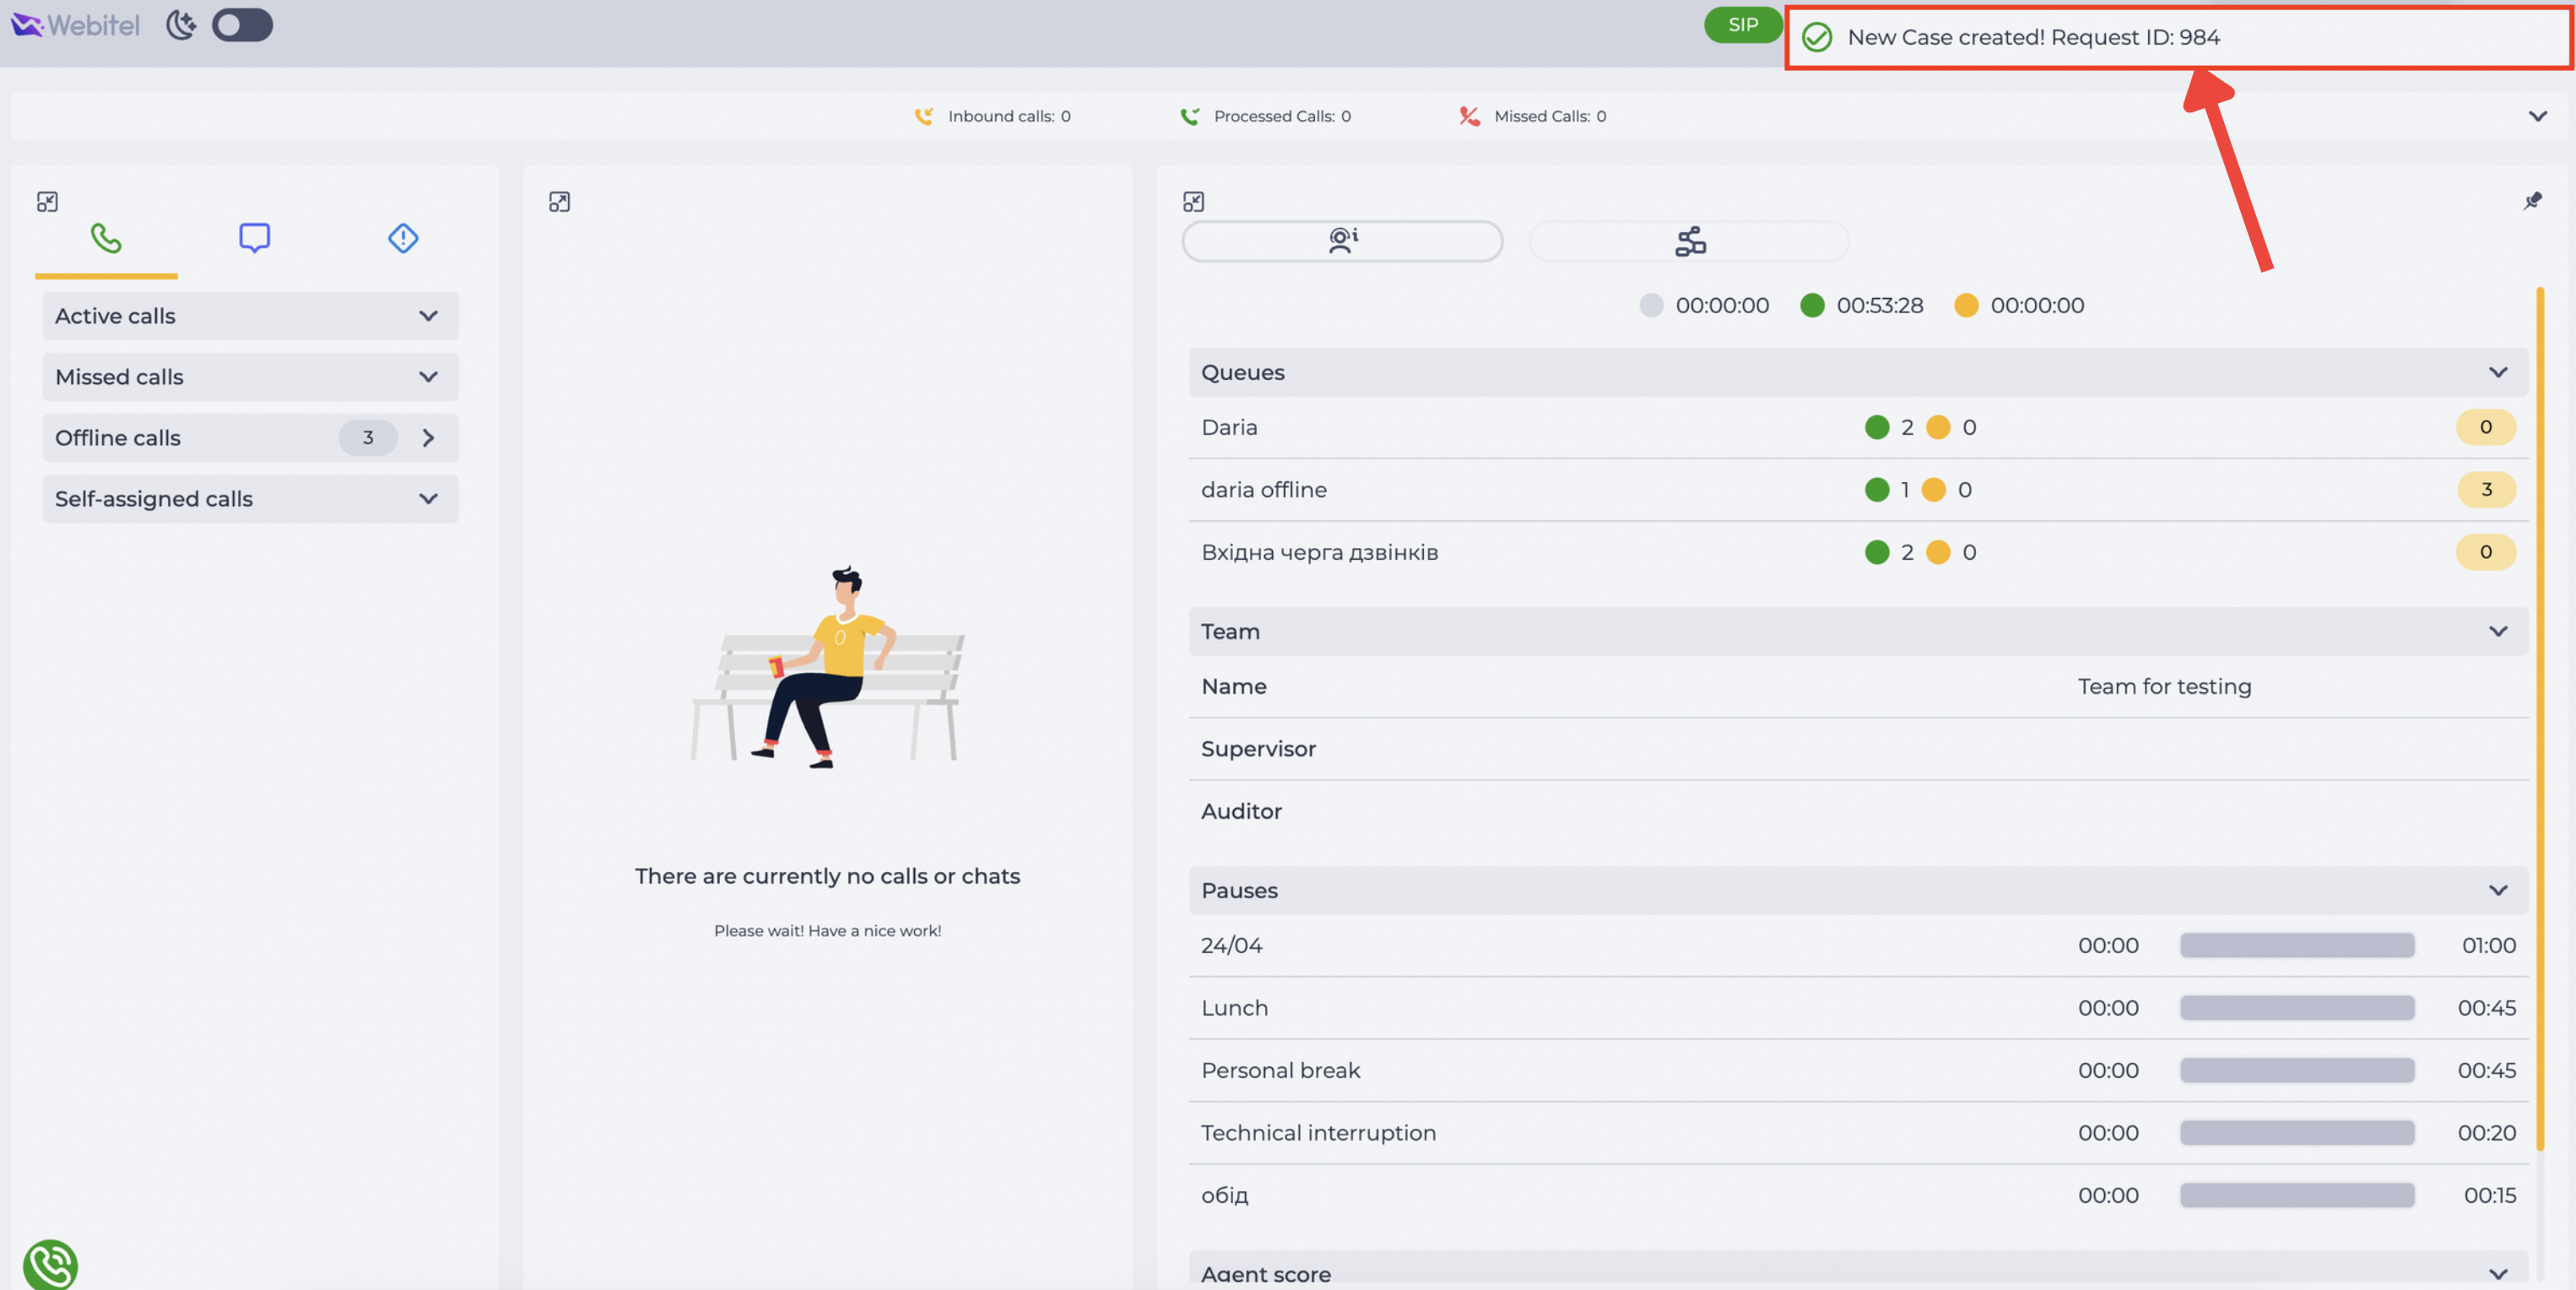
Return to Workspace and check whether the notification appeared at the top of the interface (Fig. 5).
For triggers of the At Time type, configuration is performed in the same way. The only difference is that notifications will be sent at the specified time or with a certain frequency, according to the cron expression in the Expression field.