
1. Description
An active chat is a chat that the Agent has accepted.
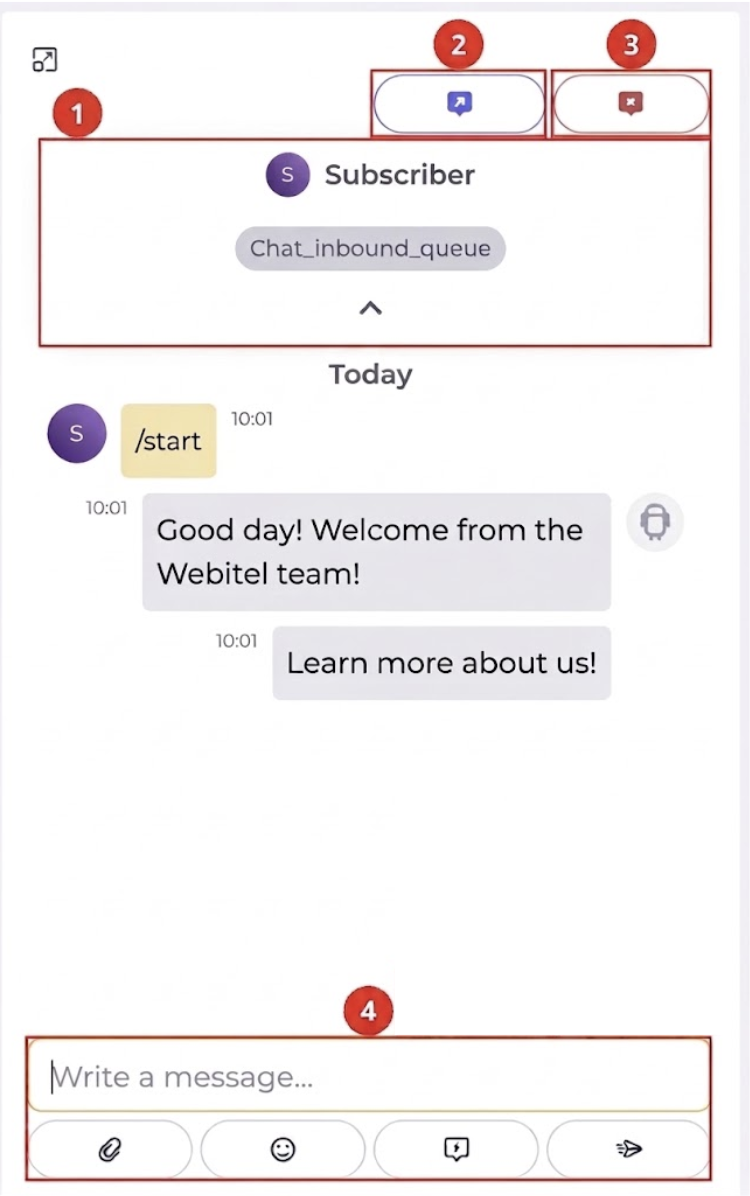
The following options are available in an active chat:
-
Chat bar (Fig. 1.(1));
-
Transferring a chat (Fig. 1.(2));
-
Close a chat (Fig. 1.(3));
-
Send a message (Fig. 1.(4));
-
Processing.
1.1. Chat bar
The top of the active chat's central panel shows a bar with the names of the conversation participants:
-
if the contact is identified — the bar shows the contact's name. The contact's name takes priority over the client's name from the connected messenger — even if they differ, the contact's name is shown. Clicking it opens that contact's page;
-
if the contact is not identified — the bar shows the client's name from the connected messenger. It's not possible to open the contact's page from it.
If the chat was transferred to another agent — the bar additionally shows, separated by commas, the names of the agents who previously took part in the chat, except for the agent currently handling it.
If the chat was not transferred — the bar does not show any agent names.
1.2. Transferring a chat
To transfer a chat to another agent or to another queue, use the Transfer tool (Fig. 1.(2)).
More about transfer can be found here.
1.3. Close a chat
The Close button (Fig. 1.(3)) ends the current chat.
More about closing chats can be found here.
1.4. Send a message
Messages in the chat can be sent in several ways:
-
text message;
-
file attachment;
-
emoji insertion;
-
use of quick replies.
-
Messages sent by the system are marked with a special icon

-
Agent and client messages are accompanied by an avatar

-
The name of the agent or client can be hidden using the settings on the Templates page of the text gateway in use.
-
Displaying client audio and video messages is supported.
1.4.1. Text message
To send a text message, enter the text in the input field (Fig. 1.(4)) and click the send button 
Before sending, the message can be edited.
1.4.2. File attachments
Files can be attached to a message in two ways:
-
using the paperclip icon

-
dragging the file into the input field with the mouse.
1.4.3. Emoji
Emoji are inserted using the emoji button on the input field toolbar 
Selected symbols are added to the message text and can be sent together with it.
1.4.4. Quick replies
The agent can use pre-prepared message templates from the Quick Replies directory.
Quick replies can be invoked:
-
via the quick replies icon on the toolbar

After invoking, a list of available templates opens:
-
all quick replies created without binding to a team;
-
quick replies assigned to the agent’s team or queue.
Features:
-
When a template is selected, its text is automatically inserted into the input field. It can be edited before sending.
-
To clear the input field, use the shortcut Alt + d.
Working with variables:
-
If the template contains variables (for example,
${customer_name}), they are automatically replaced with actual data from the channel. -
If the data is unavailable, the variable is displayed as text and can be edited manually.
-
The list of quick replies is closed by clicking the icon

1.5. Processing
More about chat processing can be found here.