
1. Description
It is designed to configure the parameters of the Queue.
It consists of the following elements (Fig. 1):
-
Max wait time;
-
Agent response timeout;
-
Customer response timeout;
-
Maximum response timeout;
-
Max wait count;
-
Access to pause when there are more online agents than;
-
Remaining members visibility;
-
Sticky;
-
Ignore calendar;
-
Manual distribution;
-
Timeout from the last message.
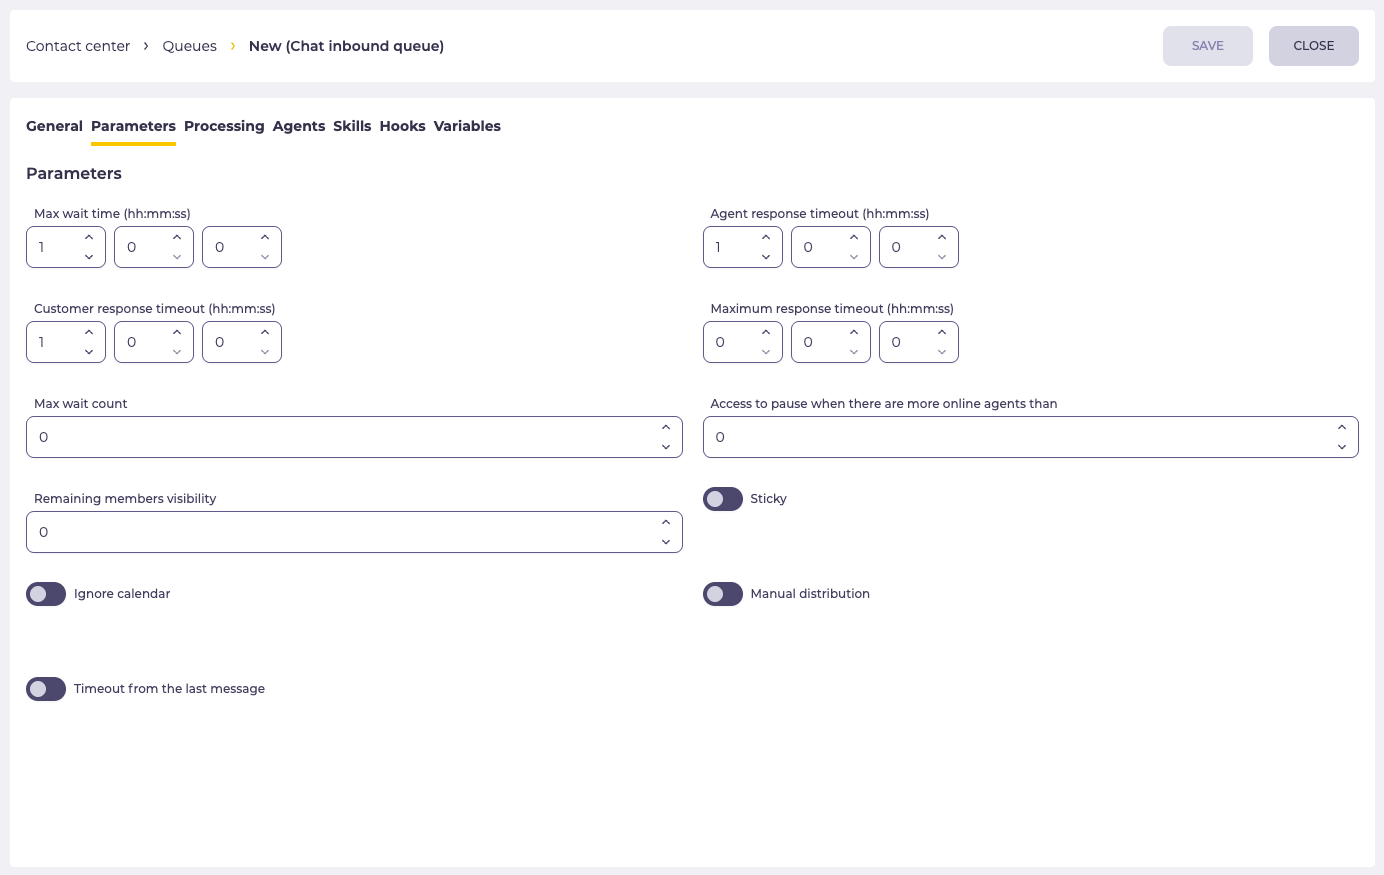
1.1. Max wait time
Here, enter the length of time the Subscriber will wait in the Queue. After this time expires, the Subscriber is removed from the Queue.
1.2. Agent response timeout
Here, the maximum time to wait for the agent’s response is specified.
If the agent does not send a message within the specified time, the chat is automatically closed.
The behavior of the parameter depends on the position of the Timeout from the last message switch:
-
If the switch is turned off

-
If the switch is turned on

1.3. Customer response timeout
Here, the amount of time to wait for the customer’s response is specified.
If the customer does not send a response within the specified time, the chat is automatically closed.
The behavior of the parameter depends on the position of the Timeout from the last message switch:
-
If the switch is turned off
-
If the switch is turned on
1.4. Maximum response timeout
Sets the maximum inactivity time in the chat.
The chat is automatically closed if neither the agent nor the customer sends messages during the specified period.
1.5. Max wait count
The maximum number of Subscribers waiting to be connected to the Agent enters here.
If more Subscribers are waiting for a connection than enter in this field, then such Subscribers will not get into the Queue, and, as a result, the chat will end.
If you enter 0 in this field, this function will be ignored.
1.6. Access to pause when there are more online agents than
What the minimum number of online Agents should be for the Agent to be able to switch to pause mode is entered here.
An Agent cannot go into pause mode if the number of Agents online is equal to or less than the number entered in this field.
1.7. Remaining members visibility
This field sets the maximum number of members that are displayed to agents in Workspace.
It allows hiding the actual number of members in the queue, showing only those that fall within the specified limit.
-
If the field is set to 0, Workspace displays the actual number of all members in the queue (no restrictions).
-
If another value is specified, Workspace will display only the given number of members. The rest remain hidden. For example, if the field value is 50 and there are fewer than 50 members in the queue, the system will show their exact number (e.g., 37). If the queue contains 50 or more members, the system will display a shortened version — 50+, instead of the real number.
1.8. Sticky
The ability to assign a specific Agent for the Subscriber.
When the “Sticky” switch is off:
-
members without a filled Agent field are routed to the queue;
-
members with a filled Agent field are also routed to the queue.
When the “Sticky” switch is on:
-
members without a filled Agent field are routed to the queue;
-
members with a filled Agent field are routed to the specific agent.
When this switch is activated, more additional elements appear (Fig. 2):
-
Sticky agent (sec);
-
Ignore agent status.
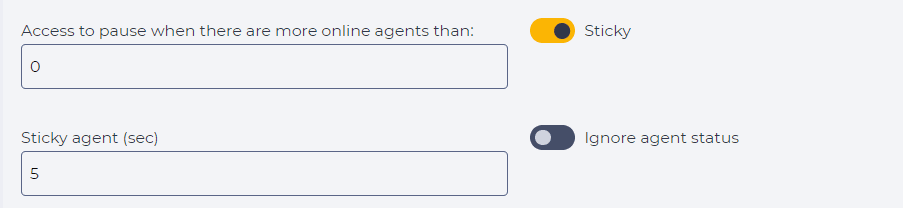
Sticky agent (sec) — the time the Queuing mechanism waits to connect only with the Agent associated with this Subscriber.
The Ignore agent status switch checks if the agent is in online status to determine whether to schedule a chat:


When the Ignore Agent Status switch is enabled and the Agent is offline or busy, the chat is assigned to that Agent but does not appear in their Workspace; instead, it waits for the time entered in the Sticky agent (sec) field.
If the Agent comes online before the time expires, the chat will appear in their Workspace.
If the Agent does not come online within that time, the chat will go to the Queue.
If the Agent is offline and the Ignore Agent Status switch is disabled, the Queue mechanism will not wait and will connect the chat to another Agent.
1.9. Ignore calendar
If the switch is turned on, the chat goes to the Queue and will remain there, but it will be distributed to the Agent only during the working hours of the Calendar. The Calendar is selected on the General tab in the Calendar field.
1.10. Manual distribution
Responsible for the manual distribution of chats in this Queue — the Agent selects which chats to accept from the list of inbound chats.
If it is enabled, then chats will not be distributed automatically but will be shown to all Agents assigned to this Queue.
1.11. Timeout from the last message
-
If the switch is turned off
The chat is closed based on the minimum value of the following parameters:
-
If the switch is turned on
2. Opportunities
2.1. Change Queue settings
|
Goal |
Change Queue settings |
|---|---|
|
Preconditions |
|
|
Steps
|
|
|
Result |
Data saved. |

2.2. Sticky settings in the Queue
|
Goal |
Sticky settings in the Queue |
|---|---|
|
Preconditions |
|
|
Steps
|
|
|
Result |
Data saved. |