
Description
This section describes the algorithm of creating and managing Webitel telephony users in the Creatio system.
Glossary
|
Term |
Description |
|---|---|
|
СRM User |
A user of the Creatio system, such a user, does not have the ability to make or receive calls from the system. |
|
Webitel User |
Webitel telephony user. In addition to using CRM, he can already make and manage calls from the CTI panel (CTI panel is one of the telephony tools in Creatio CRM. A Webitel user can receive incoming and outgoing calls, both internal and external, directly in the system). |
1. Add the "Webitel Users" section to the "Contact Center" workplace
To create a Webitel user in Creatio, go to the main page of the system (Fig. 1). In the upper left corner, select Menu (1), click on the "Contact Center" section (2).
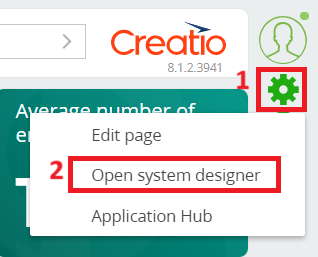
Fig. 1. Opening the contact center menu
If the "Contact Center" menu does not contain the "Webitel Users" section, it must be displayed. To display, in the upper right corner of the screen (Fig. 2) you need to click on the icon (1), then select "Open system designer" (2).
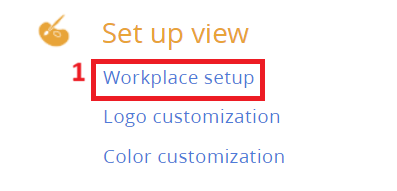
Fig. 2. Opening the system designer.
After that, open in the "Set up view" section (Fig. 3), the "Workplace settings" subsection (1).
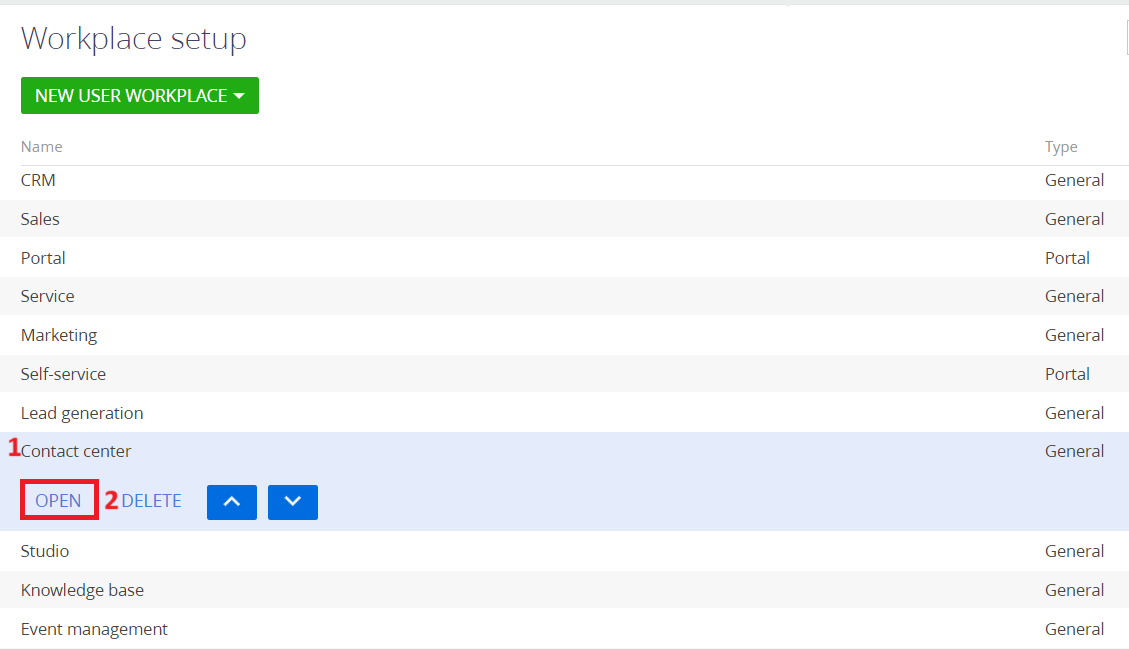
Fig. 3. Setup workplace
Select (Fig. 4) item "Add user workplace" (1), then "Main" (2).
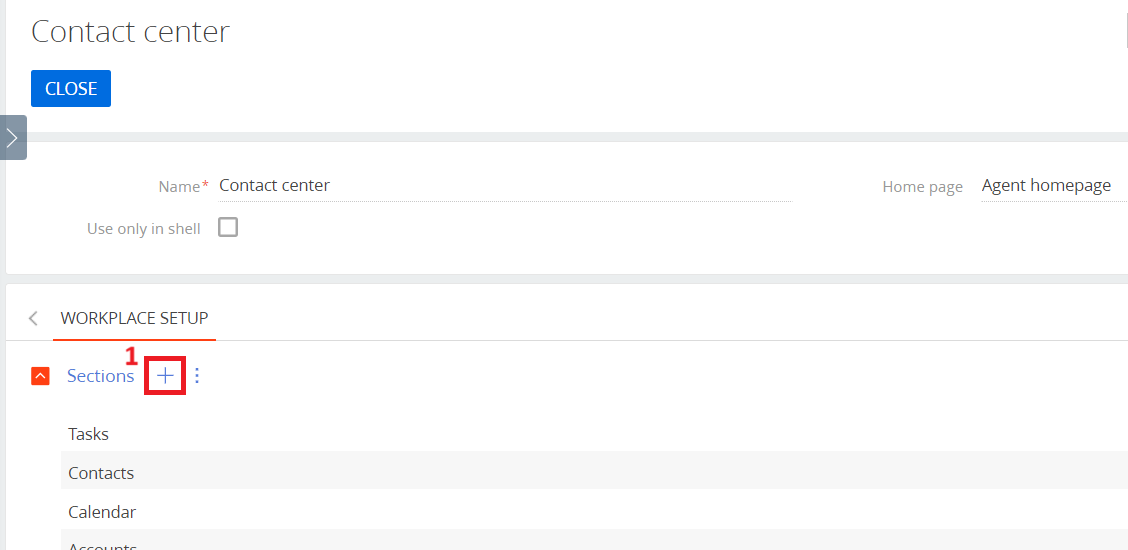
Fig. 4. Adding a user's main workplace
Click (Fig. 5) on the "+" (1) next to the "Sections" detail, then enter "Webitel Users" (2) in the search, check the box next to the section, click "Select" (3) and refresh the page.
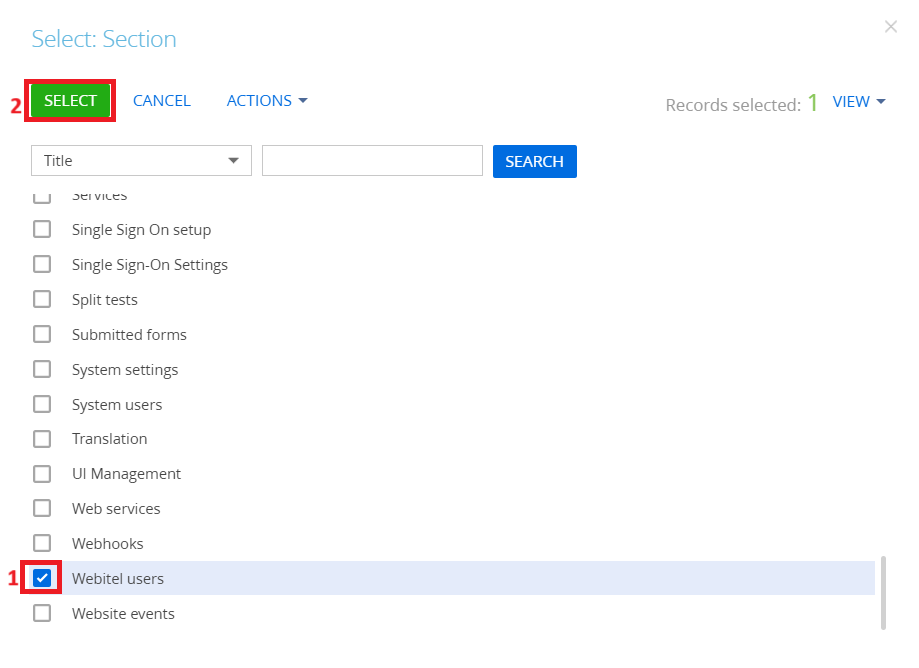
Fig. 5. Workplace selection.
The section "Webitel Users" will be displayed in the workspace of the Contact Center (Fig. 6).
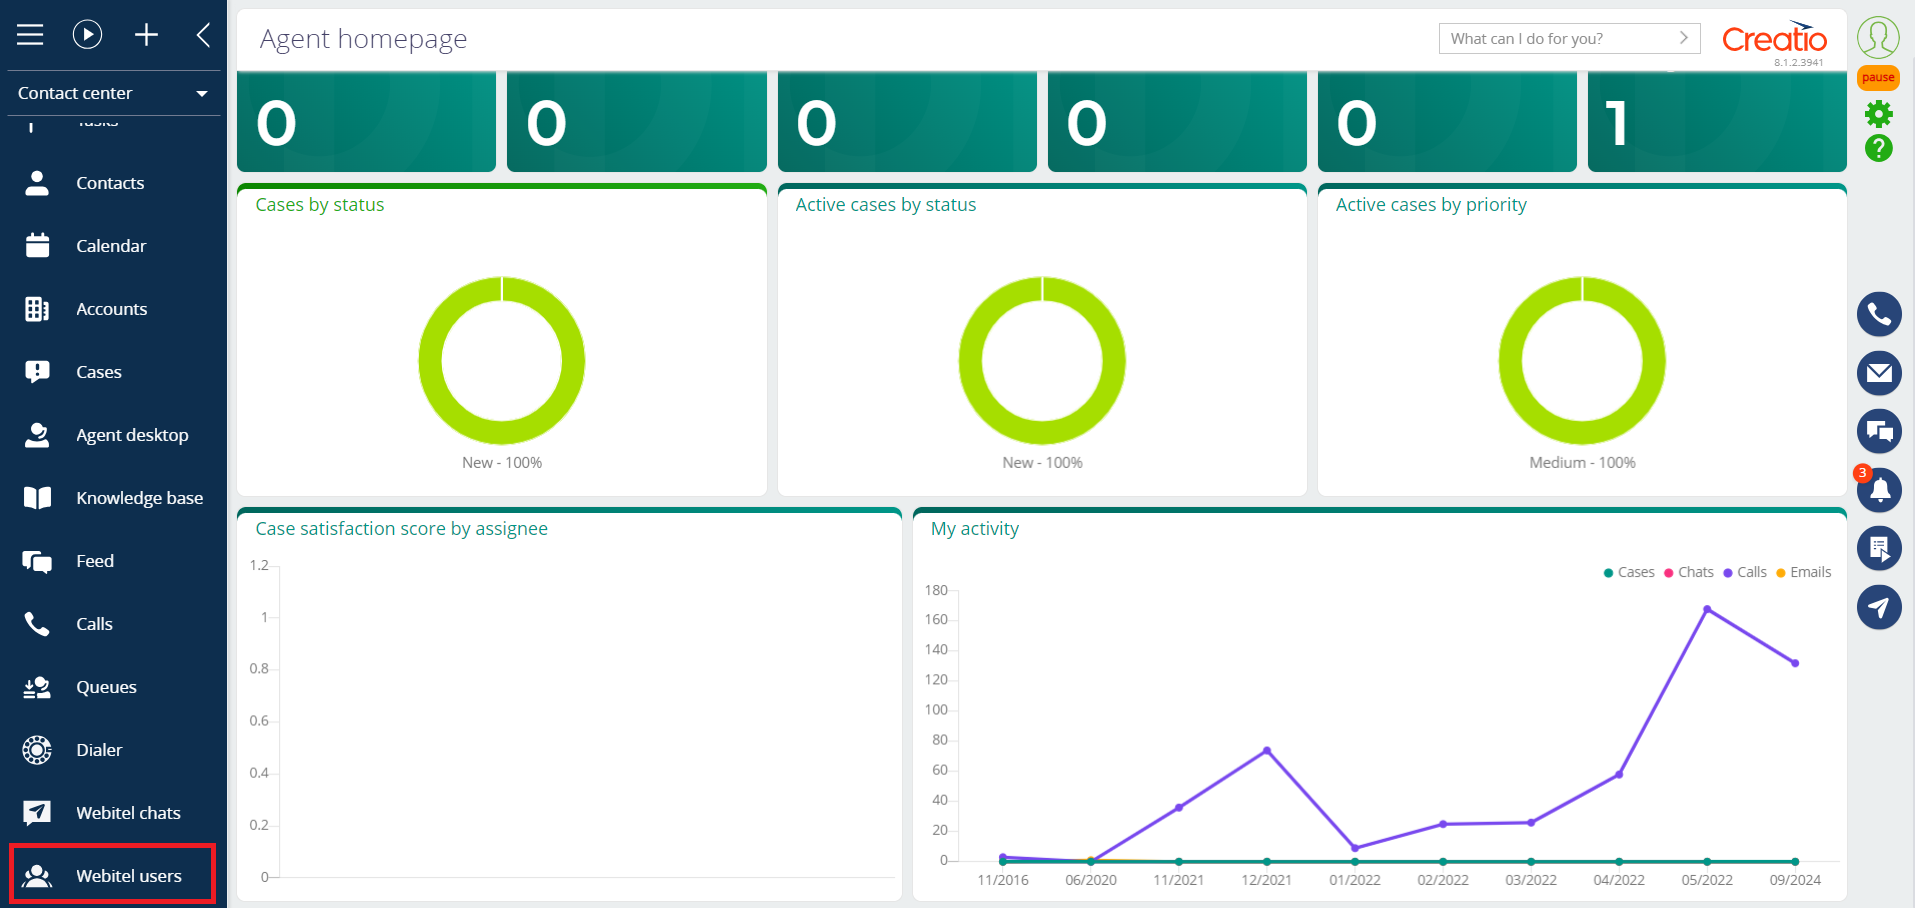
Fig. 6. Section Webitel users
To create a user in the Webitel system, he must be a registered user of Creatio!
2. Create a Creatio user
Open "System Designer". In the "Users and administration" section, open the "System users" subsection (1) (Fig. 7).
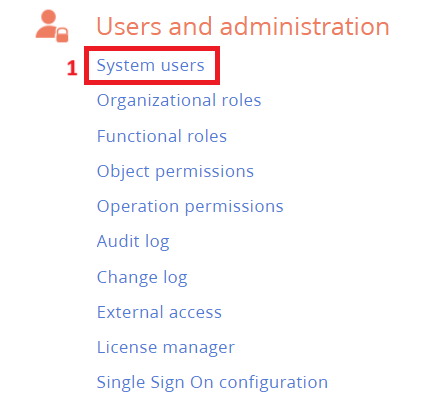
Fig.7 Opening the system users
Click "Add" (1) and select "Portal user" (2) or "Company employee" (3) (Fig. 8).
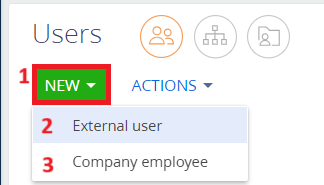
Fig. 8. Adding a Creatio user
Fill out the profile details and click Save (Fig. 9). The created user will appear in the System users list.
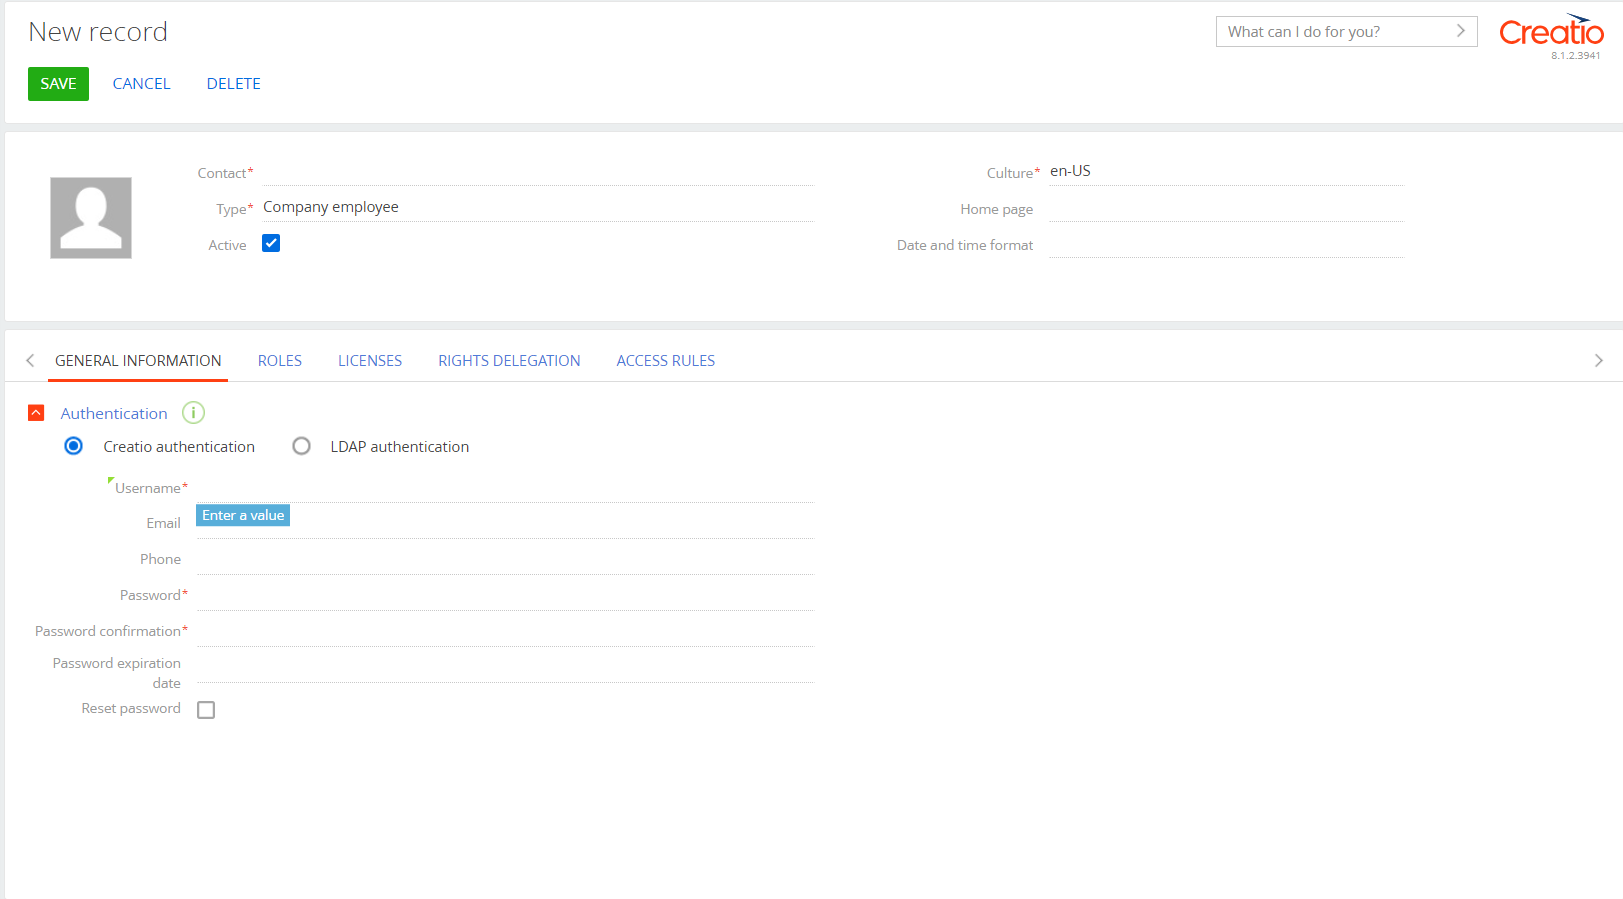
Fig. 9. Filling out the profile
3. Create a Webitel user in Creatio
To create a Webitel user in the Creatio system (Fig. 10), select the "Contact Center" workplace (1), open the "Webitel Users" section (2), and click the "Add" button (3).
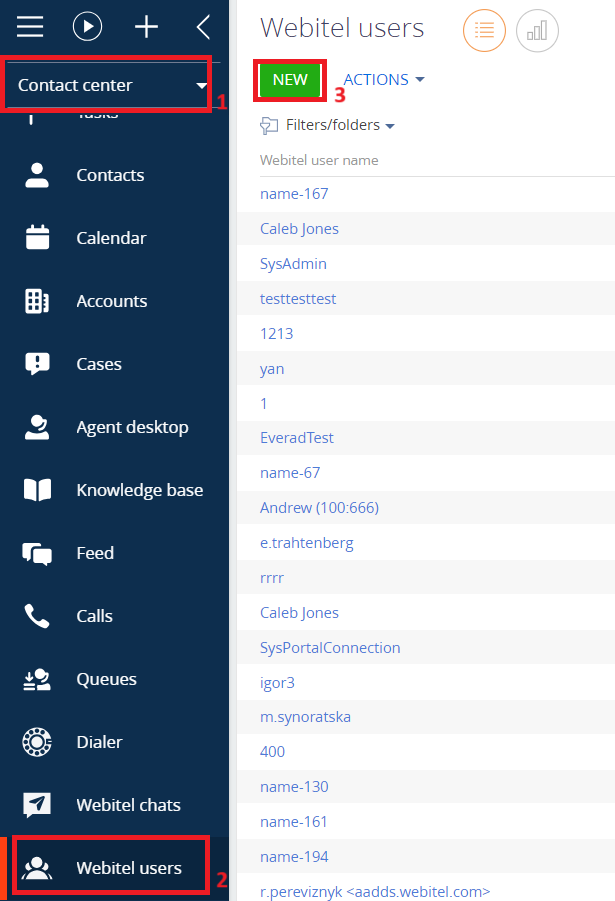
Fig. 10. Section "Webitel users"
In the "User" field, select the required Creatio User (1) (Fig. 11). The "Webitel Username" and "Contact" fields will be filled in automatically. After that, fill in the "Exstension" field (2). Note. The extension number of the Webitel system user must be unique for each user. If you do not set a number, then such a user will not be able to register a SIP phone and will not be able to make a call.
Then "Save" (3). After saving, a new Webitel user will be created with the entered data. The fields "user ID" and "Default device" will be filled in automatically.
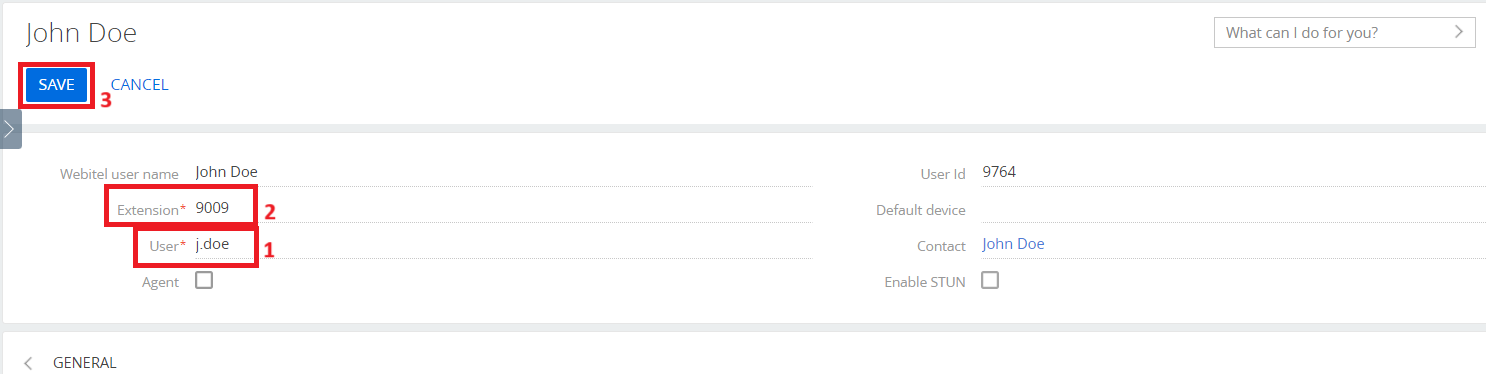
Fig. 11. Creating a new user
4. Delete a Webitel user
To delete a Webitel user in the Creatio system (Fig. 12), you need to select the entry of the required user in the "Webitel Users" section. Press the "Delete" button (1), then confirm "Yes". The user has been deleted.
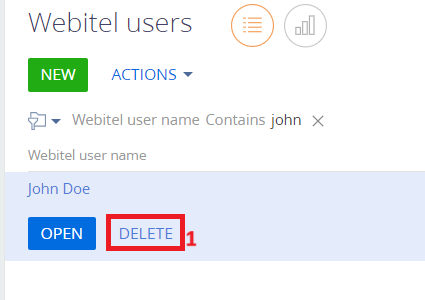
Fig. 12. The process of deleting the Webitel user
5. Add a Webitel license
To add a license to a user, you must click on the "+" button next to the "User Licenses" detail on the Webitel User record page (1) (Fig. 13).
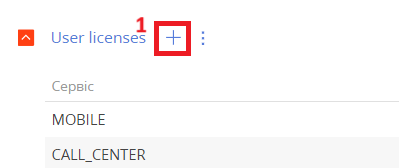
Fig. 13. Adding a license in the Webitel users section.
Open (1) the list of licenses (Fig. 14), select the required one from the list (2) and click the "Save" button (3).
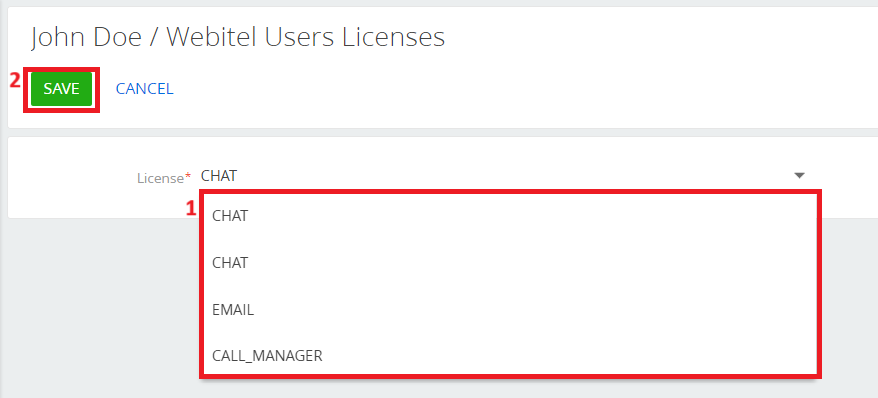
Fig. 14. The list of available licenses.
The Webitel license will be displayed in the corresponding detail (1) on the user page (Fig. 15).
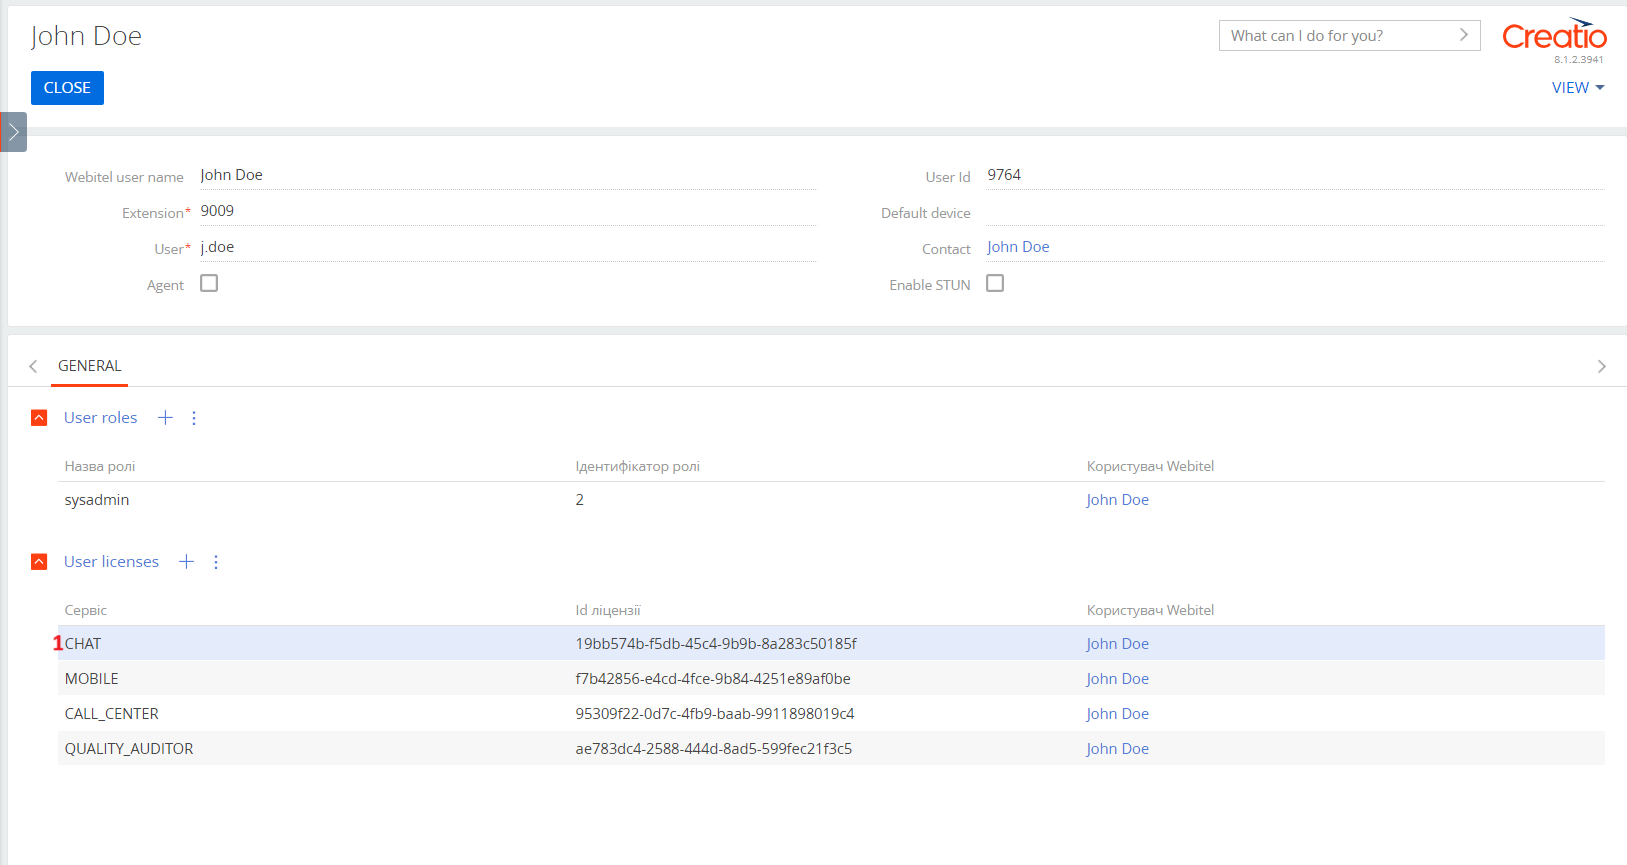
Fig. 15. User profile with connected license.
6. Removу a Webitel license
To remove a license, you need to go to the Webitel User page, open the "Webitel User Licenses" detail menu (1), select "Delete (2)" (Fig. 16).
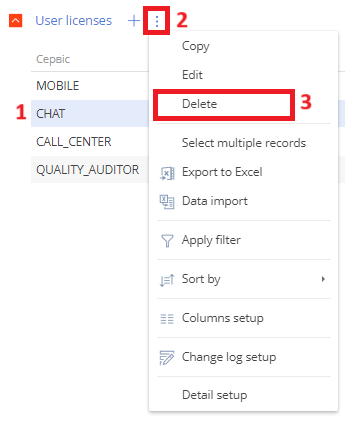
Fig. 16. Removing the license.
7. User roles
User roles are created and configured on Webitel. On the "Webitel Users" page, you can only add the required role. To add a role to a user, click on the "+" button on the "User roles" detail (1) (Fig. 17). Depending on the role setup, access to different actions can be granted.
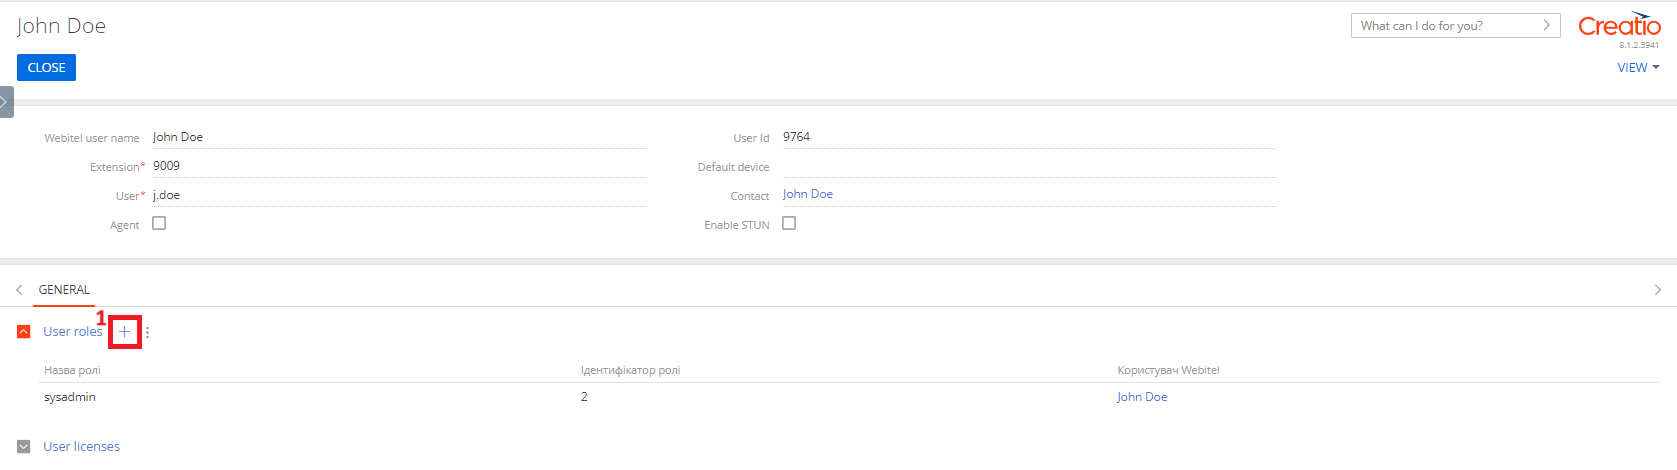
Fig. 17. Adding a user role.
Open (1) the list of roles (Fig. 18), select the required one from the list (2) and click the "Save" button (3).
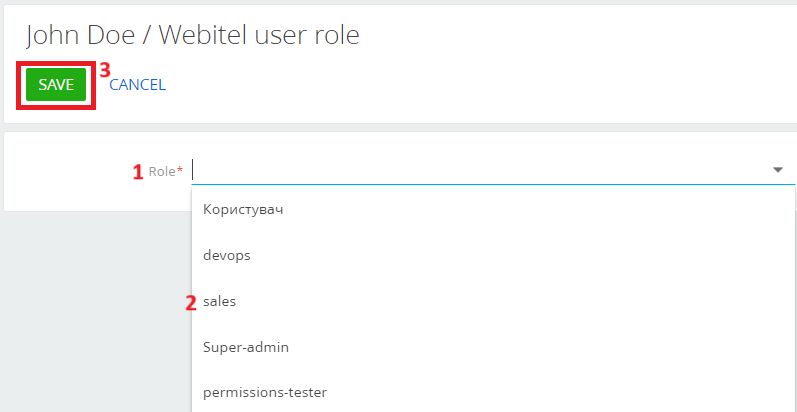
Fig. 18. List of available roles.
The Webitel user role will be displayed on the corresponding detail (1) on the user page (Fig. 19).
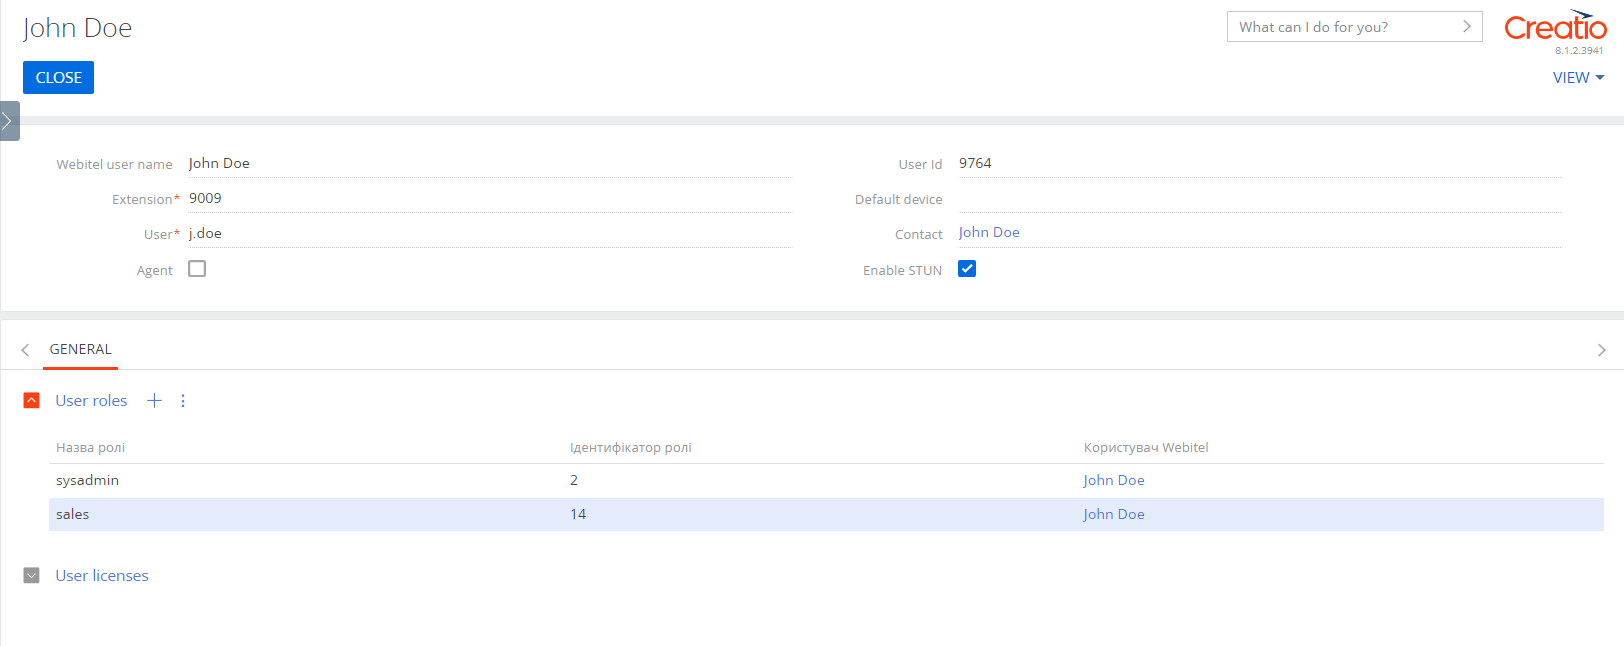
Fig. 19. User profile with an assigned role.
8. Enable STUN
Enable STUN — make active support for external STUN/TURN servers to solve the problems of voice transfer behind NAT (Fig. 20).
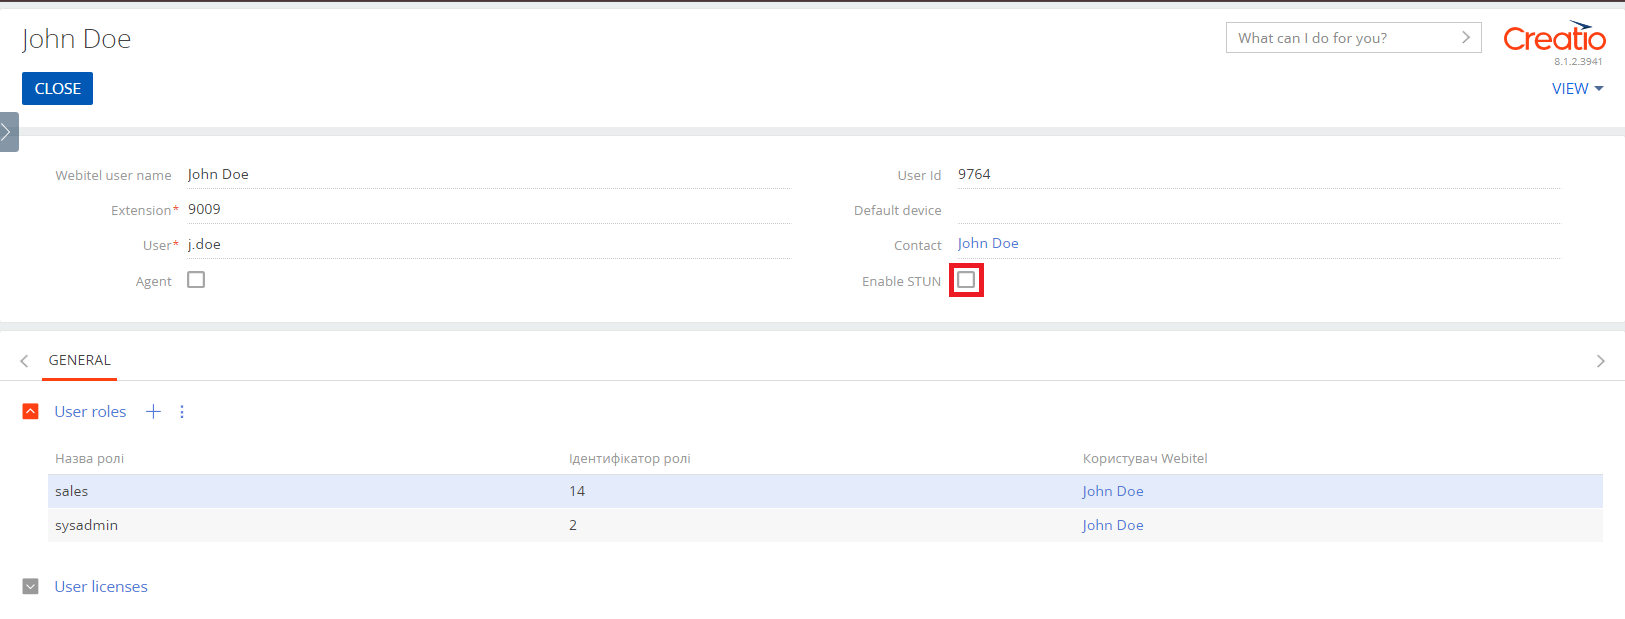
Fig. 20. Enabling the STUN function
9. Business process "GetWebitelUsers"
If users have already been created in the Webitel telephony system, they can be imported into Creatio. To do this, there is a business process "GetWebitelUsers".
To upload telephony users, you need to click on the button to start business processes (Fig. 21).
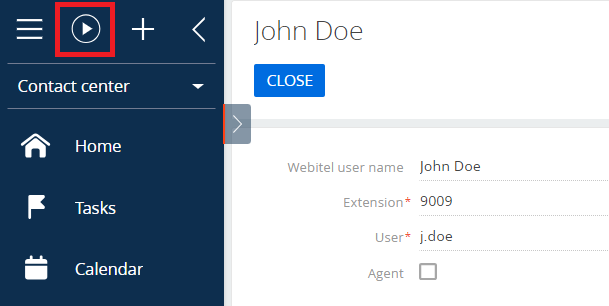
Fig. 21. Launching business processes
In the lookup window, find the business process called "GetWebitelUsers" (1) and run it by clicking the "Start" button (2) (Fig. 22).
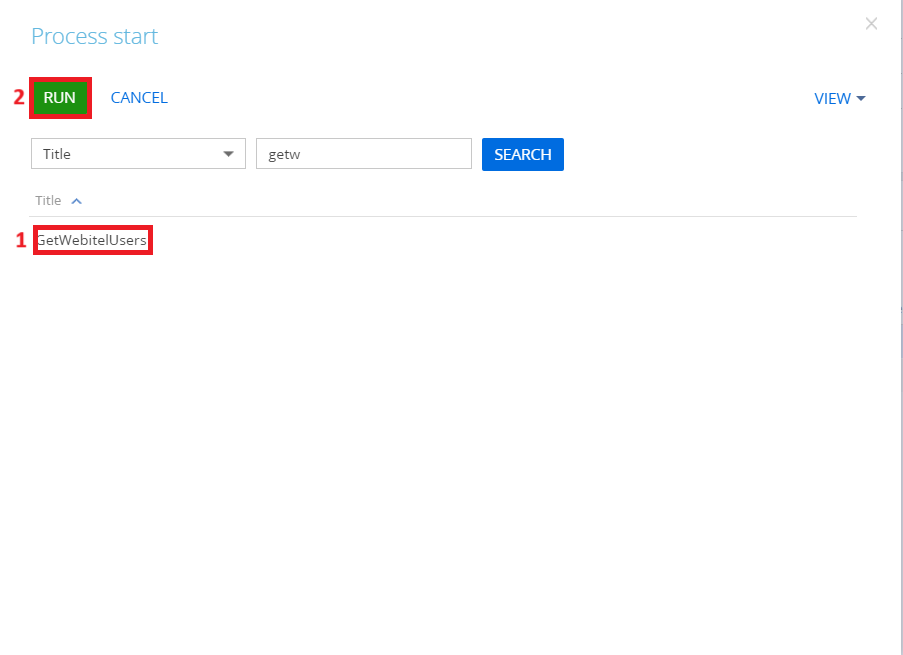
Fig. 22. Selecting business process
The process can also be launched directly from the "Webitel Users" section (Fig. 23). To do this, by opening the action menu (1) you need to select the "GetWebitelUsers" (2).
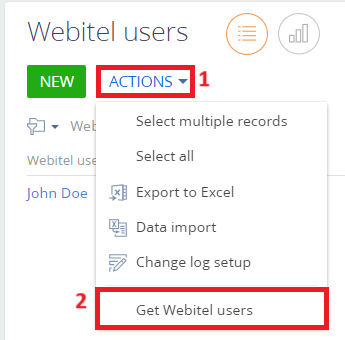
Fig. 23. Launching "GetWebitelUsers" from "Webitel users" section
After the system completes the process, all users created in Webitel (see "Users" section) will be created in Creatio (Fig. 24).
The connection between a Webitel user and a Creatio user is based on the Webitel username and Creatio Contact name. If no Account or Contact was found when importing users into Creatio, they will be created automatically.
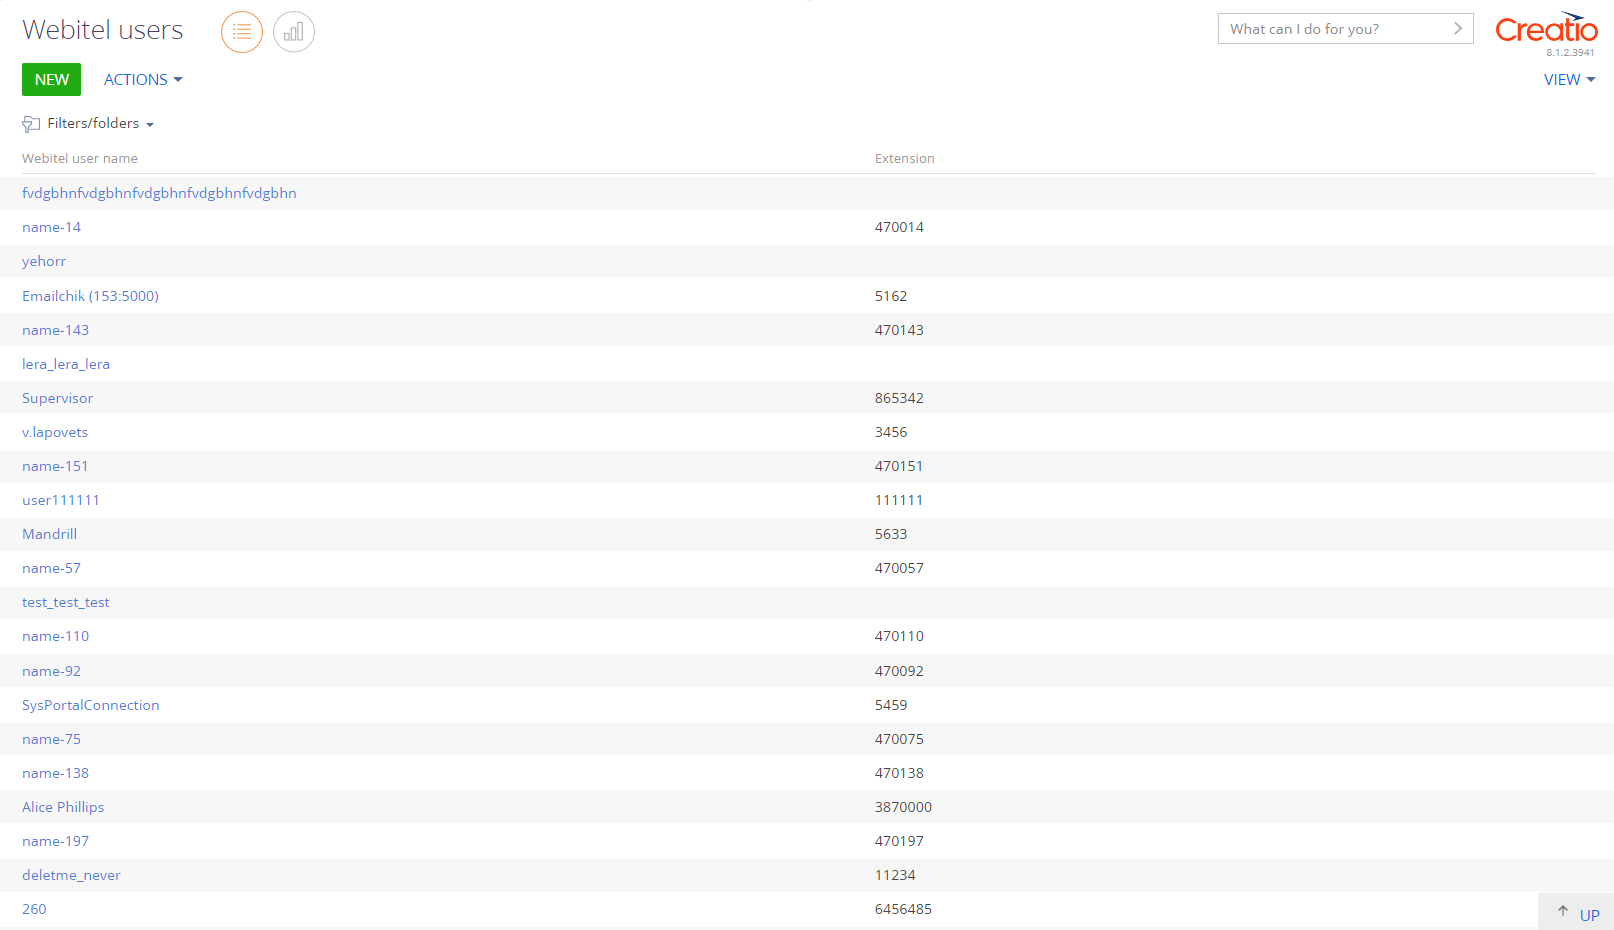
Fig. 24. Imported users to the section "Webitel users"