
1. Description
The Workspace application is the Agent workplace.
For access to the Workspace, please log in.
To work in the application, you must make sure that required browser permissions are granted (Fig. 1).
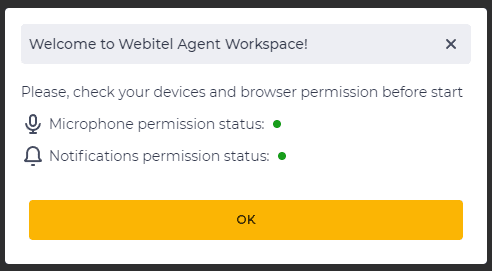
Fig. 1. Modal window


The modal window is closed after clicking the OK button.
The Workspace consists of:
-
Top bar (Fig.2(1))
-
Agent metrics bar(Fig.2(2));
-
Left block (Fig.2(3));
-
Central block (Fig.2(4));
-
Right block (Fig.2(5)).
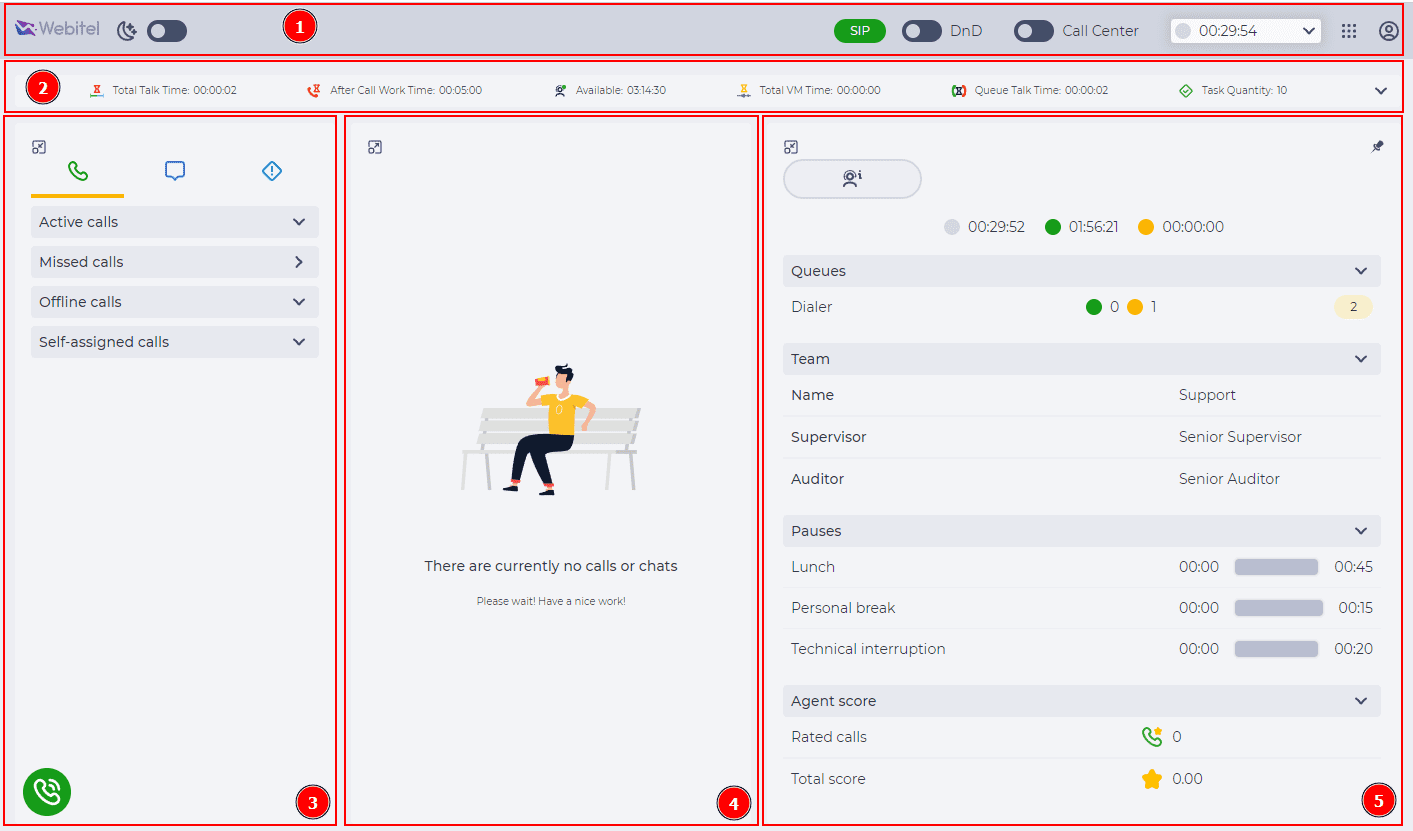
Fig. 2. Workspace
When you click the 

When you click the
When you click the 

When you click the
1.1. Top bar
This field contains the elements that allow to manage Agent’s status:
-
Design theme switch (Fig.3(1));
-
SIP connection indicator (Fig.3(2));
-
DnD switch (Fig.3(3));
-
Call Center switch (Fig.3(4));
-
Status control(Fig.3(5));
-
Applications menu (Fig.3(6));
-
User menu (Fig.3(7)).

Fig. 3. Top bar
1.1.1. Design theme switch
Dark and light website design mode are available.
Use the 
1.1.2. SIP connection indicator
This indicator indicates the existence of a SIP connection:


If you have a SIP connection, you can call, if not, you can't.
1.1.3. DnD switch
When an Agent turns Do Not Disturb mode on, he won’t be able to accept internal calls from other system Users. Only calls from Queues will be routed to him.


1.1.4. Call Center switch
If this switch is On, the User can work as an Agent, meaning he is ready to accept activities from the Queues he can process.
When the switch is Off, he will receive only calls routed directly to him.
1.1.5. Status control
The status control consists of a timer, which displays the time you are in the current state, and a drop—down list that opens by clicking on the timer field (Fig.4).
The drop—down list shows the status available for the change. Click on the needed status in the drop—down list to change it.
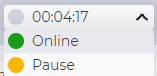
Fig. 4. Status control
Agent in the call center can have the following statuses:


The color of the circle next to the timer indicates the current Agent's status.
The Select a pause cause modal window opens when you choose the Pause status.
You can select a reason for the pause by choosing it from the provided options using the radio button, for example, Lunch (as shown in Fig. 5). The pause causes are configured in the Admin application.
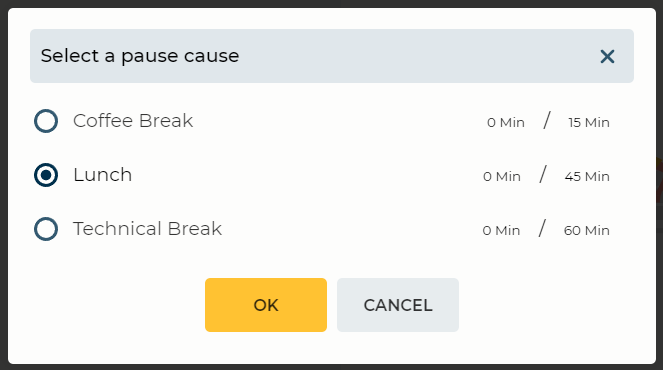
Fig. 5. Select a pause cause modal window
After clicking the OK button, the agent’s status changes to the break mode.
Then a pause window appears (Fig. 6), containing a timer that indicates the time the agent spends in this pause.
Click the Continue work button to change the Pause status to Online.
Click the Logout button to change the Pause status to Offline.
You can change the pause cause by re-selecting the Pause status in the status control (Fig. 4). The Select a pause cause modal window opens (Fig. 5), where you can select a different pause cause.
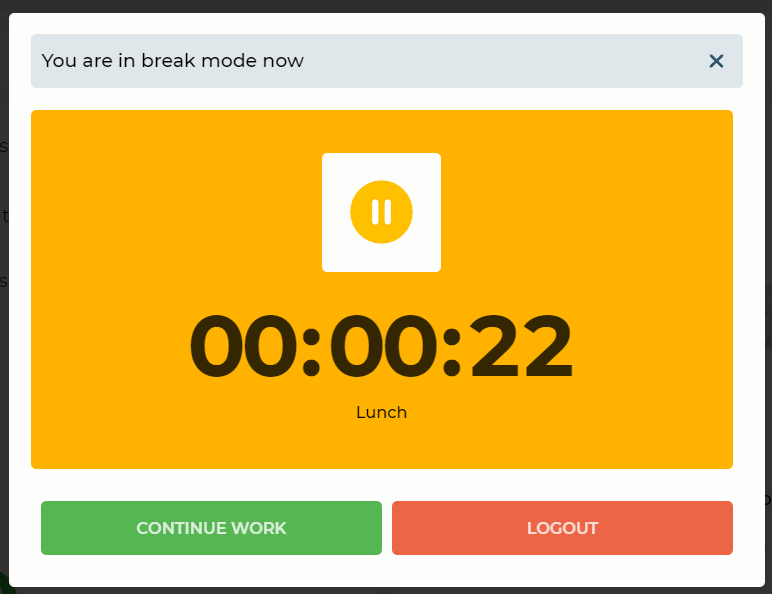
Fig. 6. You are in break mode now modal window
The Break out status cannot be set manually. It forcibly takes the Agent offline after he missed the maximum allowable number of calls. The maximum allowable number of calls is configured in the Admin application.
A modal window opens when switching to the Break out status (Fig.7).
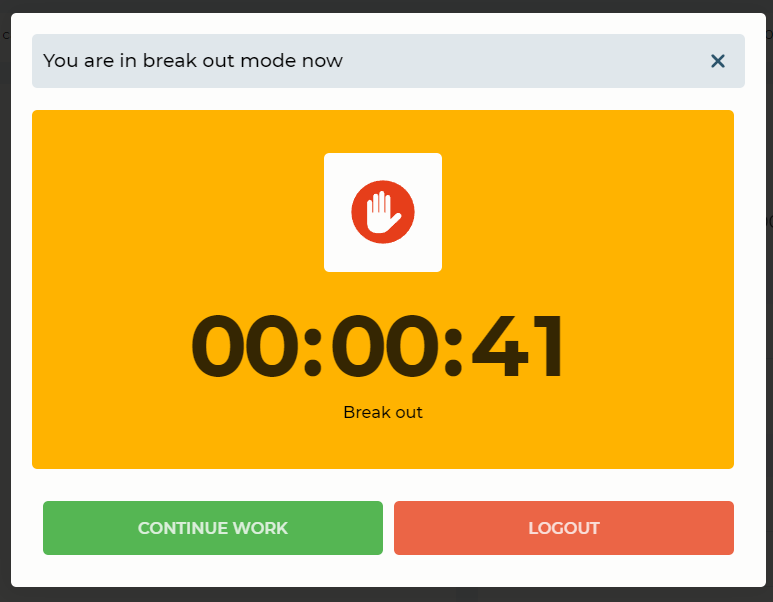
Fig. 7. You are in break out mode now modal window
Click the Continue work button to change the Pause status to Online.
Click the Logout button to change the Pause status to Offline.
When an Agent wants to change the status to pause, the system checks all his Queues whether there is a restriction; the restriction to go out of pause is set in the Access to pause when there are more online agents than: field on the Parameters tab.
An Agent cannot go into pause if the number of Agents in online status is equal to or less than the number in this field. In this case, when trying to switch to the pause mode, the Attention modal window opens (Fig.8).
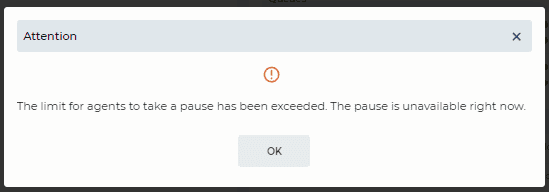
Fig. 8. Attention modal window
When this limitation is enabled, the number of Agents in Pause status is displayed in the right block of the General info tab in the format X/Y (Fig.9), where:
X — how many Agents are in the pause mode at the moment;
Y — total number of Agents that can be in pause mode currently — the number of Agents online minus the limit entered in the Access to pause when there are more online agents than: field.
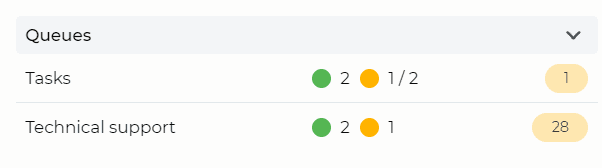
Fig. 9. Displaying the number of Agents in paused status
1.1.6. Applications menu
Clicking the 
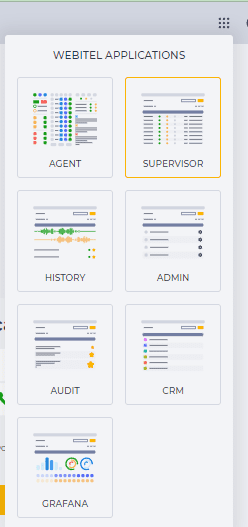
Fig. 10. Webitel Applications menu
1.1.7. User menu
Click the 
-
Name of a User;
-
Docs – redirects to the Webitel documentation page;
-
Settings – redirects to the Settings page;
-
Logout – logout from the system;
-
Build version information.
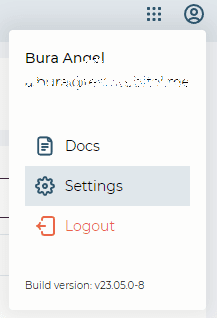
Fig. 11. User menu
1.2 Agent metrics bar
It is designed to display information about Agent metrics. You can select which metrics you want to see here by clicking 

Fig. 12. Agent metrics bar
Select the checkbox only on those metrics you need to be displayed (Fig.13).

Fig. 13. Setting of Agent metrics
All metrics are considered in the interval from 00:00 today to the current moment.
List of possible metrics (Fig.1):
-

-

-

-

-

-

-

-

-

-

-

-

-

-

-

1.3. Left block
The block is designed to display calls, chats, and tasks.
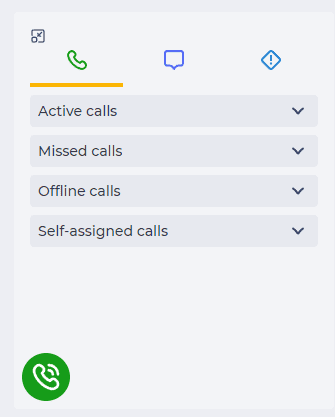
Fig 14. Left block


— chats;

A new activity mark is displayed when:
-
when there is a call distribution;
-
self-assigned calls;
-
when there is a call distribution;
-
self-assigned chats;
-
when there is a task assignment.
Clicking the button 
1.4. Central block
The Central block displays the active call, chat or task and additional tools that manage this call. There is a possibility to display different tools depending on the call state.
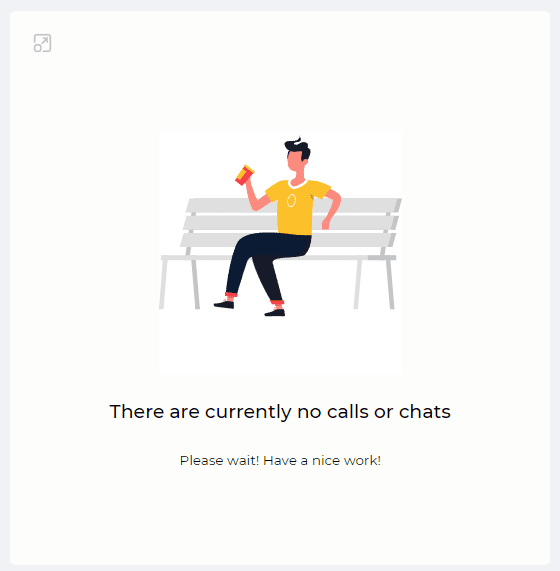
Fig. 15. Central block. Call waiting
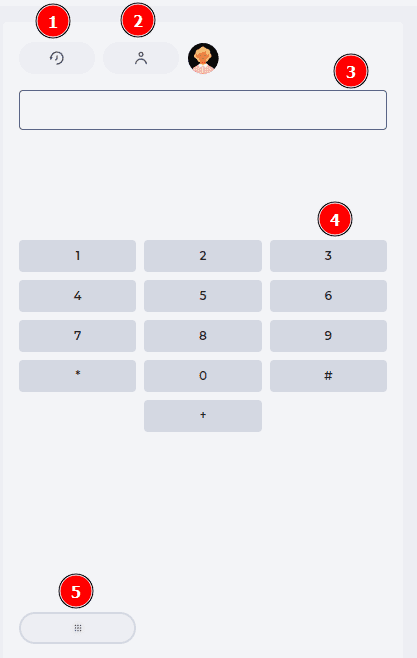
Fig.16. Central block. Call processing
The Central dialing unit consists of:
-
Call history (Fig.16(1));
-
Lists tool (Fig.16(2));
-
Phone number input field (Fig.16(3));
-
Numeric keypad (Fig.16(4));
-
Number input tool (Fig.16(5)).
1.4.1. Call history
Call history is opened by clicking the button 
It includes a search field and a list of calls.
The list displays the phone number, or the caller’s name, the call’s duration, and an icon that indicates the type of call.
If you click 
Call types:


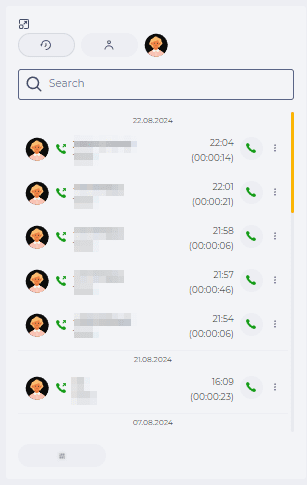
Fig. 17. Call history in the Central block
1.4.2. Lists tool
The Contacts list is displayed in the central block when you click on the 
The Contacts tab is shown only for Users who have a CRM license.
If there is no license, only the Users tab is displayed.
There are the following tabs:
-
Contacts;
-
Users.
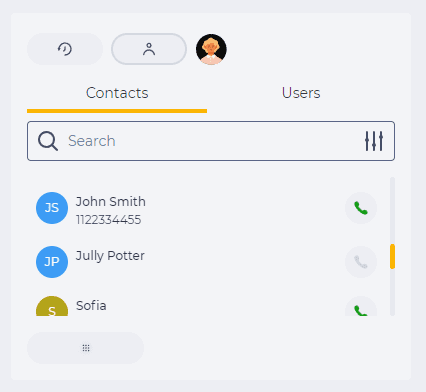
Fig. 18. Contacts tab
1.4.2.1. Contacts tab
The Contacts tab consists of the following elements:
-
Search field;
-
List of Contacts
1.4.2.1.1. Search field
Consists of an input field and a search setting icon 
Close button ( 
You can create a search query in regex format, and the system will display the results that match it.
Clicking on the
-
Name;
-
Phone;
-
Email.
1.4.2.1.2. List of Contacts
It contacts from CRM are displayed here. The call button is active for Contacts who have a phone number.
Clicking on a Contact's name opens his contact's page.
1.4.2.2. Users tab
The list displays the standard avatar, User name, User extension and call button (Fig.19).
The search is performed by the internal number, or name, of the User.
It consists of an input field and a close button ( 
You can form a search query in regex format, and the system will display results that match it.
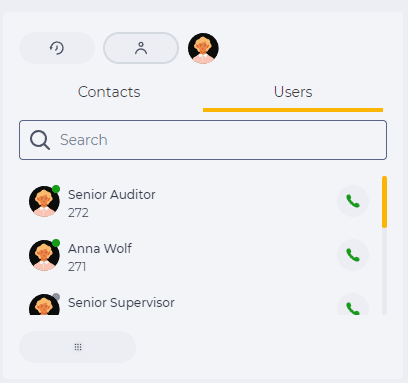
Fig. 19. Users list
A color indicator the User is currently in depends on the state the User is in.
The color of the status indicator can be:


1.4.3. Phone number input field
The field displays the phone number dialed using the keypad. For input, you can use both the numeric keypad (Fig.16(4)), and the computer keyboard.
1.4.4. Numeric keypad
The keypad is used to enter the phone number.
Clicking the 
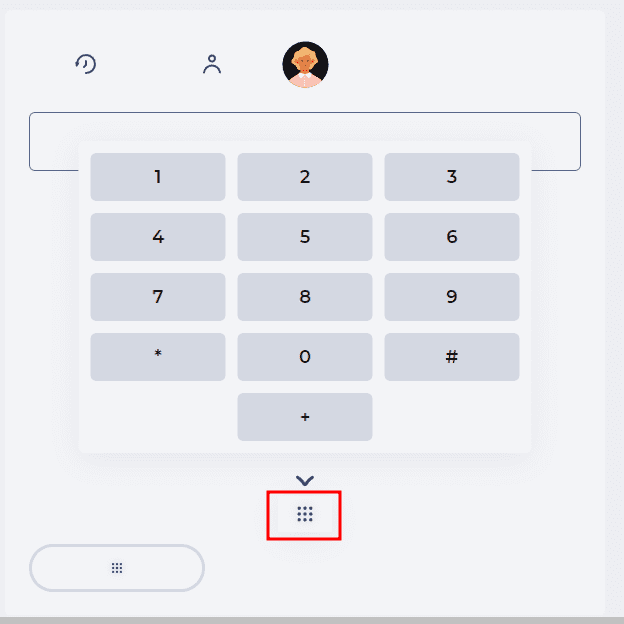
Fig. 20. Numeric keypad
1.4.5. Number input tool
This tool (Fig.16(5)) allows opening the Central block to enter a phone number from the call history or Agent information.
1.5. Right block
Information about the Agent and caller is displayed in this block.
It consists of the following tabs:
-
General info;
-
Client info;
-
Task processing;
-
Flow schemas.
1.5.1. General info tab
This tab displays the following information on the Agent (Fig.21):
-
the amount of time the Agent spent in Offline, Pause, and Online statuses;
-
the list of Queues to which the Agent is assigned;
-
the name of a Team the Agent is in, names of his Supervisor and Auditor;
-
pause status limits and the amount of time used in them;
-
evaluation of Agent's calls made by Auditors and Supervisors.
.png?cb=c23dc1cf7bbf446c8fedec0177bde966)
Fig. 21. General Information
1.5.2. Client info
The Client info tab becomes available on inbound, or outbound, call and chat. Here information about the subscriber is displayed, the name of the Queue, if the call is from the Queue, and blocks with information about the subscriber (Fig.22):
-
Client;
-
Member description;
-
Variables.
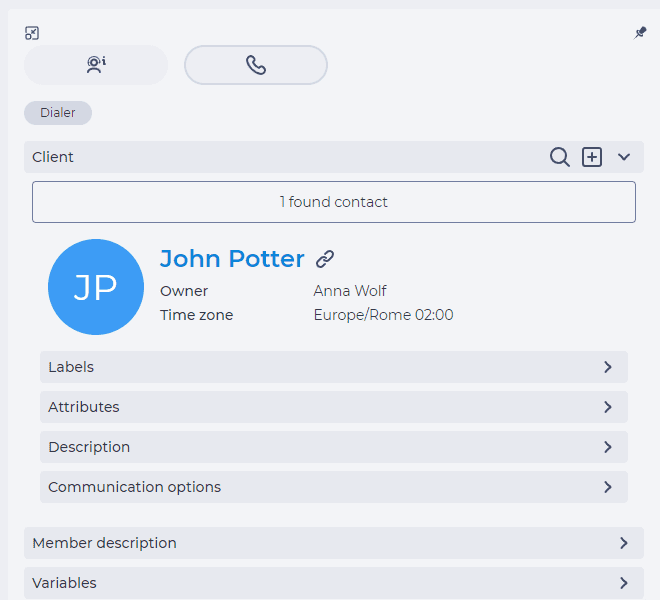
Fig. 22. Client info tab
When calling, identification is based on the Contact's phone number. The contact's phone number is displayed on the Phones tab on the Contact's page.
When chatting, identification is based on the Contact's communication channel identifier. The contact's communication channel identifier is displayed on the Messages tab on the contact's page.
1.5.2.1. Client
If there is no Contact for the current number, the corresponding information is displayed. After accepting a call or chat, the search and add options become available (Fig. 23).
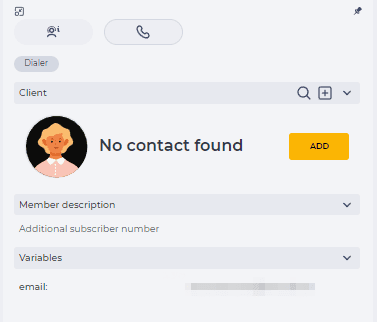
Fig. 23. No contact found
The Add button opens the form for adding a new Contact with this number (Fig.24).
If a new Contact is created from an active chat, the number is added to the newly created Contact.
If a Contact was found, but the Agent creates a new Contact during the active chat, the number is automatically unlinked from this Contact and linked to the new one.
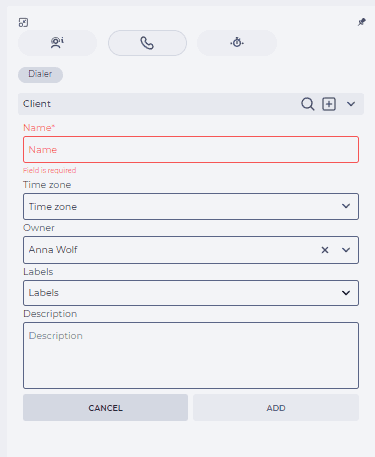
Fig. 24. Add a contact
Consists of the following elements:
-
Name — the name of the Contact;
-
Time zone — the Contact's time zone;
-
Owner — the User to be assigned to the Contact;
-
Label — you can select, or enter new, label(s) to group Contacts by;
-
Description — description of the Contact;
-
Cancel button — closes the form, the Contact is not added;
-
Add button — adds the Contact.
Clicking the 
If you click the 
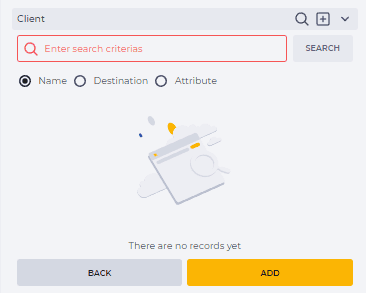
Fig. 25. Search for Contacts
Click the Search button after entering the data in the search field. You can search by name, destination (phone number or email address) and attributes.
If several contacts are found as a result of the search, they are displayed one by one with the possibility of viewing the next ones, for which you need to use the 
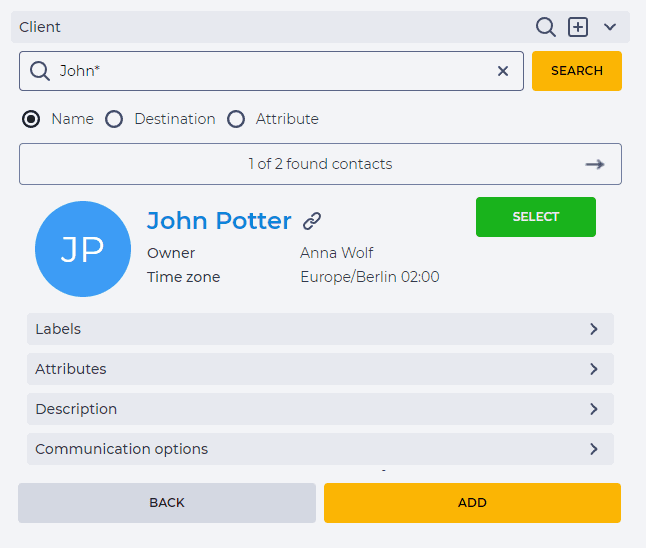
Fig. 26. Search result — multiple contacts

The Select button binds the call to this Contact to then show it in the Contact's call history.
Sections:
-
Labels — labels of this Contact;
-
Attributes — attributes of this Contact;
-
Description — description of this Contact;
-
Communication options — has the Phones, Messaging and Emails tabs, where phone numbers and email addresses are displayed, respectively.
The Back button closes the search results.
The Add button opens the form for adding a new contact.
If there is a Contact by the current number, the information about it is displayed.
1.5.2.2. Member description
The description of the number entered when loading the Member number is displayed here.
1.5.2.3 Variables
The information transferred from the routing is displayed here.
1.5.3. Task processing
The Task processing tab is displayed if the processing is enabled.
It may differ depending on the settings:
-
Simple processing;
-
Dynamic post-processing forms.
1.5.3.1. Easy processing
Simple processing is a form for entering information about a conversation.
After the activity ends, a timer starts in the form, which indicates the number of seconds until the form closes (Fig.27). The form closes when the timer reaches zero. Click the 
Attention!
Clicking the Send button closes the active call!
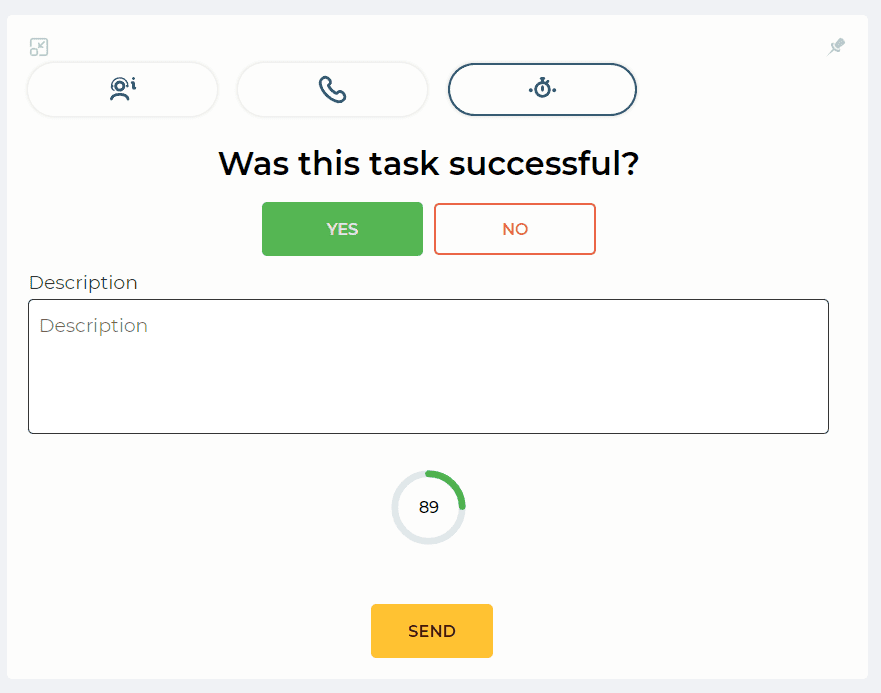
Fig. 27. Form for entering information about the call with a timer
If the call was successful, you can enter a comment in the Description field
The No button is clicked if the call is unsuccessful (Fig.28).
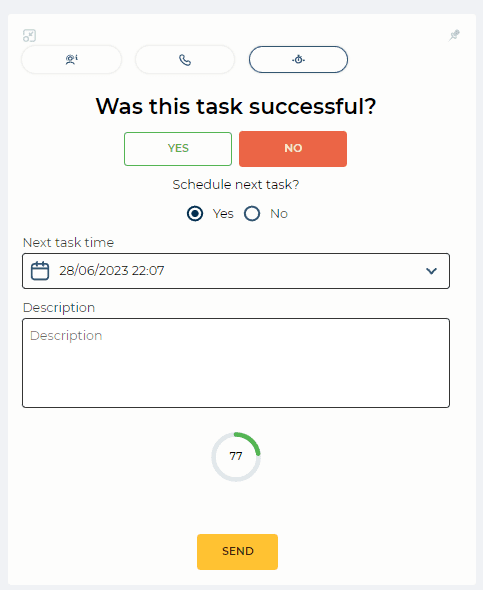
Fig. 28. Planning for the next call
The option to schedule the next call is available. Click on the “Next task time” field. A calendar will open where you can choose the date and time of the next call (Fig.29).
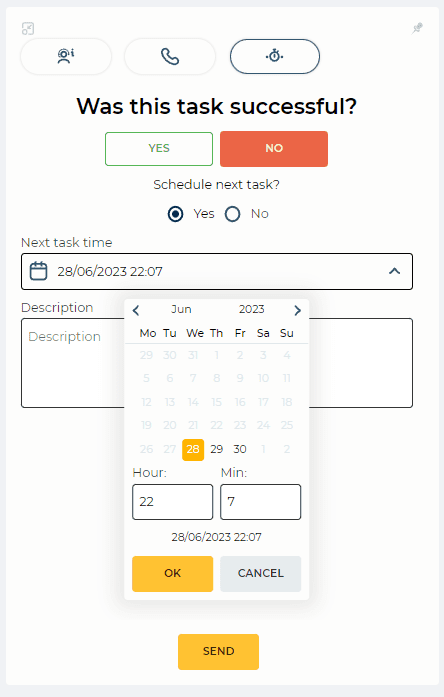
Fig. 29. Choosing the date and time of the next call
If there is no need to schedule a specific time for the next call, then the answer (radio button) No (Fig.30) is selected, and the data is filled in without specifying the time.
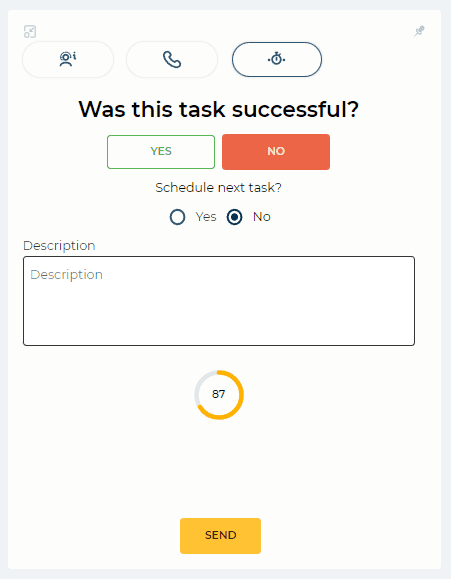
Fig. 30. Next call without time
1.5.3.2. Dynamic post-processing forms
Dynamics post-processing forms are configured with Flow schemas in Webitel Admin application.
The display will depend on the selected Flow scheme.
If the dynamics post-processing forms are configured for the Queue, they will be shown in the right block.
It is possible to display elements such as:
-
Information field (Fig.31(1)) — for displaying any static information on the page;
-
Input field (Fig.31(2)) — for entering information;
-
Date and time picker (Fig.(31(3));
-
A field with a drop—down list (Fig.31(4)) — a list of possible options opens when clicked;
-
Button (Fig.31(5));
-
File container — displays the container for input/output files.
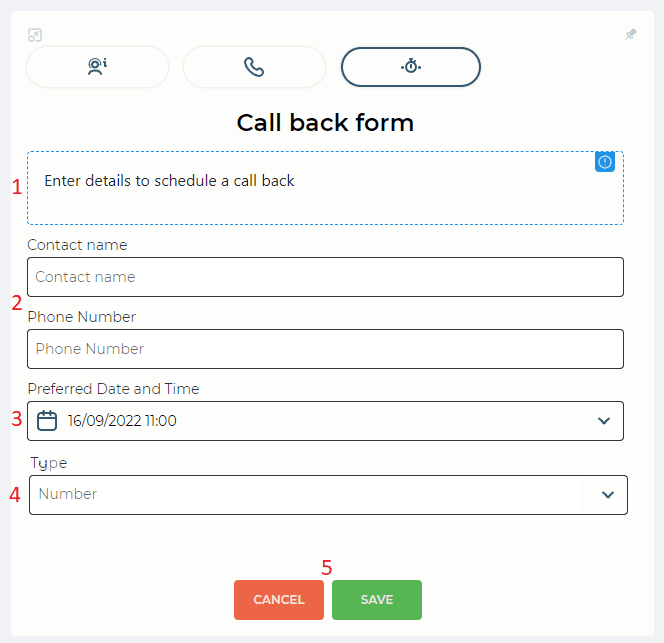
Fig. 31. An example of a Dynamic post-processing forms
1.5.4. Flow schemas
The Flow schemes configured for the Agent's Team are displayed here.
The corresponding settings can be made on the Flow schemas tab of the Team to which the Agent belongs.
The tab is available if you have a CALL_CENTER license.
.png?cb=3c2177f9471fc144fc70acf3ccbdc33c)
Fig. 32. Flow schemas tab
The tab consists of a list of Flow schemes and the Run button.
The Run button executes the selected Flow scheme.
You can run the scheme at any time.
After clicking the Run button, a notification of the Flow scheme's successful or unsuccessful run is displayed.
2.Call
Put the Call Center switch in the active position and ensure you have a SIP connection (
You must have at least one Queue assigned to receive tasks (calls, chats, or tasks). You can see it in the right block.
2.1. Active calls
The User is notified about an inbound call with a ringing sound. The call is displayed in the left block in Active calls (Fig.33).
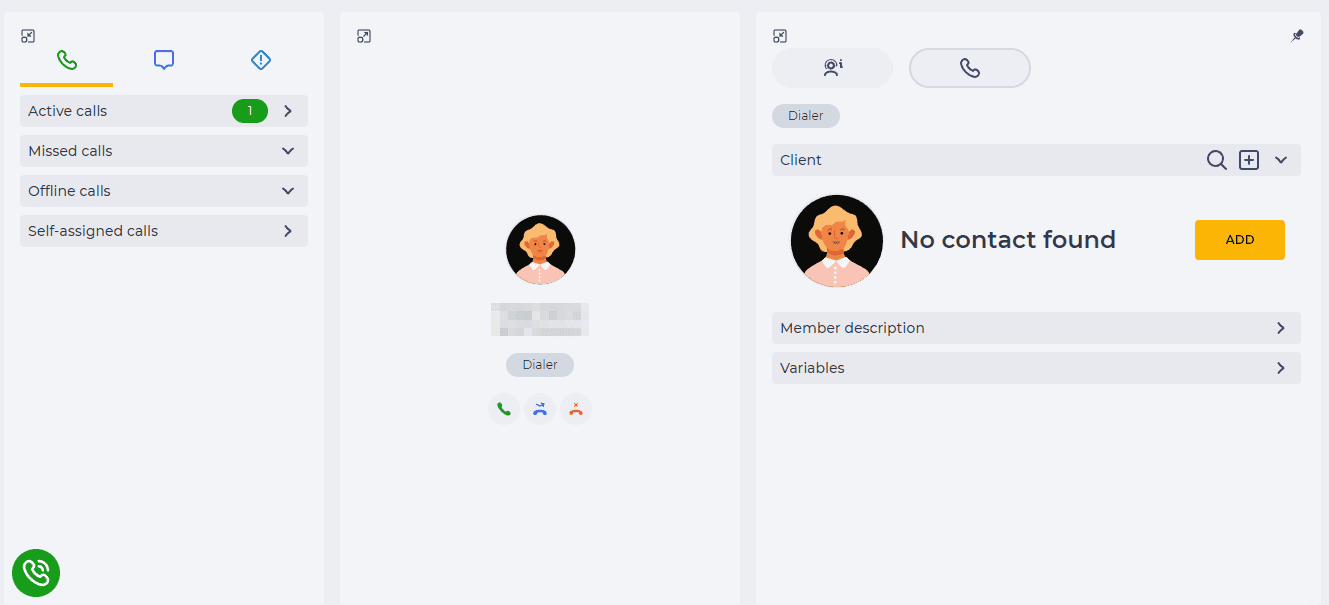
Fig. 33. Active call
The central block displays the Subscriber's name, phone number, and the name of the Queue from which the call comes. The following buttons are also present:


In the left block, the inbound call is displayed in the Active Calls list. To open a list, click on its title (Fig.34).
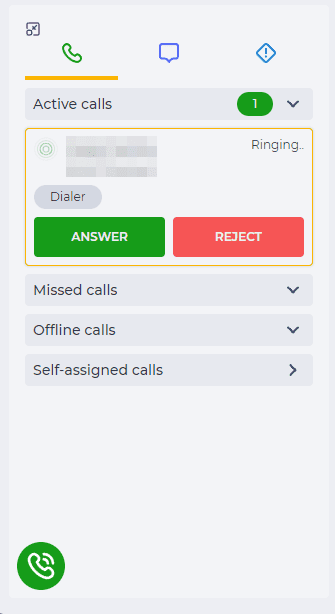
Fig. 34. Inbound call in the left pane
To answer an inbound call, the Agent must click the Answer button. The Subscriber is connected to the Agent, and the conversation begins.
When you click the Reject button — the call ends, and the Agent is credited with plus one to the missed calls if it was not an internal call.
Answering a call that looks like this — Fig.35. The right block displays the configured processing. If processing is not configured — the Client info tab is displayed.
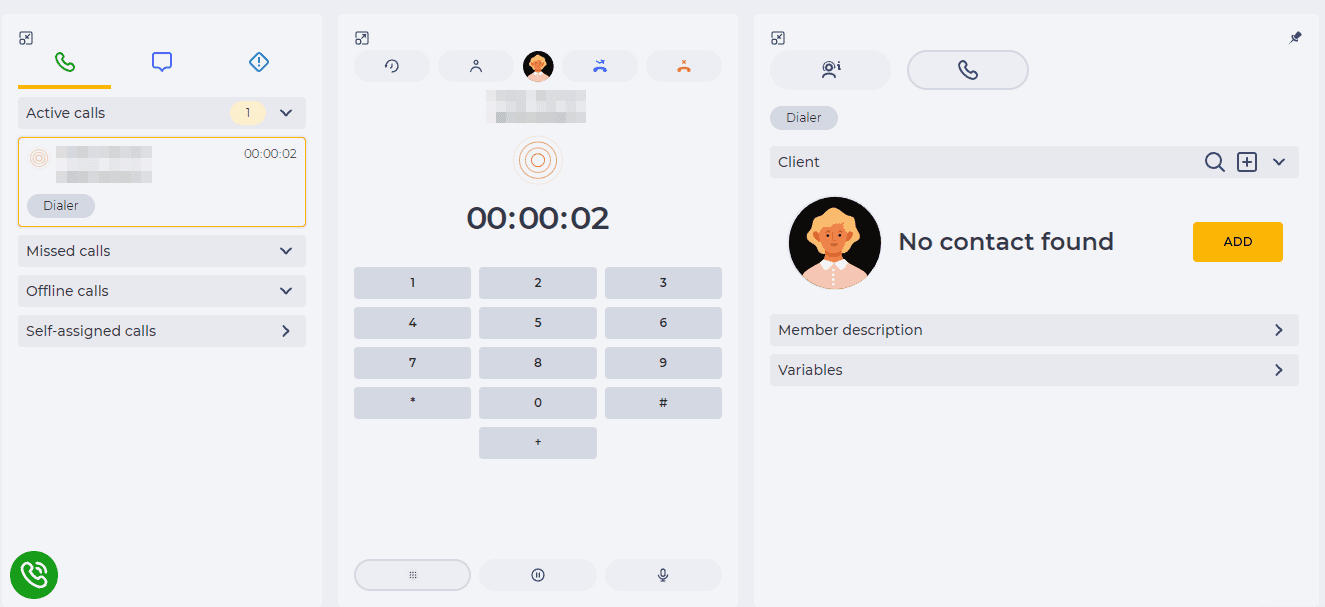
Fig. 35. Accepted call
The following tools are available after answering a call:

If you call another number during the answered call, the previously answered call will be put on hold.

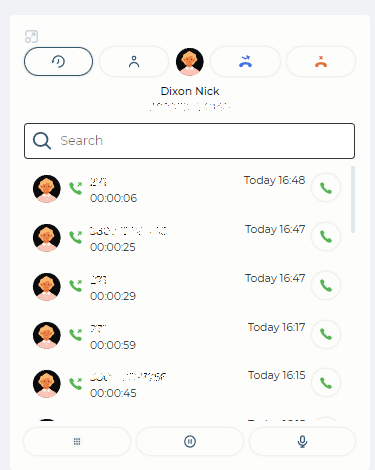
Fig. 36. Call history
In addition to the elements described in paragraph 1.4.1, the following are displayed here:




Transfer
There are two types of call transfer:
-
Blind;
-
Transfer with consultation.
Blind transfer
Blind transfer is made by clicking the button (Fig.36a(1)) and selecting an Agent from the list of agents (Fig.36a(2)). A call will be transferred to the selected Agent.
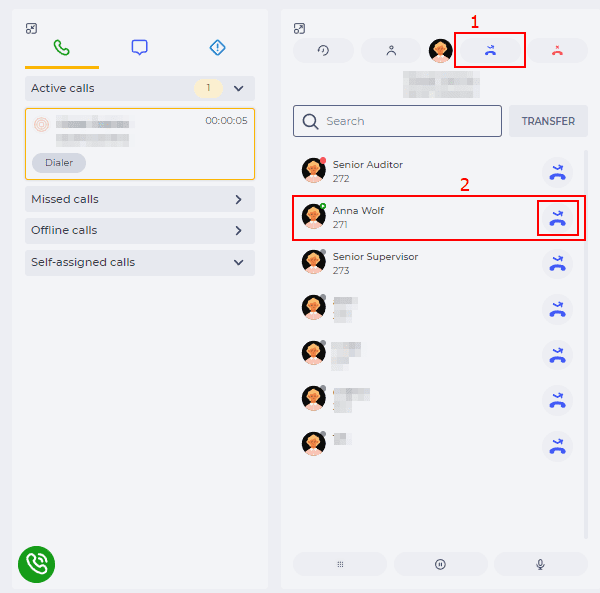
Fig. 36a. Blind call transfer
Transfer with consultation
A transfer with consultation is a transfer made in the following way:
-
The Agent clicks the hold button during the conversation with a client;
-
Clicks the call button in the left block;
-
Enters the number of the required Agent and clicks the call button on the central block (Fig.36b);
-
The Agent is connected to another Agent, to which the transfer should be made (Fig.36c). The reason for the transfer is reported;
-
Then, the Agent clicks the button

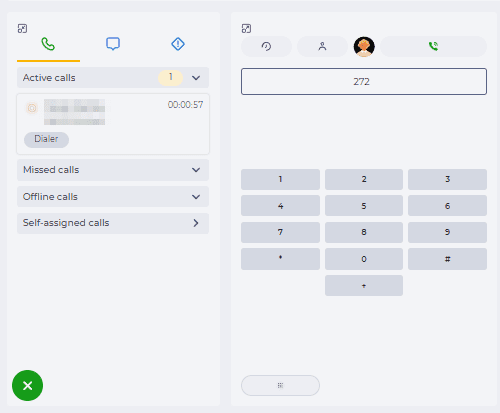
Fig. 36b. Dialing the Agent’s number to transfer a call
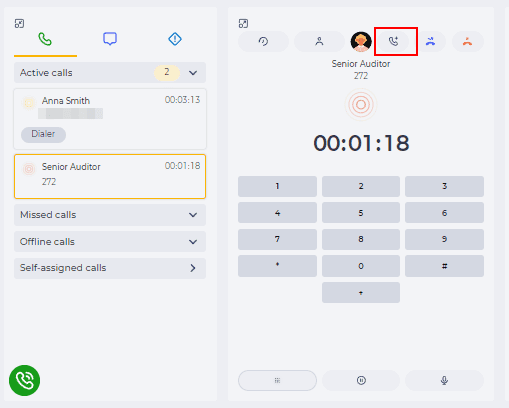
Fig. 36c. Connecting an Agent with another Agent
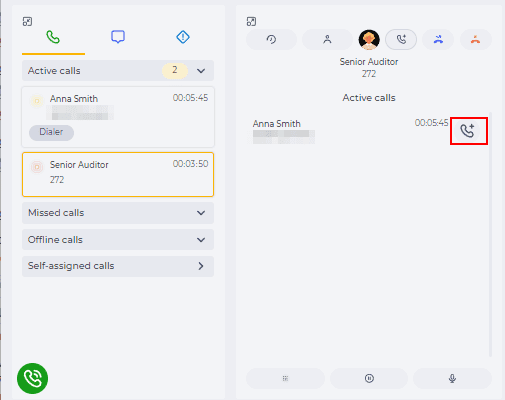
Fig.36d. Connecting a client with another Agent
Actions that are performed using the tools in the central block refer to a call that is selected in the left block. A yellow frame indicates the selected call.
Call processing, if configured, will be displayed only to the first Agent.
The right block displays the configured data — see paragraph 1.5.
2.2 Missed calls
This list contains calls missed/rejected by the Agent:
-
from the Inbound Queue;
-
direct calls to the Agent;
-
internal calls.
If the list block is minimised, the number equal to the number of missed calls is added next to the list name (Fig.37). Up to 10 missed calls are displayed in the list. If there are more than 10 missed calls, there is a button, clicking on which displays 10 next calls.
Click the call button 
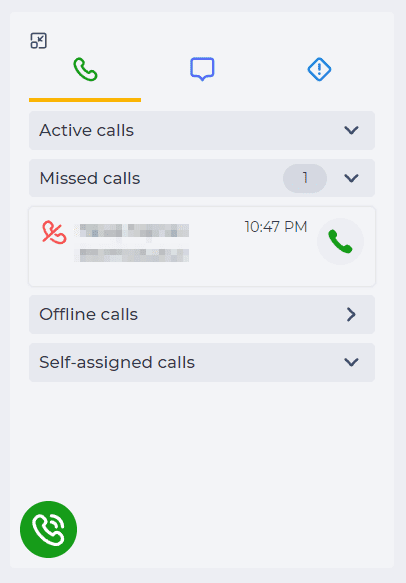
Fig. 37. Ringing back to a missed call
When you hover the cursor over a missed call record, the 

If the call is distributed to several Agents and none accepts it, it is displaced on the Missed calls of all these Agents. If one initiates a callback, the call is removed from the Missed calls of all Agents, regardless of whether the Subscriber picked up the phone.
If the call is distributed to several Agents and the last one accepts it, it is not displayed in Missed calls to other Agents.
2.3 Offline calls
This list displays numbers of subscribers to whom you need to call back manually, for example, the subscriber did not wait in the Queue and chose the option to call back. Open the offline list, and select the subscriber by clicking on the entry in the left block. Thereafter, in the central block the list of possible communications with the subscriber (for example, several numbers) opens, select the necessary number and click the call button at the top of the central block (Fig.38).
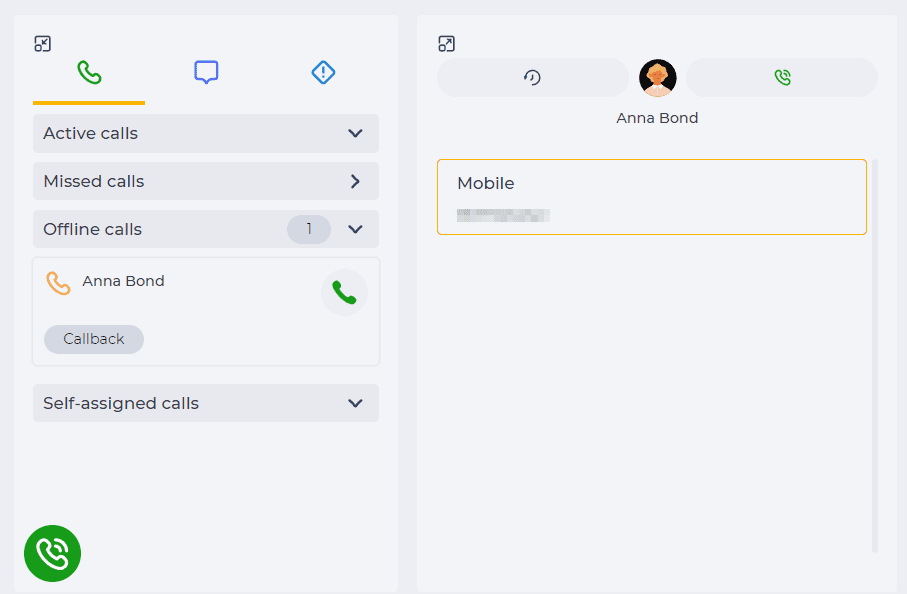
Fig. 38. Offline calls
Up to 10 calls are displayed in the list.
If the list block is collapsed, then if there are calls, a number equal to their number is added next to the list name.
In the reduced left block, 
2.4. Self—assigned calls
This list includes inbound calls from Queues where self—assigning distribution is configured.
If there is at least one call in the Queue with self—assigning allocation enabled, a number equal to the number of such calls is added next to the list name (Fig.39).
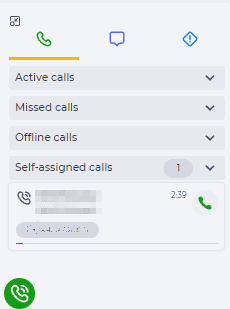
Fig. 39. Self—assigned calls
Up to 10 calls are displayed in the list.
The Agent can choose which call to take over. To accept a call, you must click the 
The scale under the entry shows the Subscriber's waiting time. The color changes depending on the percentage of the waiting time to the time in the Max wait time field of this Queue:
-
Green — < 50%
-
Yellow — 51—75%
-
Red — 76% <
2.5. Outgoing call
Calls can be conditionally divided into calls into the system and calls to a subscriber, i.e., a client. Calls to subscribers described in paragraphs 2.1–2.4.
You can make a call to the system User's extension in the following ways:
-
Manual dialing;
-
Select from a list;
-
Call back from call history.
2.5.1. Manual dialing
Click the 
After entering the number, another call button appears at the top of the central block— 
2.5.2. Select from a list
Click the 
The indicator next to the name means the status in which the User/Agent of the system is located.
The status options described in 1.4.2.2.
2.5.3. Call back from call history
To select a number from the call history, click the call button ( 

3. Chats
Chats are displayed in the left block under the chats tab.
There are such lists in the chat tab:
-
Active chats;
-
Self-assigned chats;
-
Closed chats.
The presence of a blue circle in the tab indicates the presence of unaccepted chat(s).
3.1. Active chats
When chat is automatically allocated to an Agent, an audible alarm accompanies an inbound chat.
The following options for chat acceptance can be outlined:
-
Automatic chat acceptance;
-
Manual chat acceptance.
When a Contact is identified, the central block shows the full message history linked to that Contact. Chats from all connected messengers are visible. The Contact's information appears on the right block.
If several Contacts are found, the Agent chooses the Contact to link the chat to. After linking, the chat history of the selected contact is displayed.
The chat history displays all chats, regardless of which Agents participated in the conversation.
When hovering over the icon 
3.1.1. Automatic chat acceptance
In case of automatic chat acceptance, the chat received by the Agent is accepted as soon as it arrives — without clicking the acceptance button.
Set the variable wbt_auto_answer: true on the Variables tab of the Queue to automatically connect chat with the Agent (without the Agent clicking the Accept button). Self—assigned of chat must be switched off.
3.1.2. Manual chat acceptance
If automatic chat acceptance is not configured, chats are accepted by clicking the Accept button in the center block.
The presence of an unaccepted chat is indicated by a blue circle in the chat tab 
Inbound chat is displayed in the left block, and the message history of this chat is displayed in the central block. To accept such a chat, click the Accept button in the central block (Fig. 40).
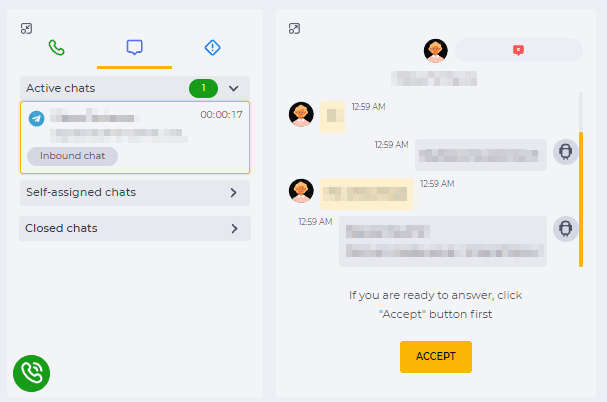
Fig. 40. Inbound chat
If there are any issues when sending a message, a notification will appear indicating that the message was not sent.
3.2. Self—assigned chats
This list is displayed to all Agents of this Queue, i.e., any Agent can select any waiting chat for connection.
If the chat is accepted by any Agent that serves this Queue, this chat is removed from this list (Fig. 41)
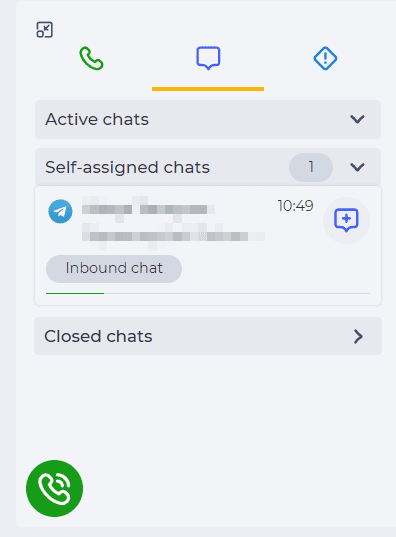
Fig. 41. Inbound chats with manual distribution
Unlike automatic chat distribution, adding a new chat to the list of chats waiting to be connected to the Agent is not accompanied by a sound signal.
To accept a chat, you need to click the 
After accepting a chat, the central block opens the history of communication between the Subscriber and the chatbot, the ability to send a message to the Subscriber, and other options.
After accepting a chat, it is listed in the Active chats section.
If self-assigned distribution is enabled, you can accept several chats. The maximum number of waiting chats is specified in the Max wait count field on this Queue's Parameters tab.
The following options are available in an active chat (Fig. 42):
-
Transfer a chat;
-
Close a chat;
-
Send a message;
-
Processing.
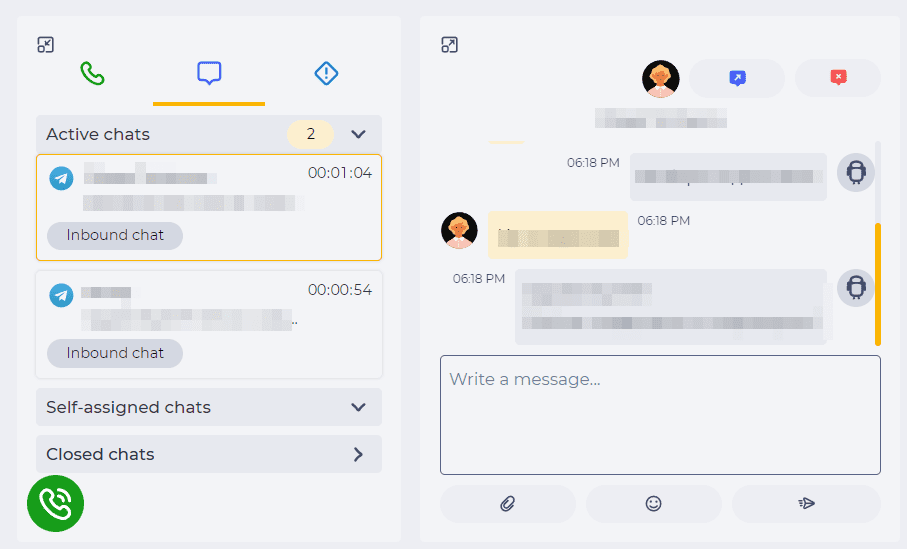
Fig. 42. Active chat
If the chat was closed by the Subscriber or the response time expired, you need to click the 
3.3. Closed chats
Here, closed chats in which the Agent participated are displayed.
Only chats from the current day are displayed.
Reasons for closing the chat:


Clicking on an entry opens the message history in the central block,
The list is sorted by the time the chat was closed, in descending order. The 10 most recently closed chats are displayed first. If there are more than 10 closed chats, a More button appears. After clicking the More button, the next 10 closed chats appear.
3.4. Transfer a chat
Only accepted chat can be transferred.
Click the 
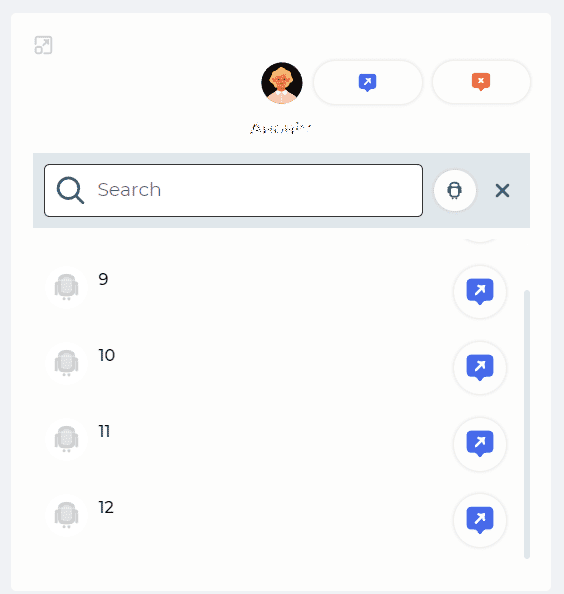
Fig. 43. Schemes for transfer
The list displays schemas that have been previously created in the Admin application.
Near each scheme, a button 
3.5. Close a chat
Closing a chat for an Agent can be done in several ways.
The following options are available:
-
Closing an unaccepted chat;
-
Closing an active chat;
-
Transfer chat;
-
Auto-close chat.
3.5.1. Closing an unaccepted chat
Click the close button ( 
3.5.2. Closing an active chat
Click the
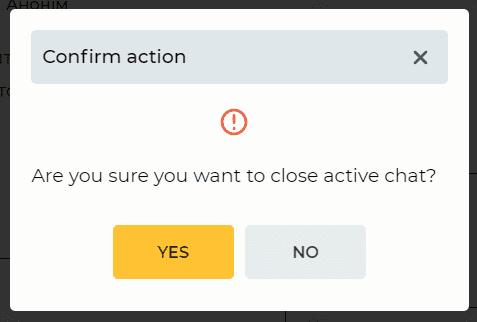
Fig. 44. Confirm action modal window
The No button closes the modal window; the chat does not close. The modal window closes when you click the Yes button, and the chat closes.
In cases where there is processing, the chat is available for viewing during processing without the ability to write a message to the chat (Fig.45).
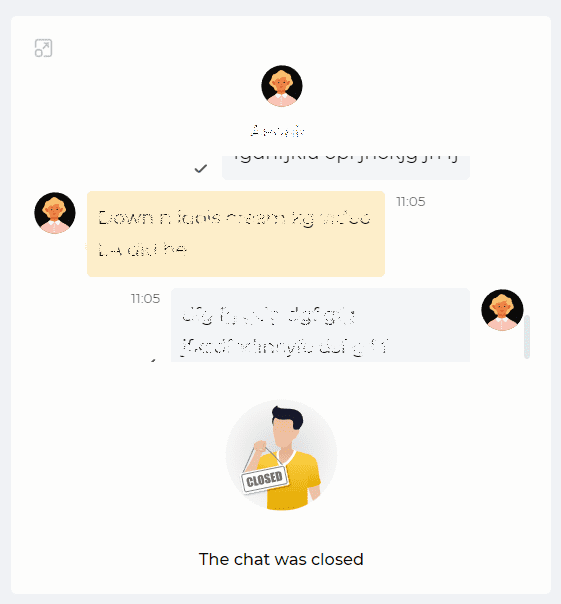
Fig. 45. The chat was closed
The chat can be closed by the Subscriber. In this case, the close button and the ability to leave messages in the chat disappear. It remains possible to fill in the processing depending on its settings.
3.5.3. Transfer chat
When a chat is transferred to a scheme, the chat is closed for the Agent. In the case of configured processing, it remains possible to fill it out without access to the chat (Fig.46).
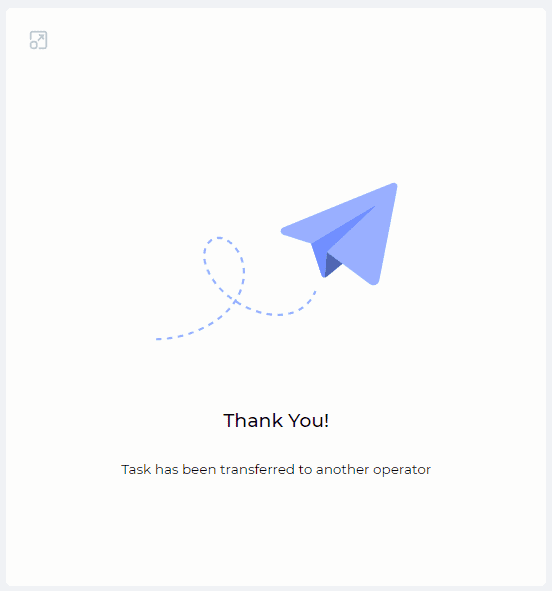
Fig. 46. Ending a chat after translation
More information about transfers can be found in paragraph 3.3.
3.5.4. Auto-close chat
When the chat is accepted, but there is no response from the Subscriber or Agent for some time (the amount of time is set by the admins when setting up the Queue), then such a chat is closed automatically.
In cases where there is processing, the chat is available for viewing during processing (Fig.44) without the ability to write a message to the conversation.
The subscriber can close the chat with command in some messengers or by clicking the button configured to close the conversation.
3.6. Send a message
To send a message, enter the text in the message input field (Fig.42), attach a file, or select an emoji. Then click on the button to send, or press the Enter key on the keyboard.
You can attach a file to a message by using the 
Near to the message sent by the system is 

It is possible to display audio/video messages from the Subscriber.
3.7. Processing
Customized processing is displayed after the chat is accepted and is displayed for a specific time after the end of the chat.
There are two processing options:
-
Simple processing;
-
Dynamic post-processing forms.
3.7.1. Simple processing
Processing without a scheme — the page displayed in the right block in the Processing task tab is a form for entering information about the chat.
After the chat ends, a timer is added to the form, which indicates the number of seconds until the form closes (Fig.47). The form closes when the timer reaches zero. Click the 
Attention!
Clicking the Send button closes the active chat!
Fig. 47. Form for entering information about the chat with a timer
The Description field is used to enter notes about the chat.
3.7.2. Dynamic post-processing forms
If the dynamics post-processing forms are configured for the chat Queue, they will be shown in the right block. The Agent will process a chat according to the selected Flow schema.
4. Tasks
An audible signal accompanies an inbound task. It is displayed in the left block in the tasks section (Fig.48).
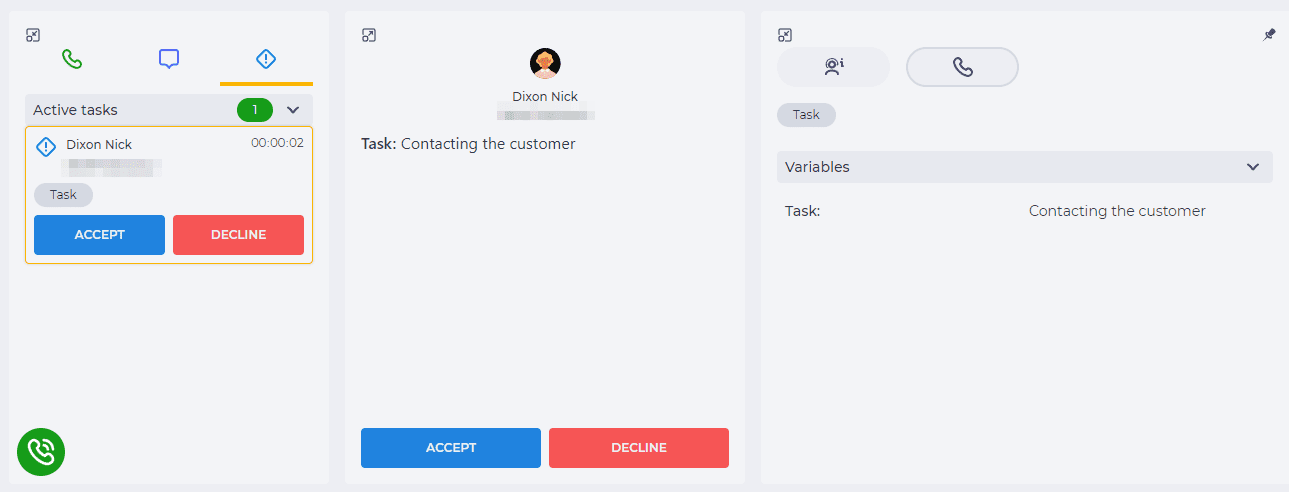
Fig. 48. Inbound task
Click the Accept button in the central or left block to accept the task. The Decline button closes the task for the Agent. Such a task will be distributed to another Agent until it is accepted.
Dynamic post-processing forms open in the right block (Fig. 49) after acceptance. Dynamic post-processing forms are configured depending on the task and have a different look.
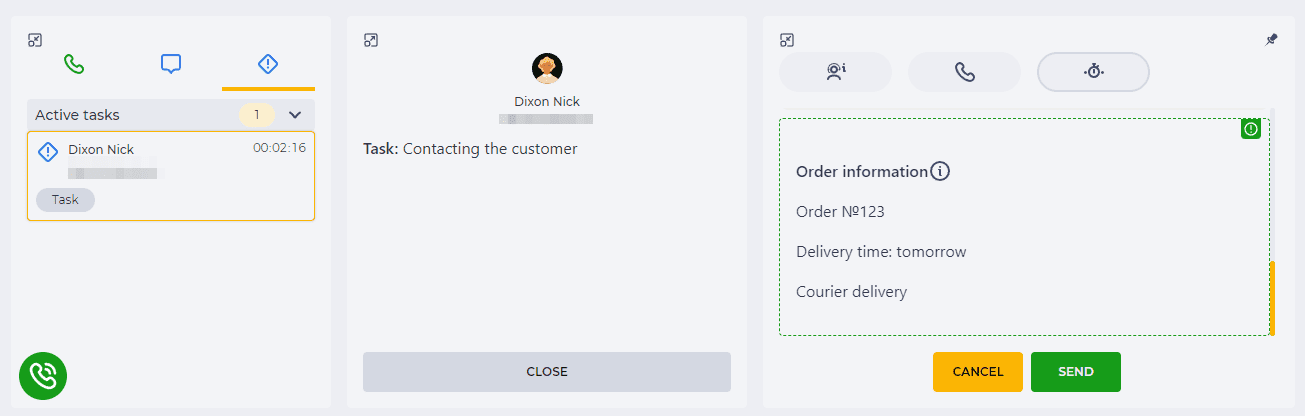
Fig. 49. Accepted task
The Close button in the central block closes the task for the Agent.