
1. Description
The video call feature allows a contact center agent to interact with a client via video communication.
A video call follows the logic of a regular call in the Webitel system and is processed through a Flow schema and contact center queues. To join a video call, the client uses a special link that opens a connection page in the browser.
Once connected, a video session is established between the agent and the client. During the call, users can interact via video and chat. After the call ends, all related materials are saved in the system and available for review in the History section.
The following features are available during a video call:
-
video communication between the agent and the client;
-
chat during the video call for exchanging messages and transferring files;
-
screenshot capture by the agent during the call;
-
video call recording (manual by the agent or automatic);
-
call rating by the client after the call ends;
-
viewing call information in the History section, including the recording, screenshots, chat, and files.
The video call feature is supported on desktop devices only. When the link is opened on a mobile device, the following message is displayed:
"This page is not available on mobile. Please switch to desktop".
2. Client Connection to a Video Call
2.1. Receiving the Link and Opening the Video Call Page
To start a video call, the agent sends the client a link to join the video call.
The link is generated by the system using the createMeeting component. The agent can then send the link to the client, for example, via chat.
The generated link has a limited validity period, defined by the expireSec parameter.
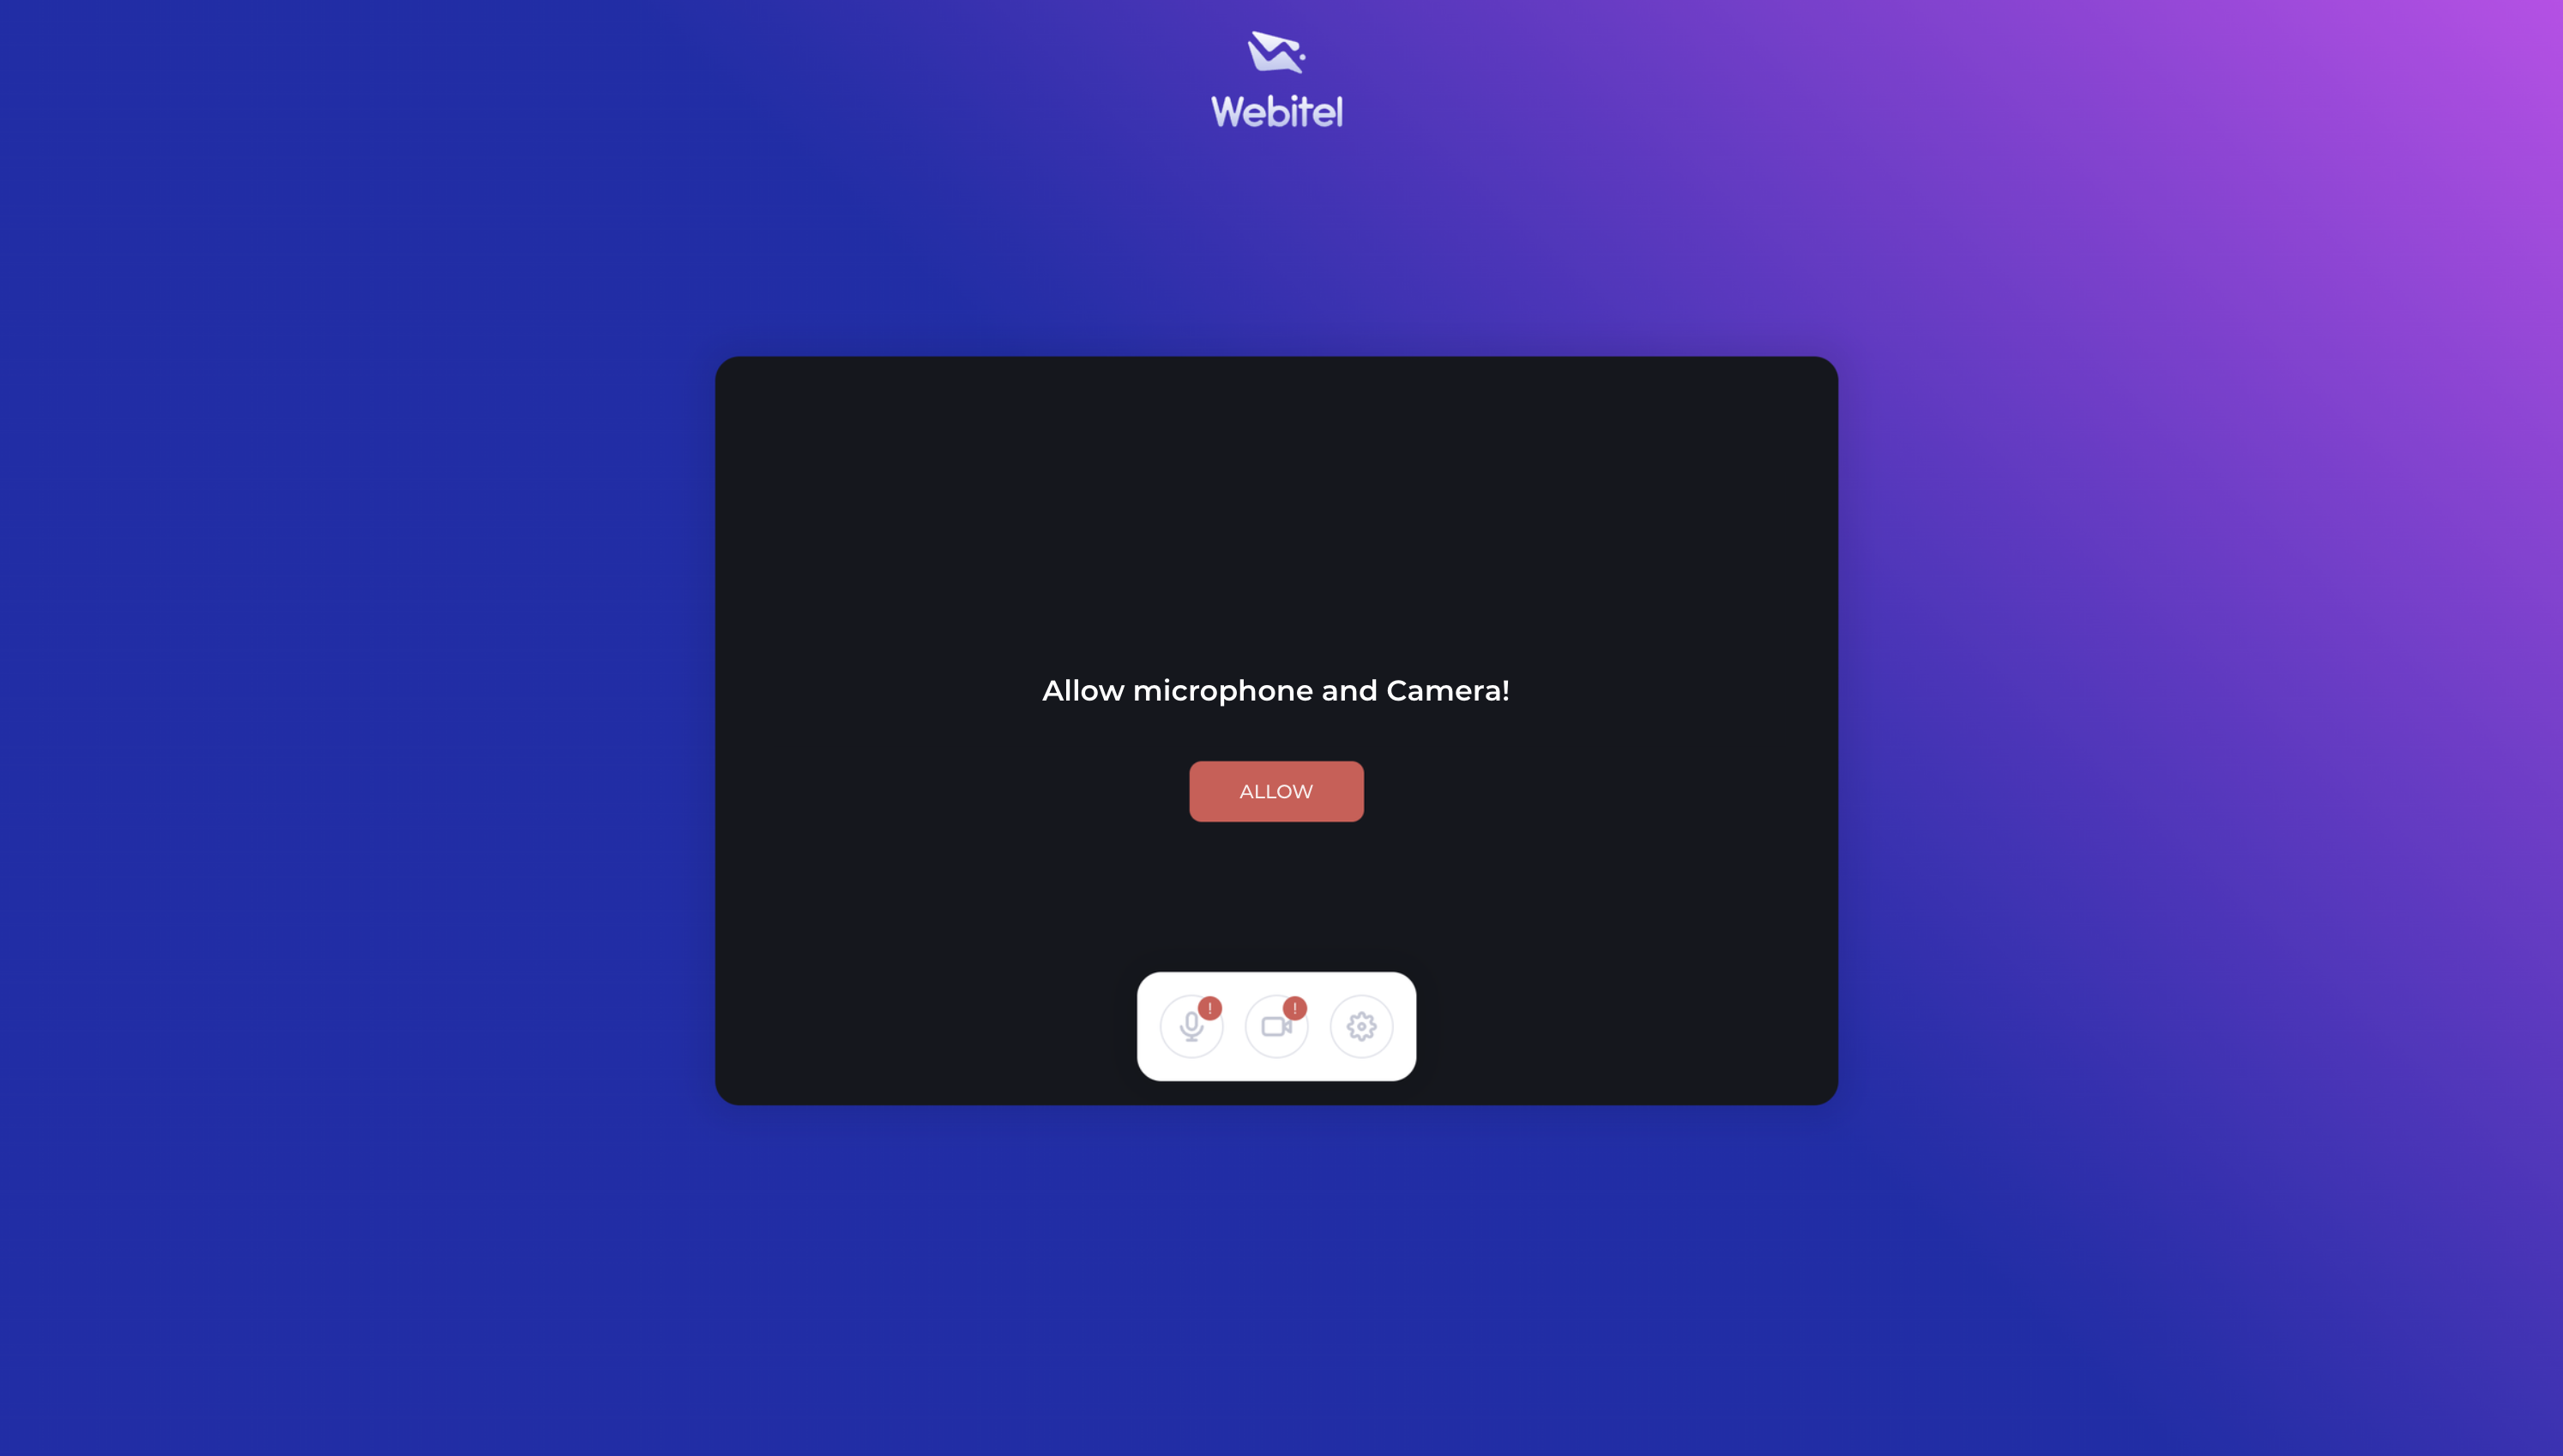
After following the received link, the video call connection page opens, displaying a message asking the client to check access to the camera and microphone (Fig. 1).
When the page is opened for the first time, the browser requests permission to use:
-
the camera;
-
the microphone.
To proceed, the user must click Allow and confirm device access in the browser. Once access is granted, the system navigates to the video call connection screen (Fig. 2).
2.2. Device Setup and Connecting to a Video Call
After granting access to the camera and microphone, the device controls become available on the connection page.
The user can enable or disable the microphone and camera, and open the settings panel to select the microphone, speaker, and camera.
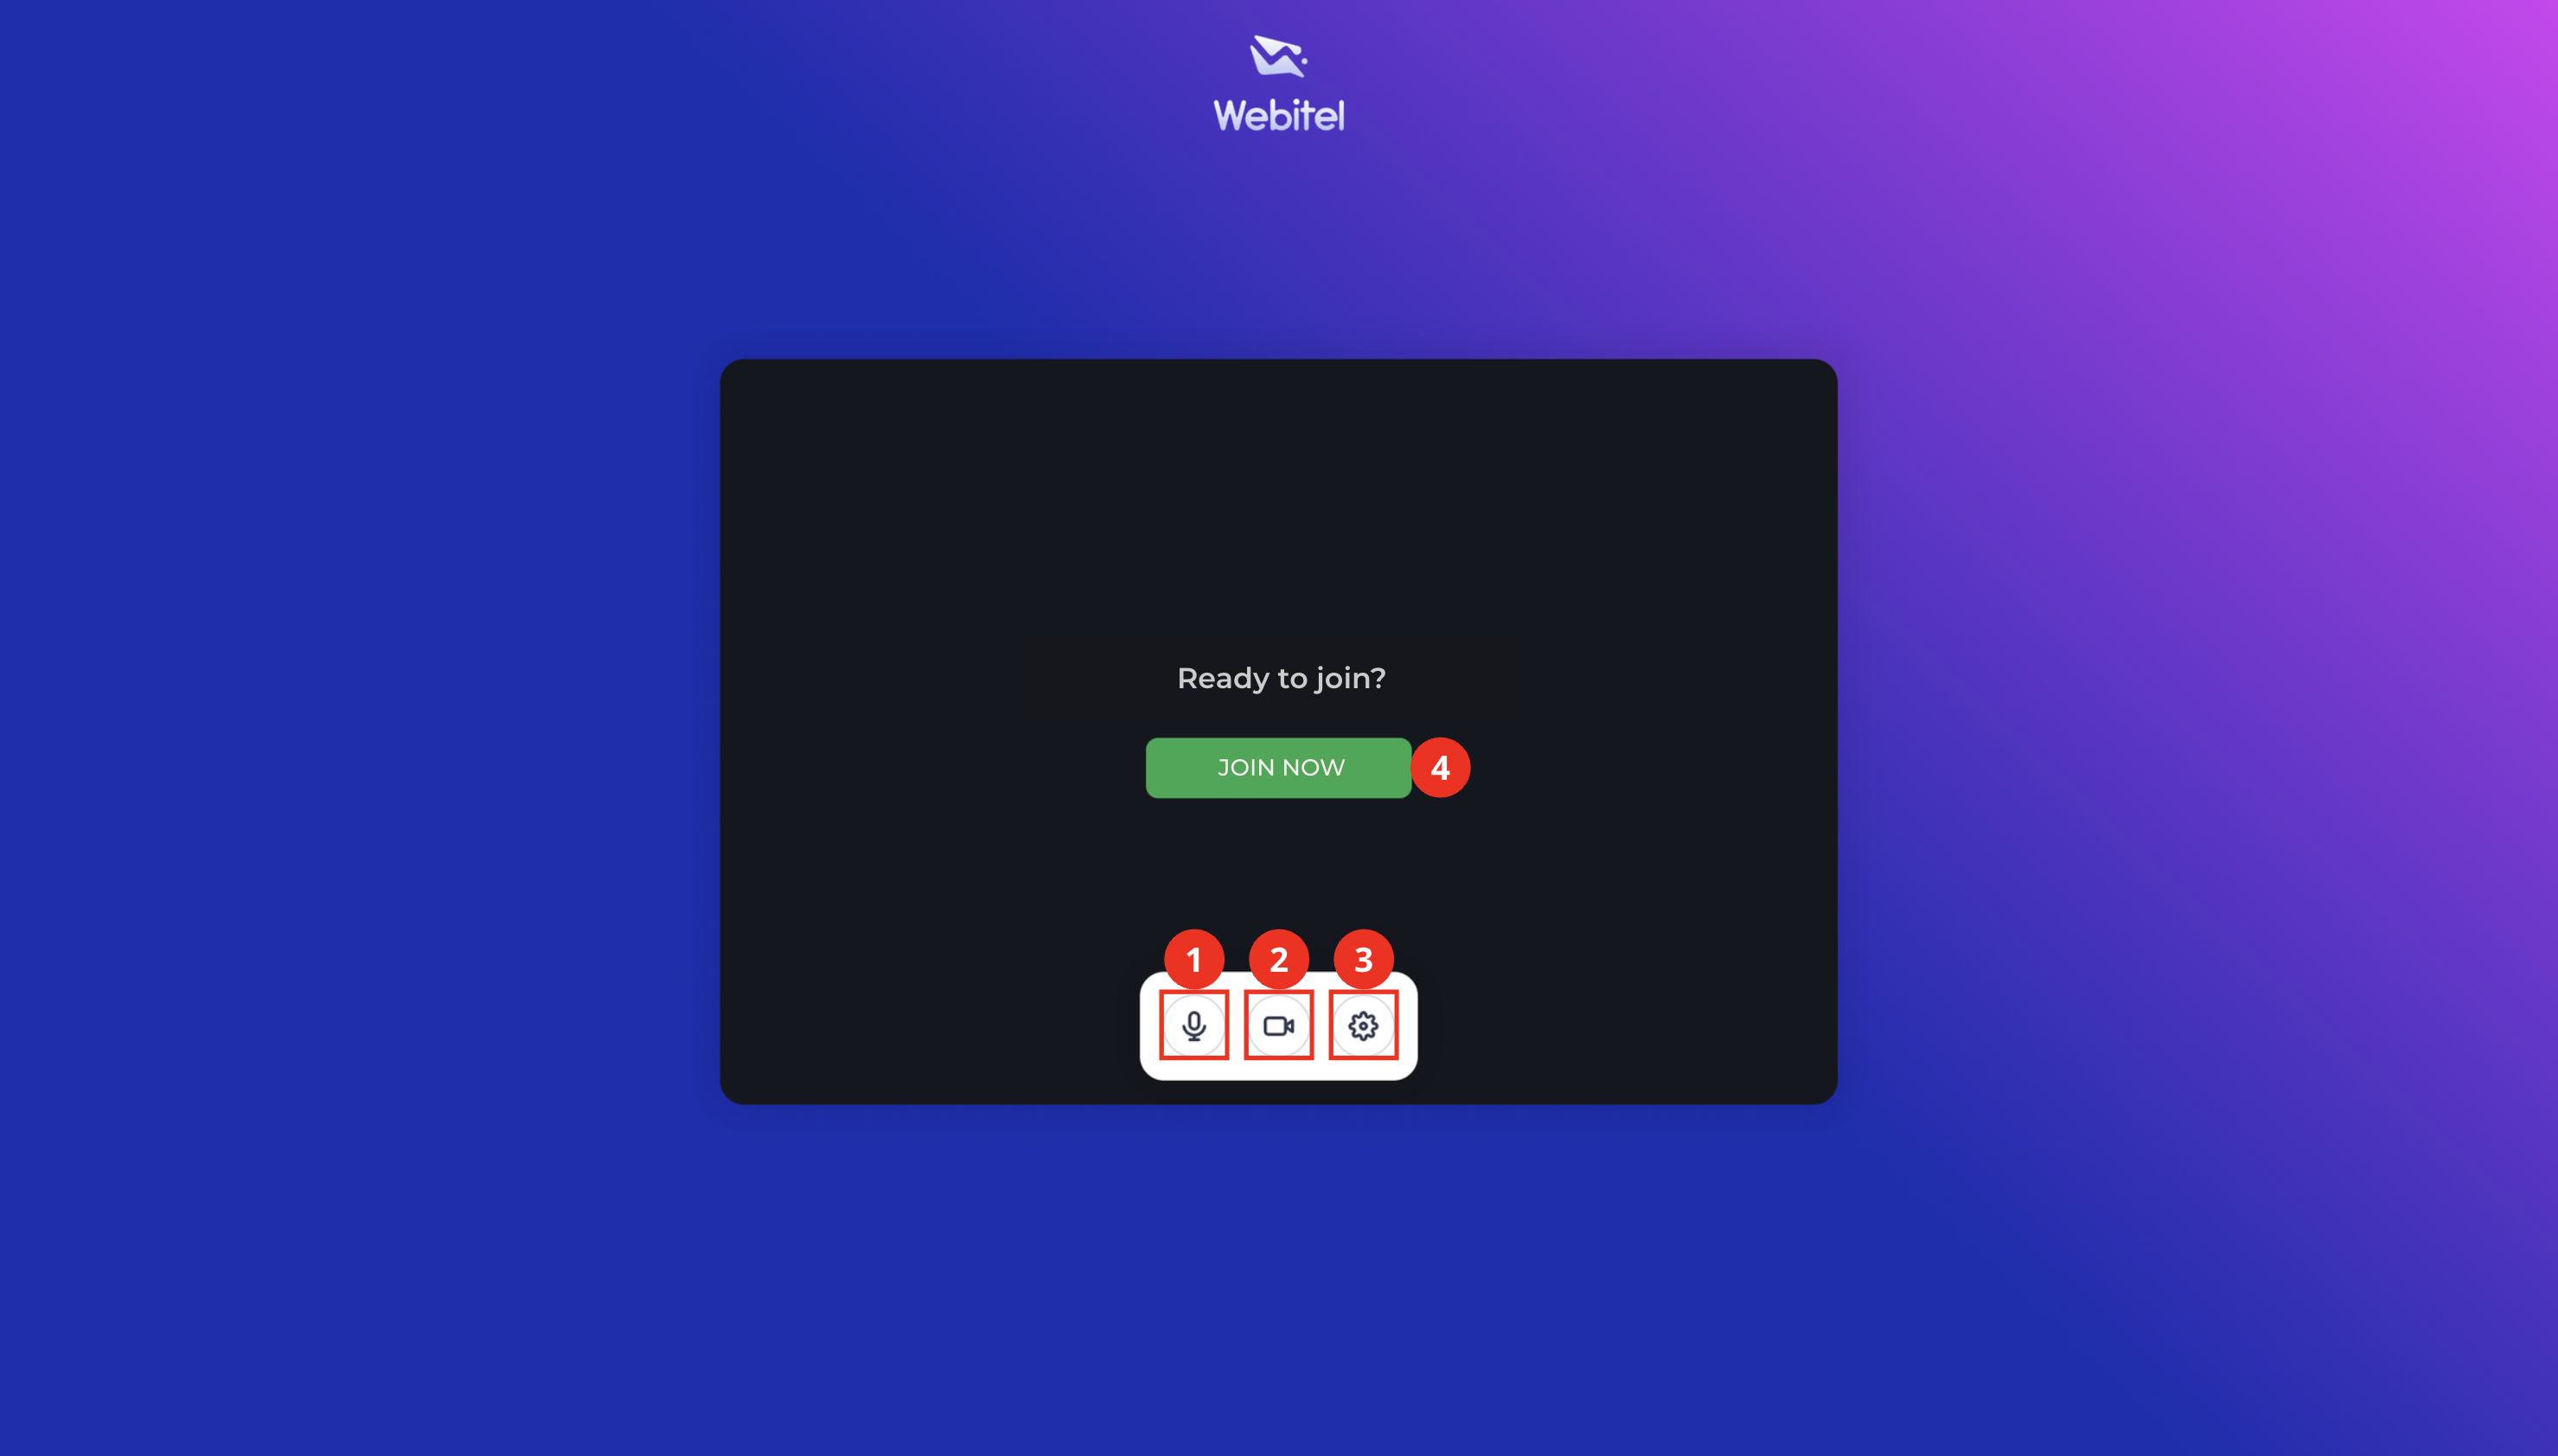
The following elements are displayed on the connection page (Fig. 2):
-
Microphone icon (Fig. 2.(1)) — enables


-
Camera icon (Fig. 2.(2)) — enables


-
Settings icon (Fig. 2.(3)) — opens the device settings panel (Fig. 3).
-
Join now button (Fig. 2.(4)) — connects to the video call.
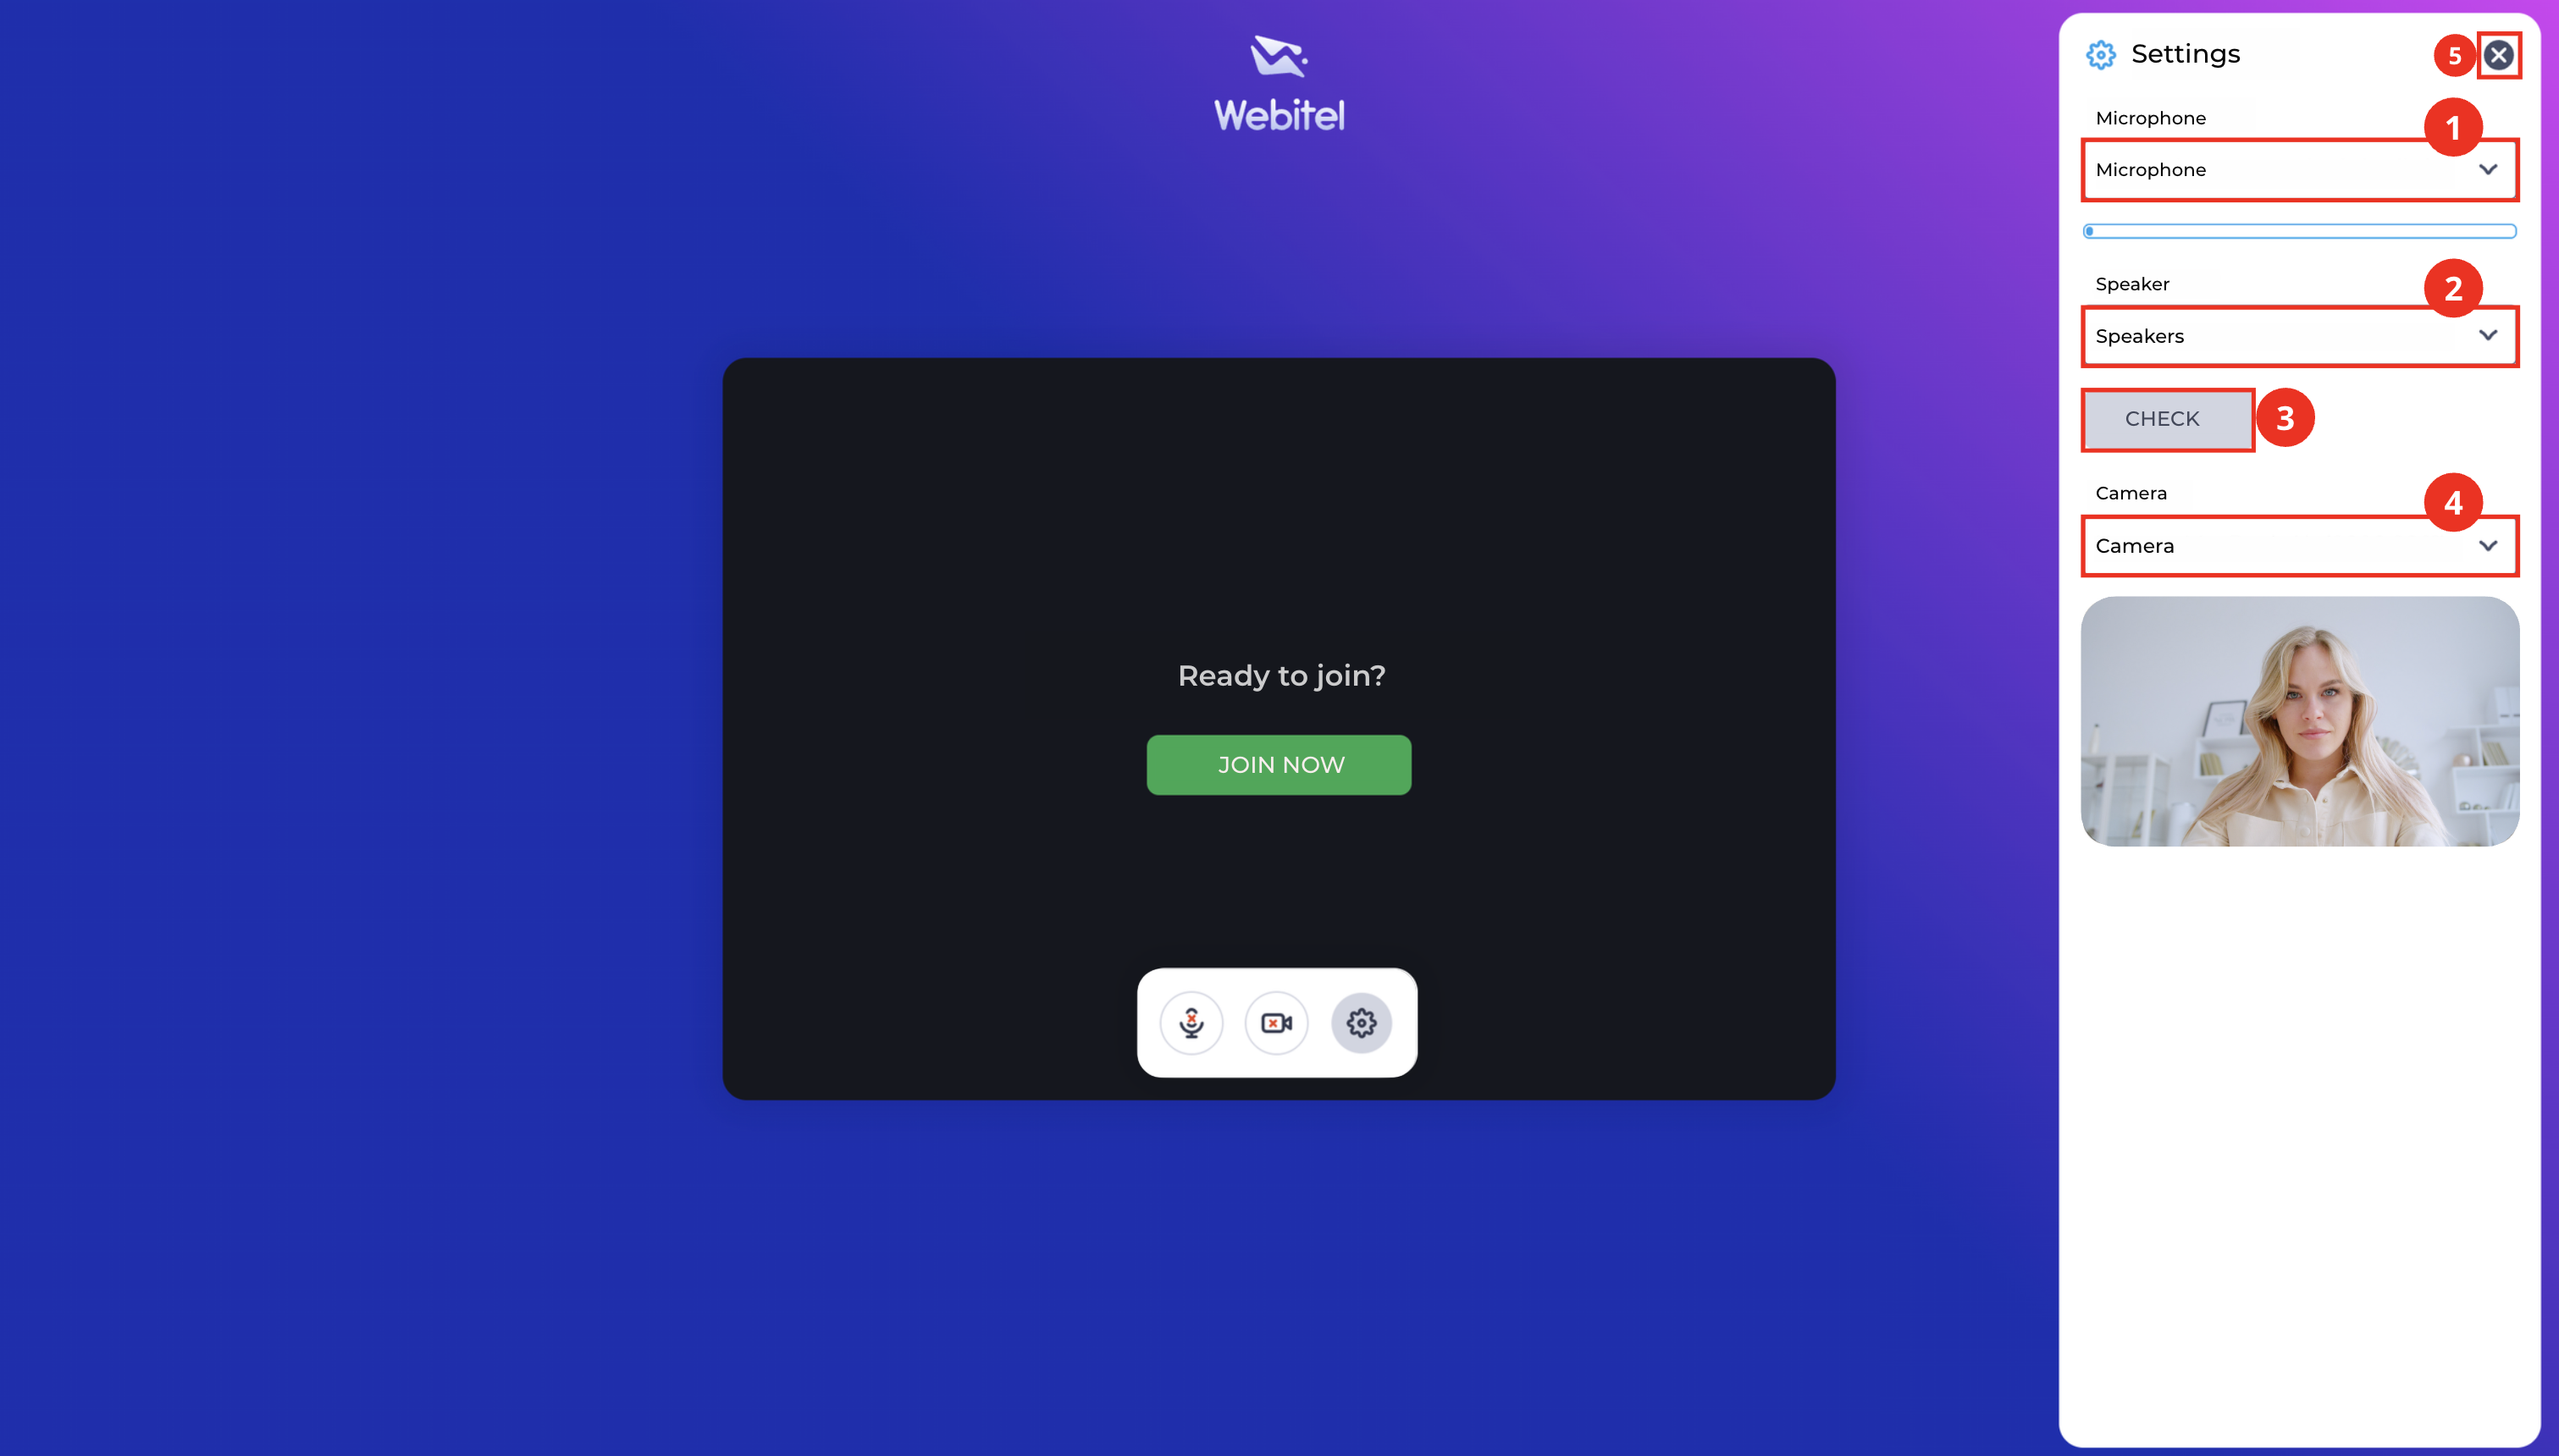
The following parameters are available in the settings panel:
-
Microphone (Fig. 3.(1)) — select the device for audio transmission.
-
Speaker (Fig. 3.(2)) — select the device for audio playback.
-
CHECK button (Fig. 3.(3)) — test the audio of the selected speaker.
-
Camera (Fig. 3.(4)) — select the device for video transmission and preview the image.
-
Close icon (Fig. 3.(5)) — closes the device settings panel.
After checking and configuring the devices, the client can connect to the video call.
To do so, click Join now (Fig. 2.(4)), after which the system initiates the connection to the agent.
2.3. Client Video Call Interface
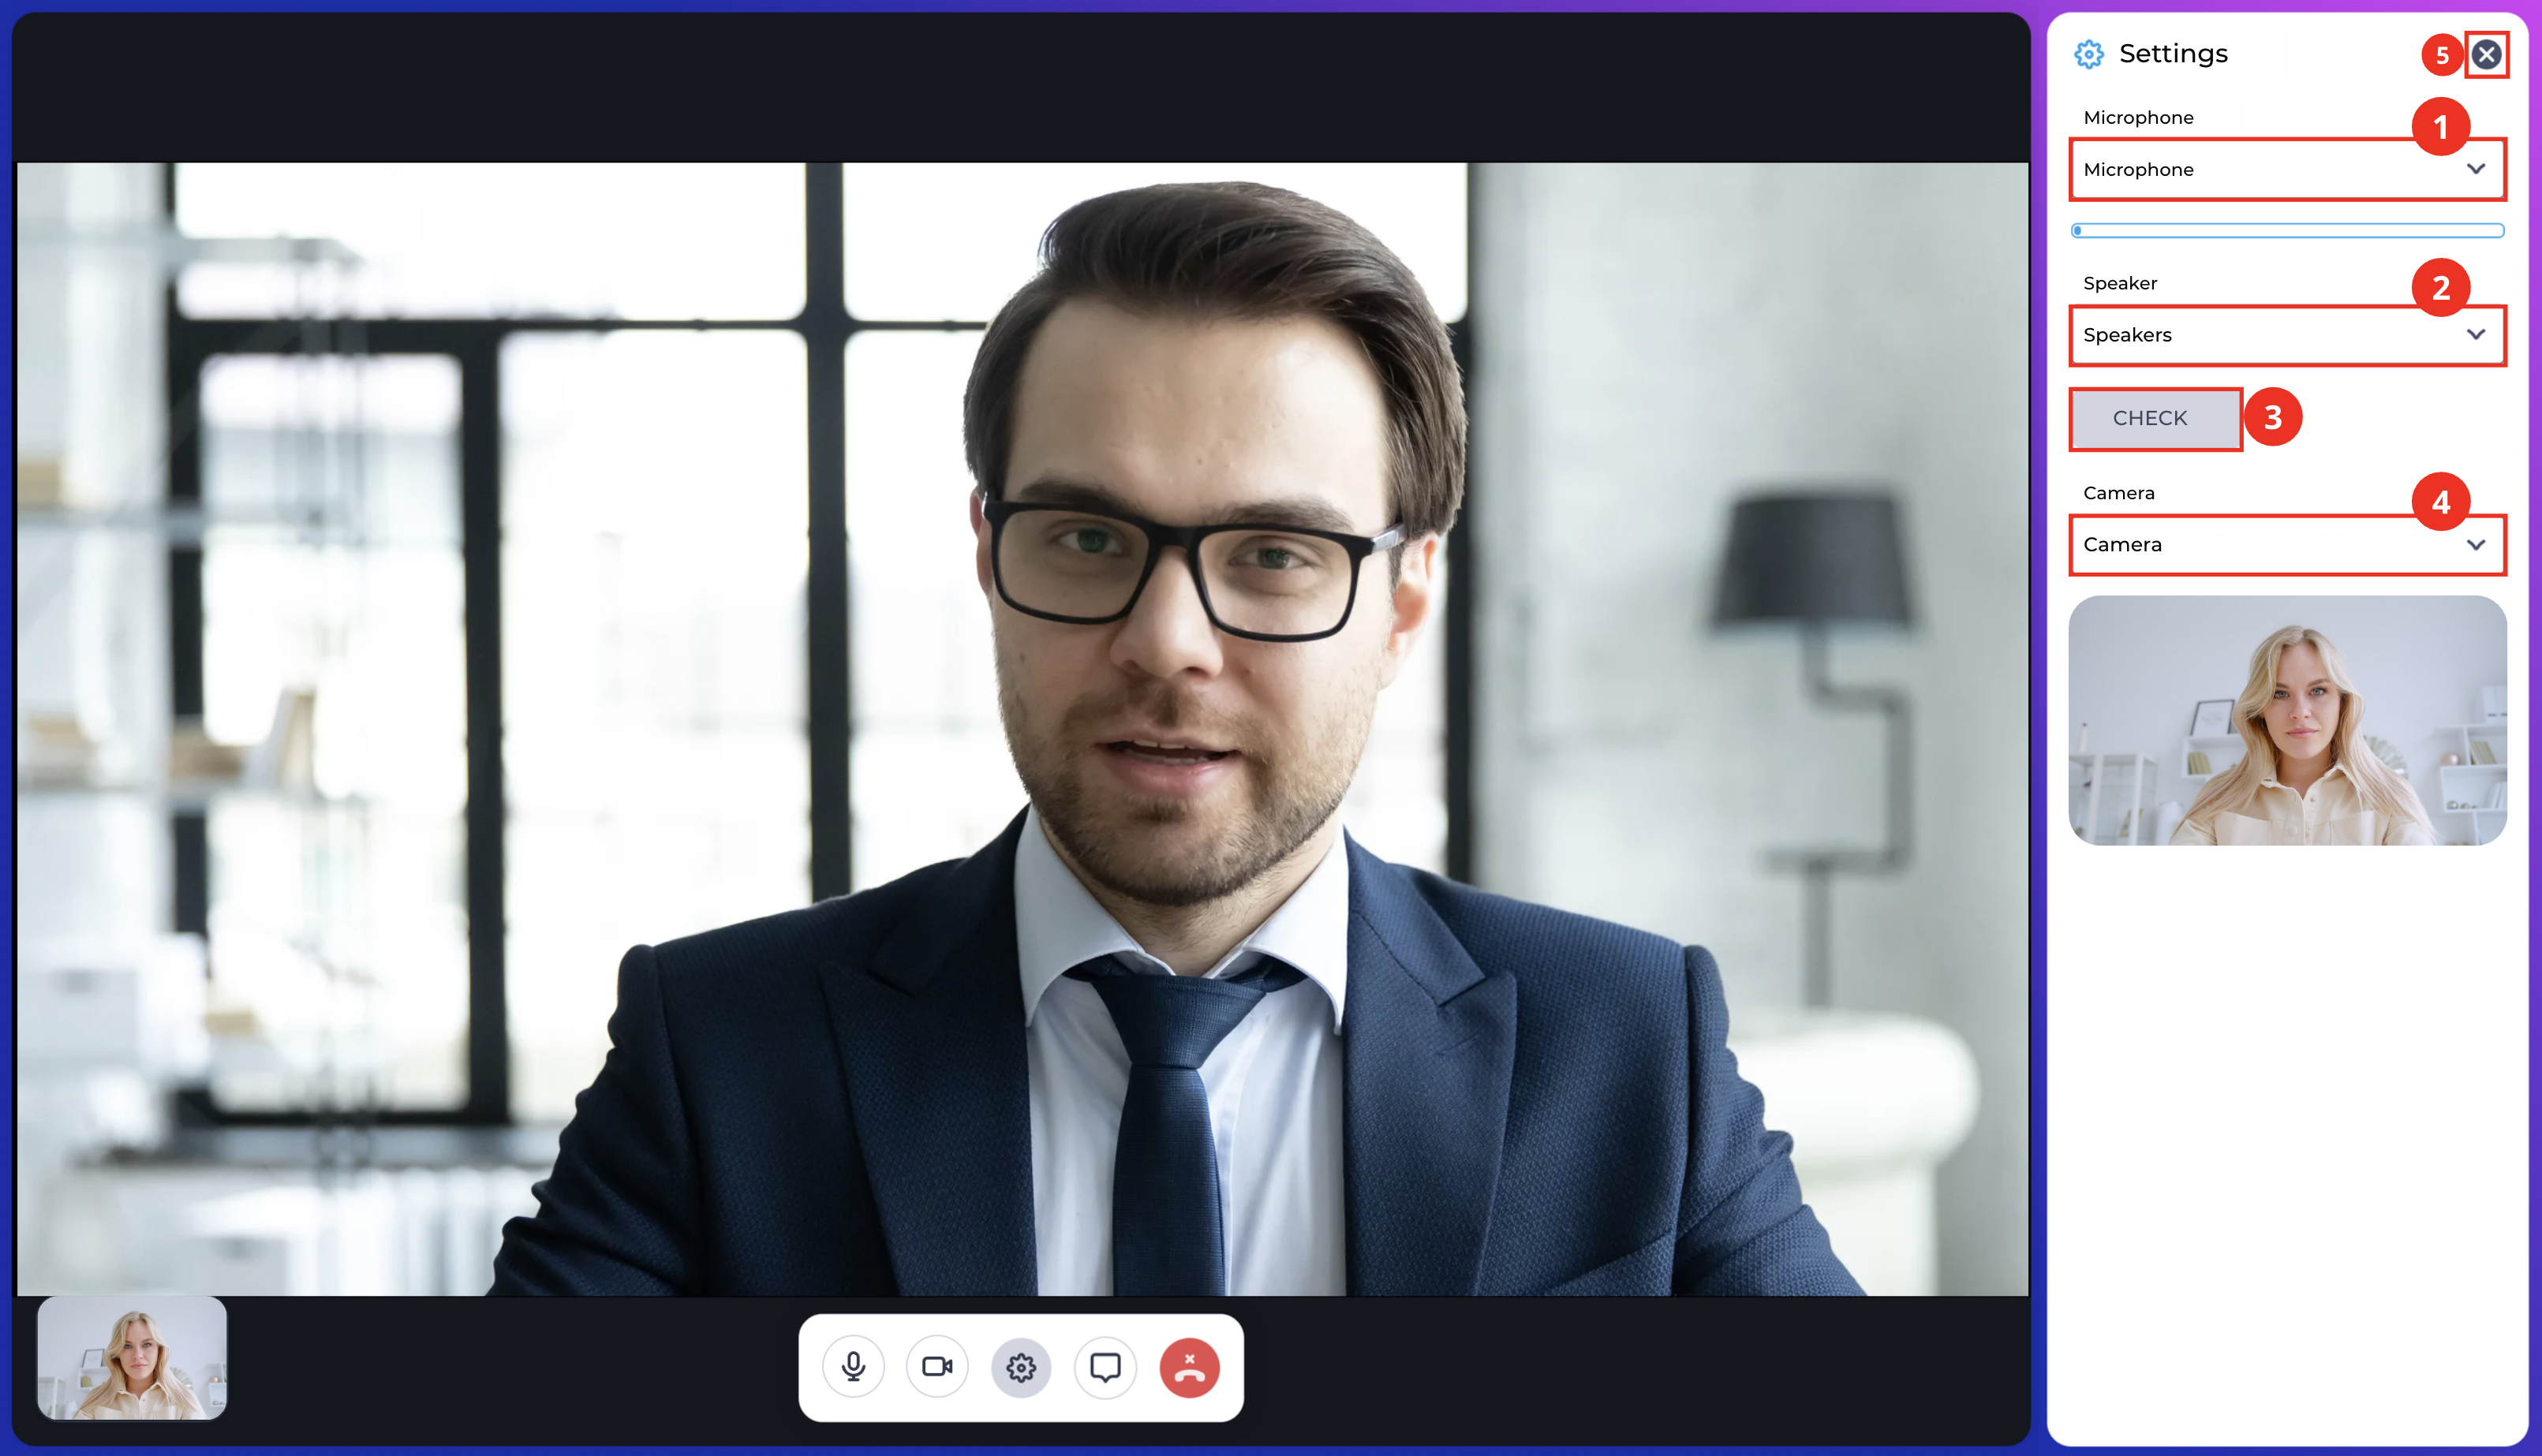
After the connection is established, the client video call interface opens (Fig. 4).
The following elements are displayed in the interface:
-
Agent video (Fig. 4.(1)) — the main video call window displaying the agent's video.
-
Client's own video (Fig. 4.(2)) — a small preview window displaying the image from the client's camera.
-
Microphone icon (Fig. 4.(3)) — enables
-
Camera icon (Fig. 4.(4)) — enables
-
Settings icon (Fig. 4.(5)) — opens the device settings panel for configuring or changing the microphone, speaker, and camera (Fig. 5).
-
Chat icon (Fig. 4.(6)) — opens the chat panel for exchanging messages during the video call (Fig. 6).
-
End video call button (Fig. 4.(7)).

2.4. Settings Panel During a Video Call
During a video call, the client can change the device settings. To do so, click the Settings icon (Fig. 4.(5)).
The following parameters are available in the settings panel (Fig. 5):
-
Microphone (Fig. 5.(1)) — select the device for audio transmission.
-
Speaker (Fig. 5.(2)) — select the device for audio playback.
-
CHECK button (Fig. 5.(3)) — test the audio of the selected speaker.
-
Camera (Fig. 5.(4)) — select the device for video transmission.
-
Close icon (Fig. 5.(5)) — closes the settings panel.
After changing the parameters, the settings are applied immediately during the current video call.
2.5. Chat During a Video Call
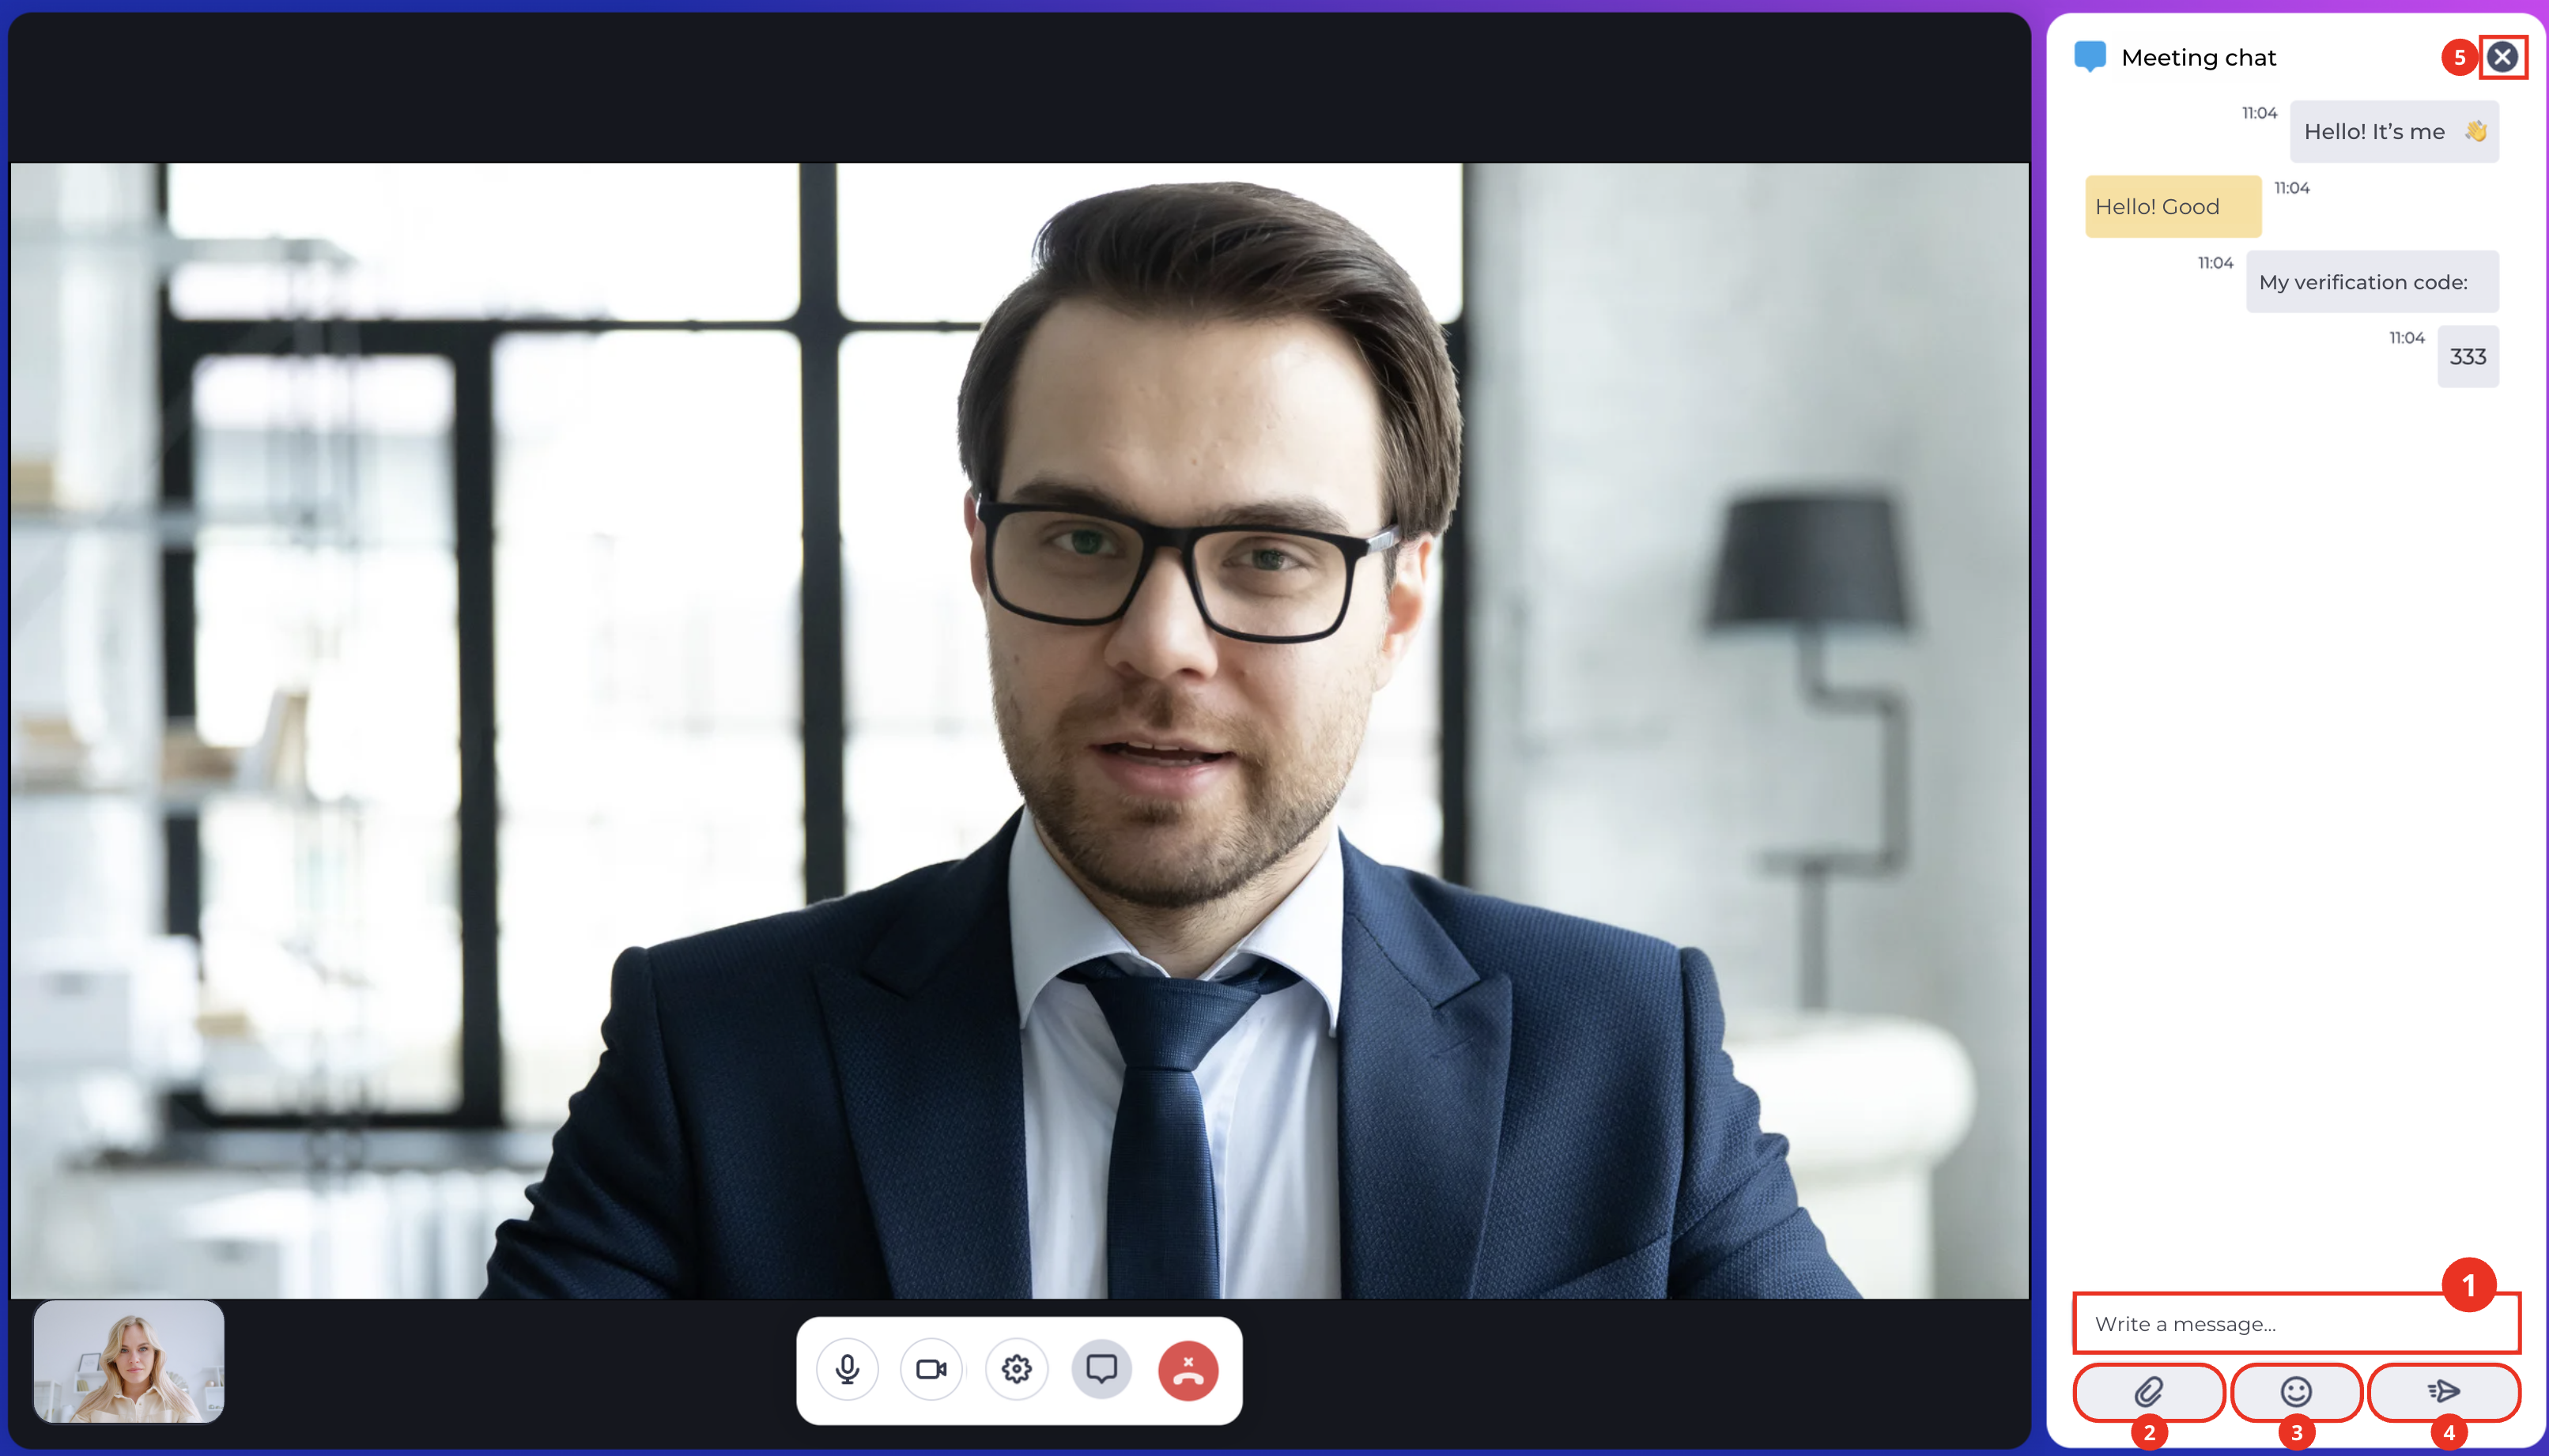
During a video call, the client can use the chat to exchange messages with the agent. To open the chat panel, click the Chat icon (Fig. 4.(6)).
Once opened, the chat panel is displayed (Fig. 6).
Through the chat, the client can send text messages, emoji, and files.
The following elements are available in the chat panel:
-
Message input field (Fig. 6.(1)) — used to type a text message.
-
File attachment button (Fig. 6.(2)) — allows adding a file to the message.
-
Emoji button (Fig. 6.(3)) — opens the emoji selection panel.
-
Send message button (Fig. 6.(4)) — sends the typed message to the chat.
-
Close chat button (Fig. 6.(5)) — closes the chat panel.
2.6. Ending the Call
To end the video call, the client uses the end call button.
To do so, click the button 
2.7. Video Call Rating
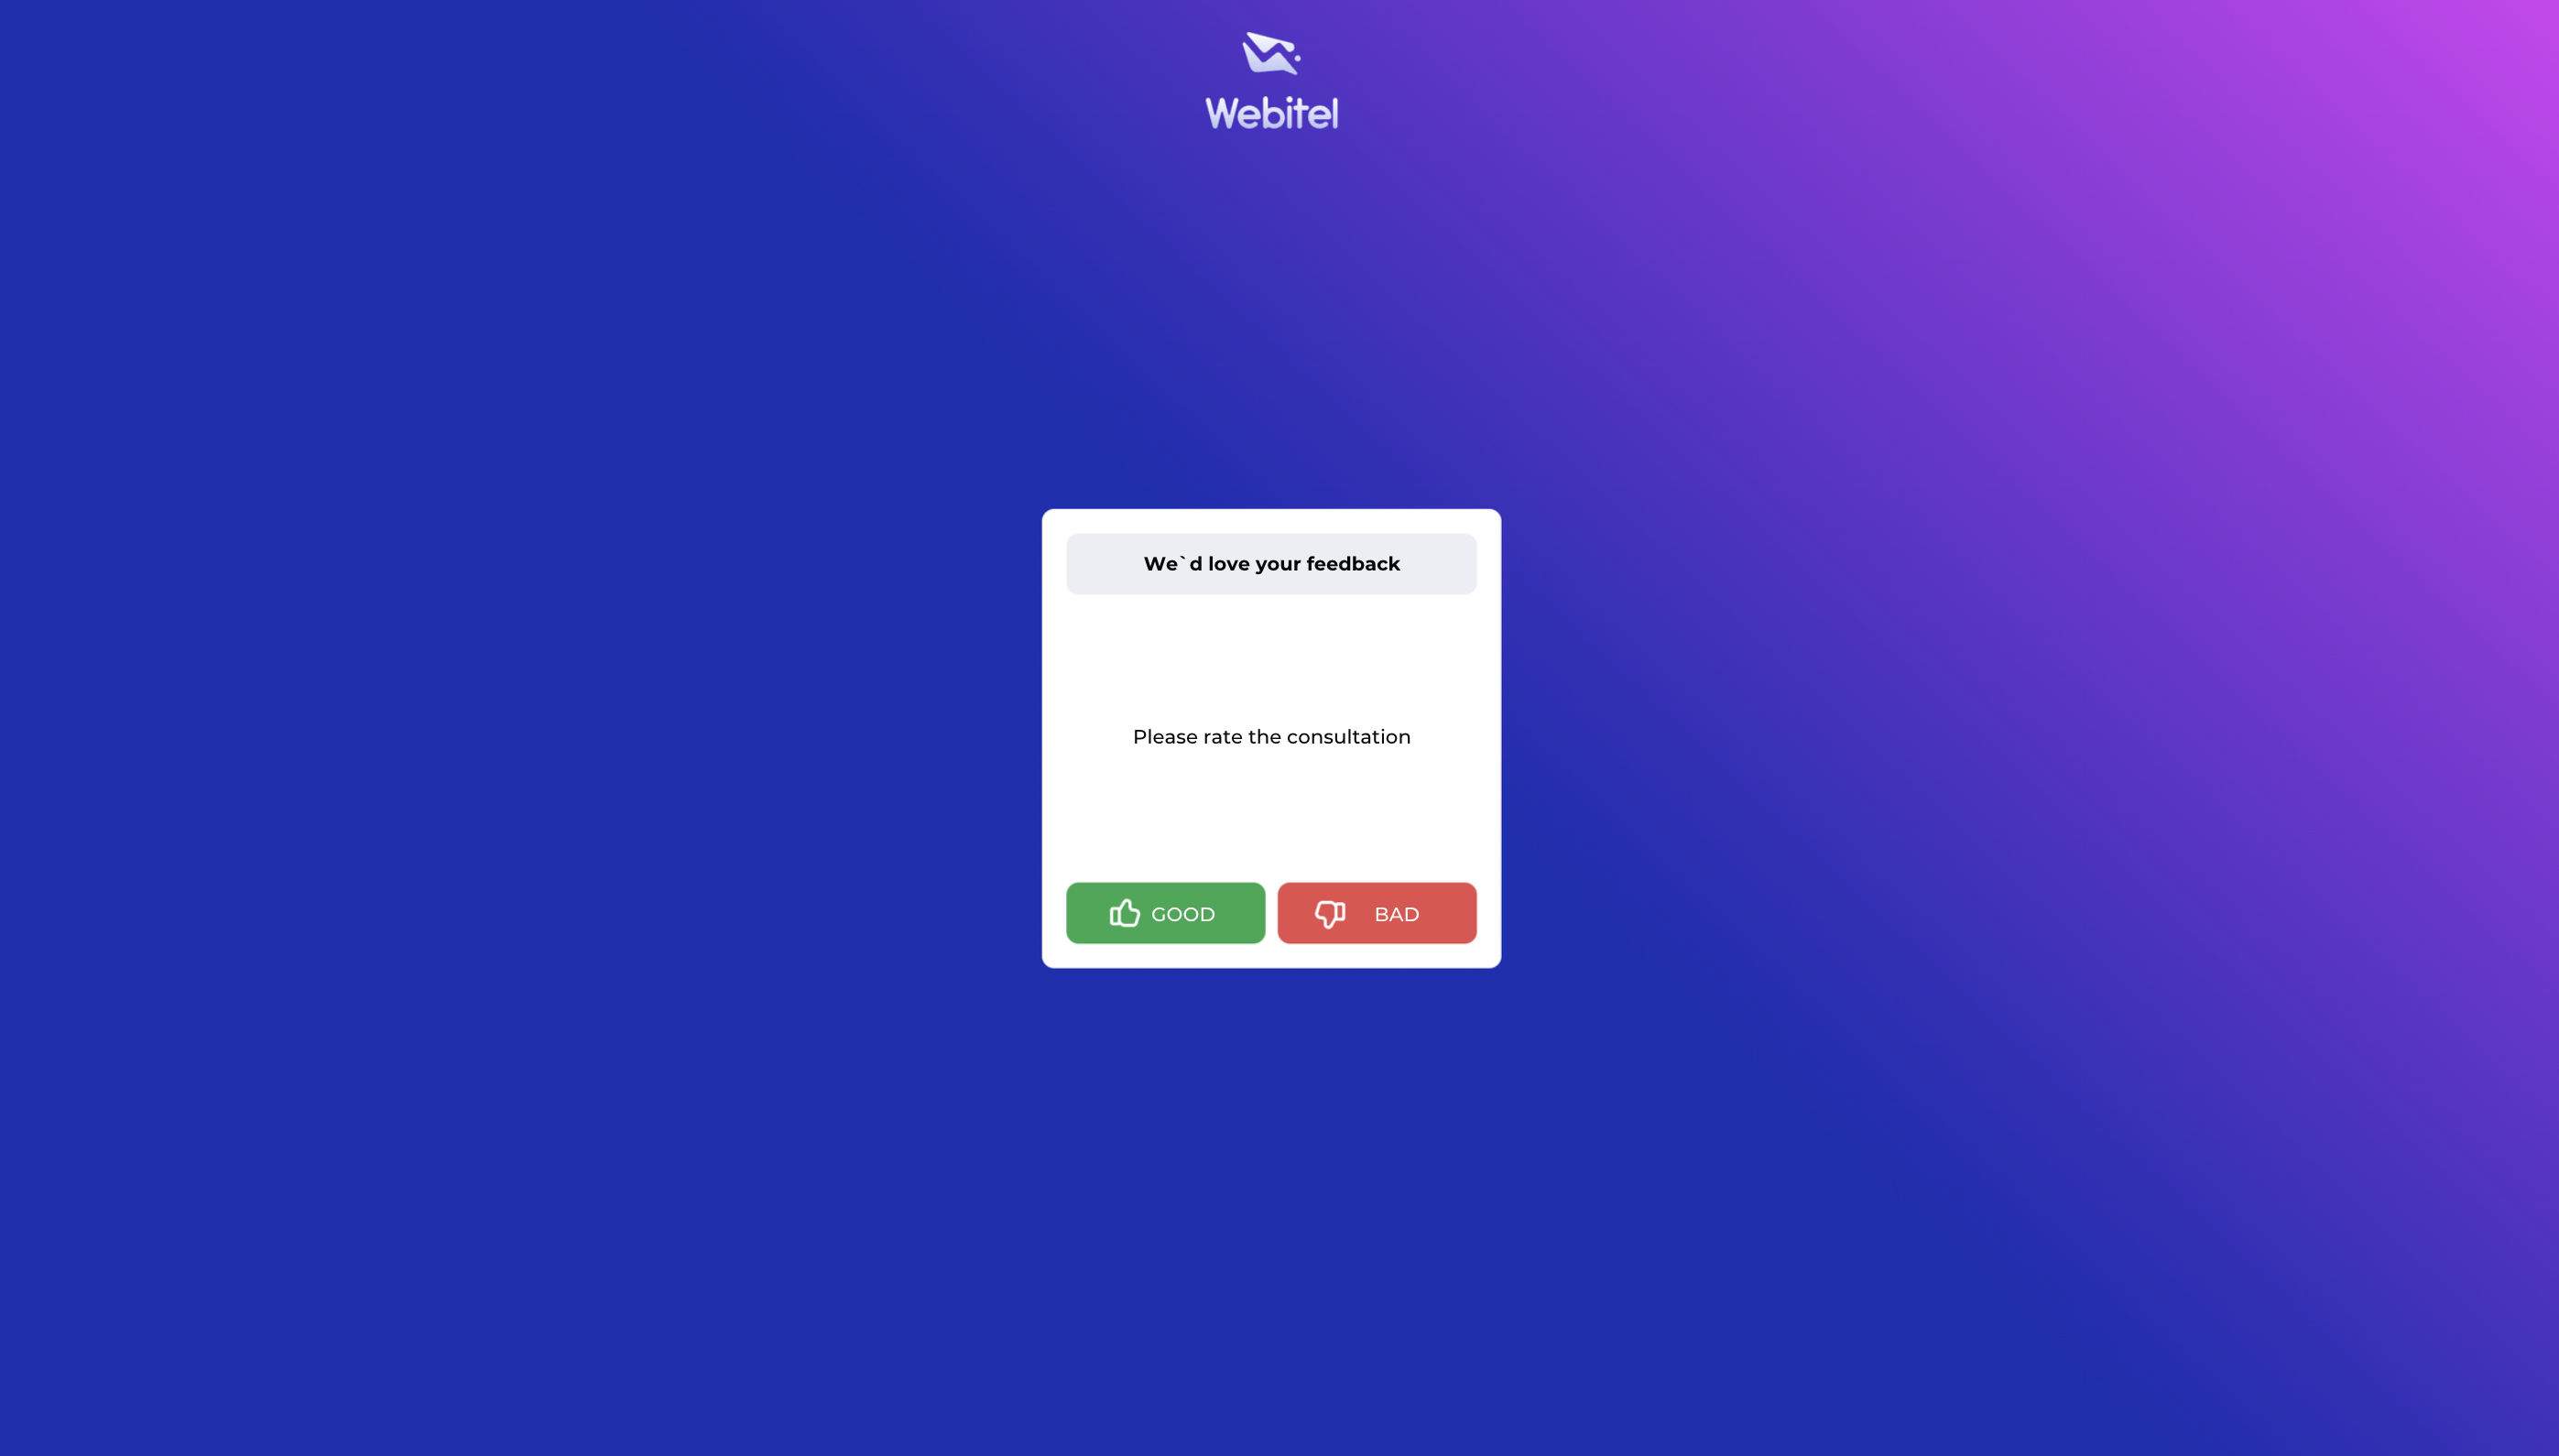
After the video call ends, the client is prompted to rate the quality of service (Fig. 7).
The client can select one of the following rating options:
-
Good — a positive rating of the consultation.
-
Bad — a negative rating of the consultation.
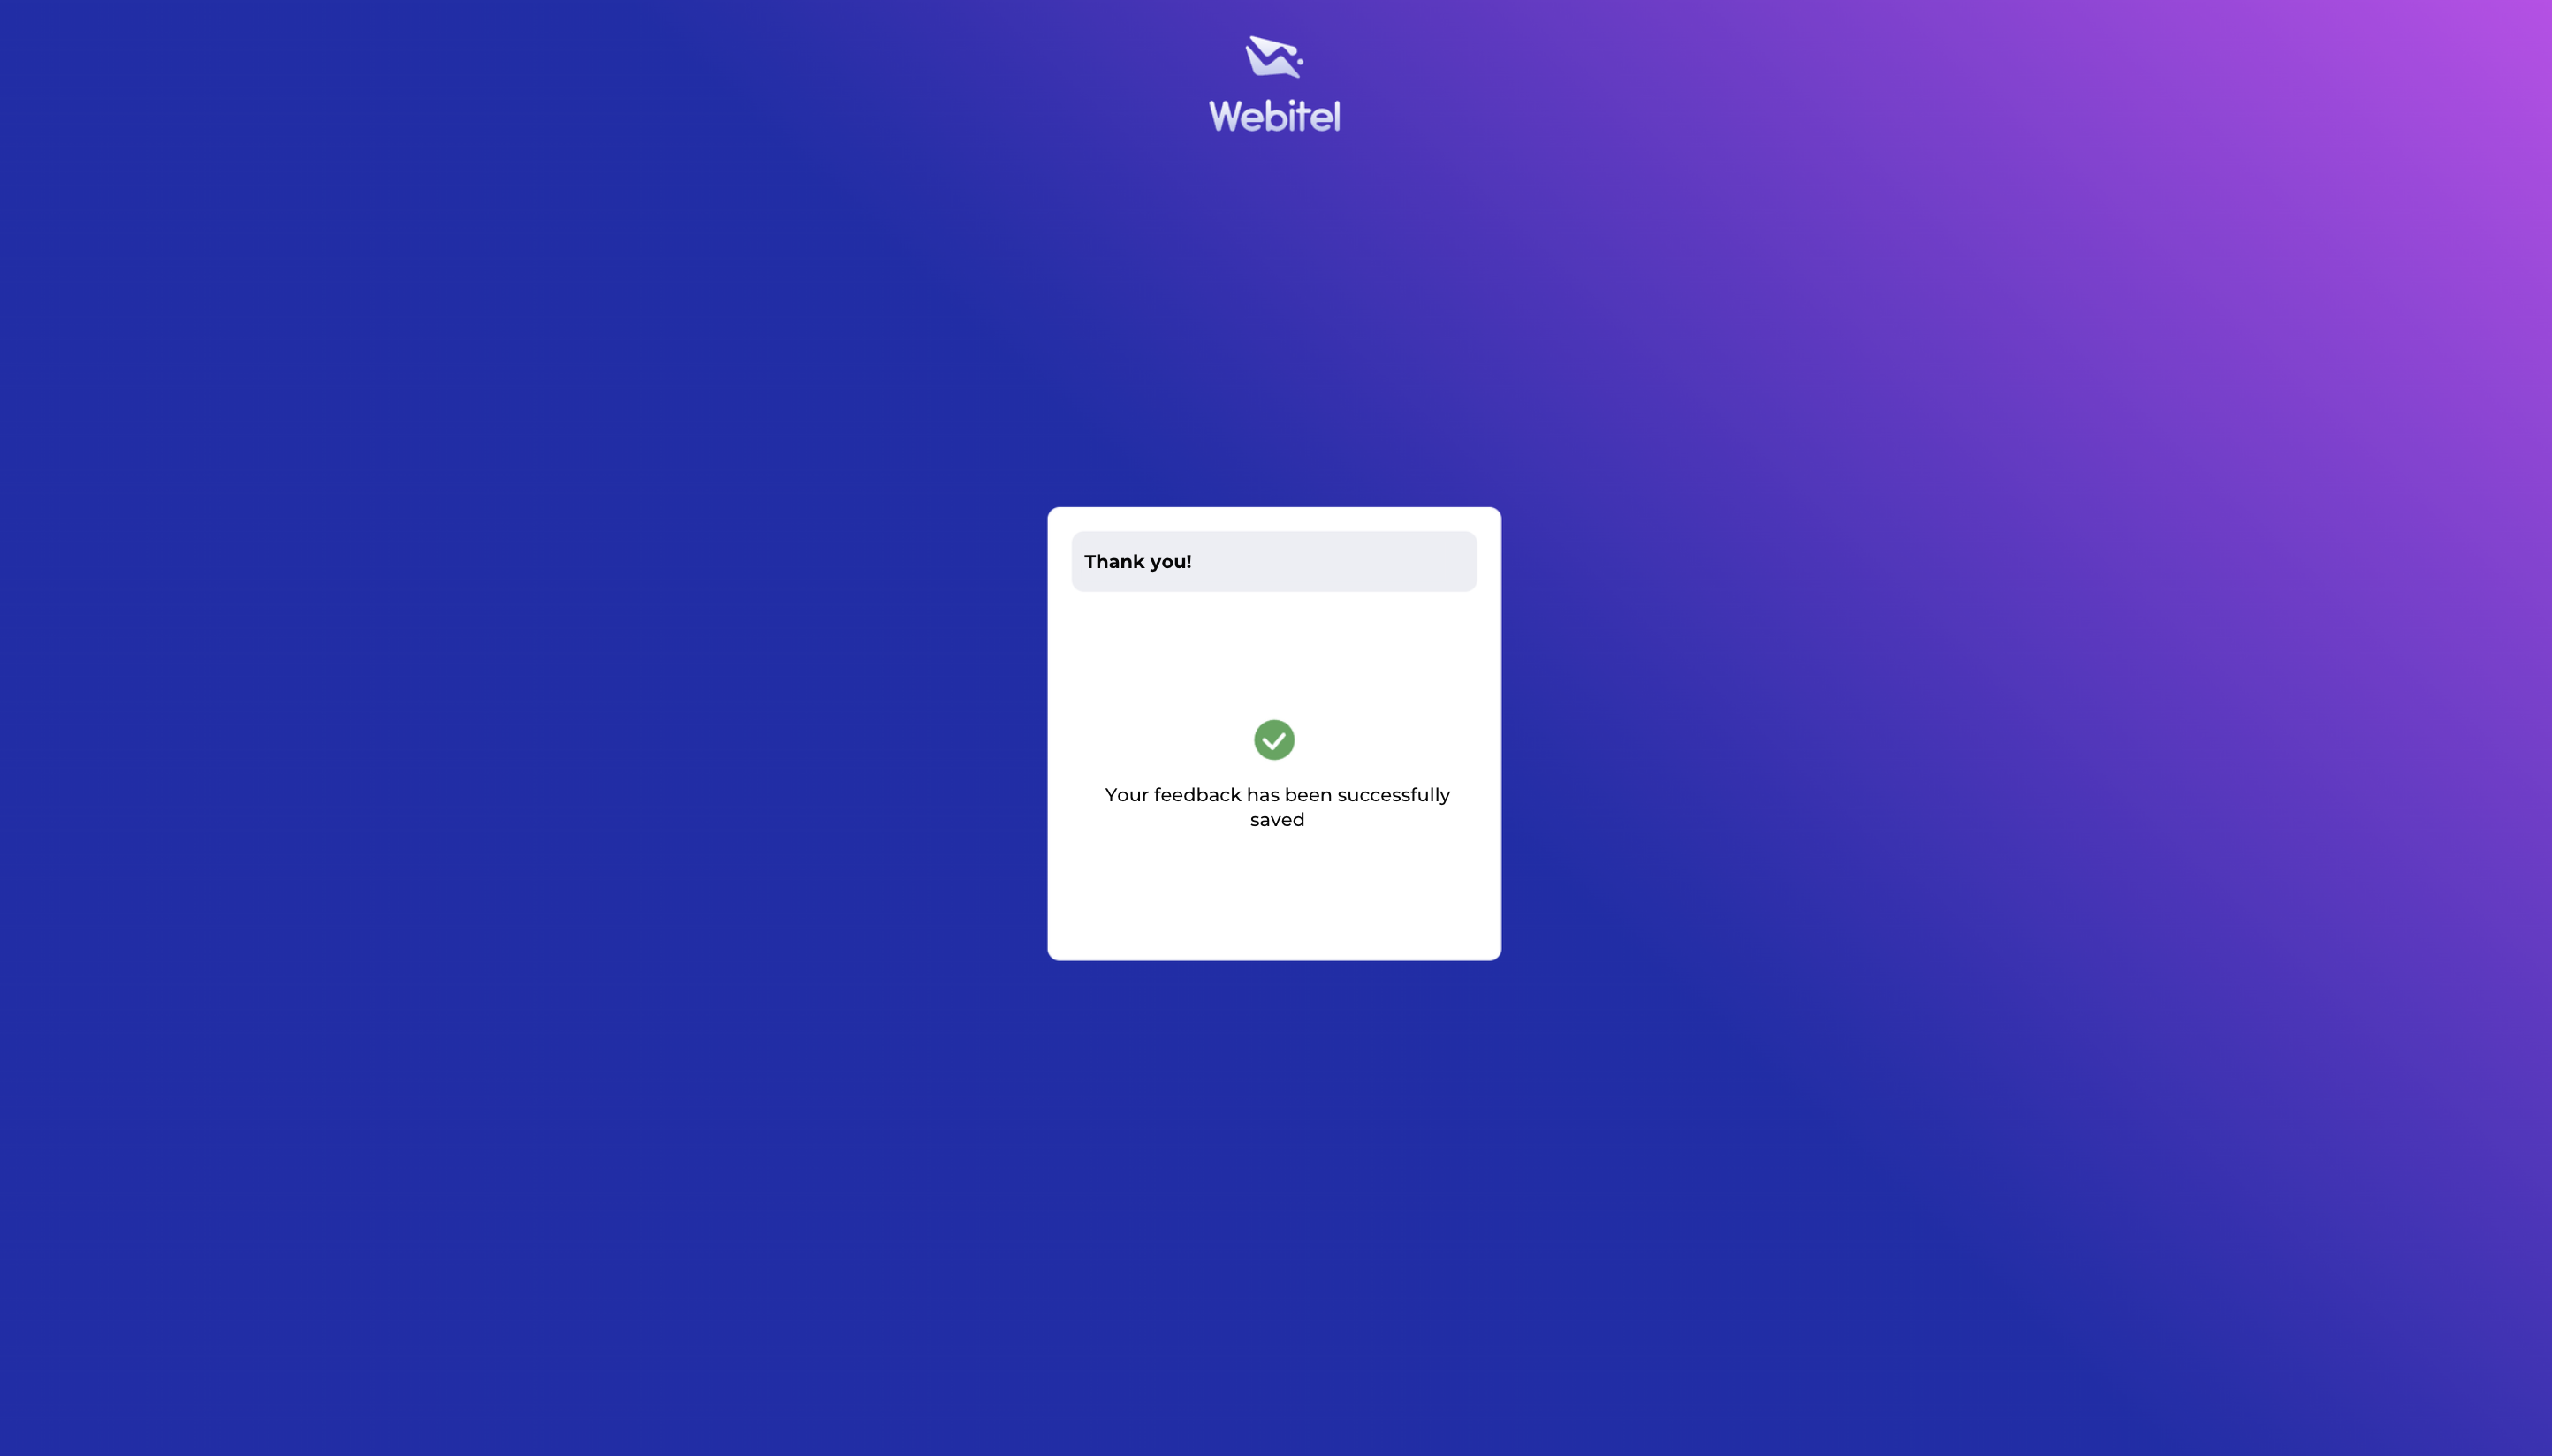
After selecting a rating, the system saves the client's feedback and displays a confirmation message (Fig. 8).
The client's rating is saved in the meeting_satisfaction variable in the call card in the History → Call info section.
This variable is used to pass the video call rating and can be configured according to the system settings.
3. Agent Work with Video Calls ("Workspace")
3.1. Receiving an Incoming Video Call
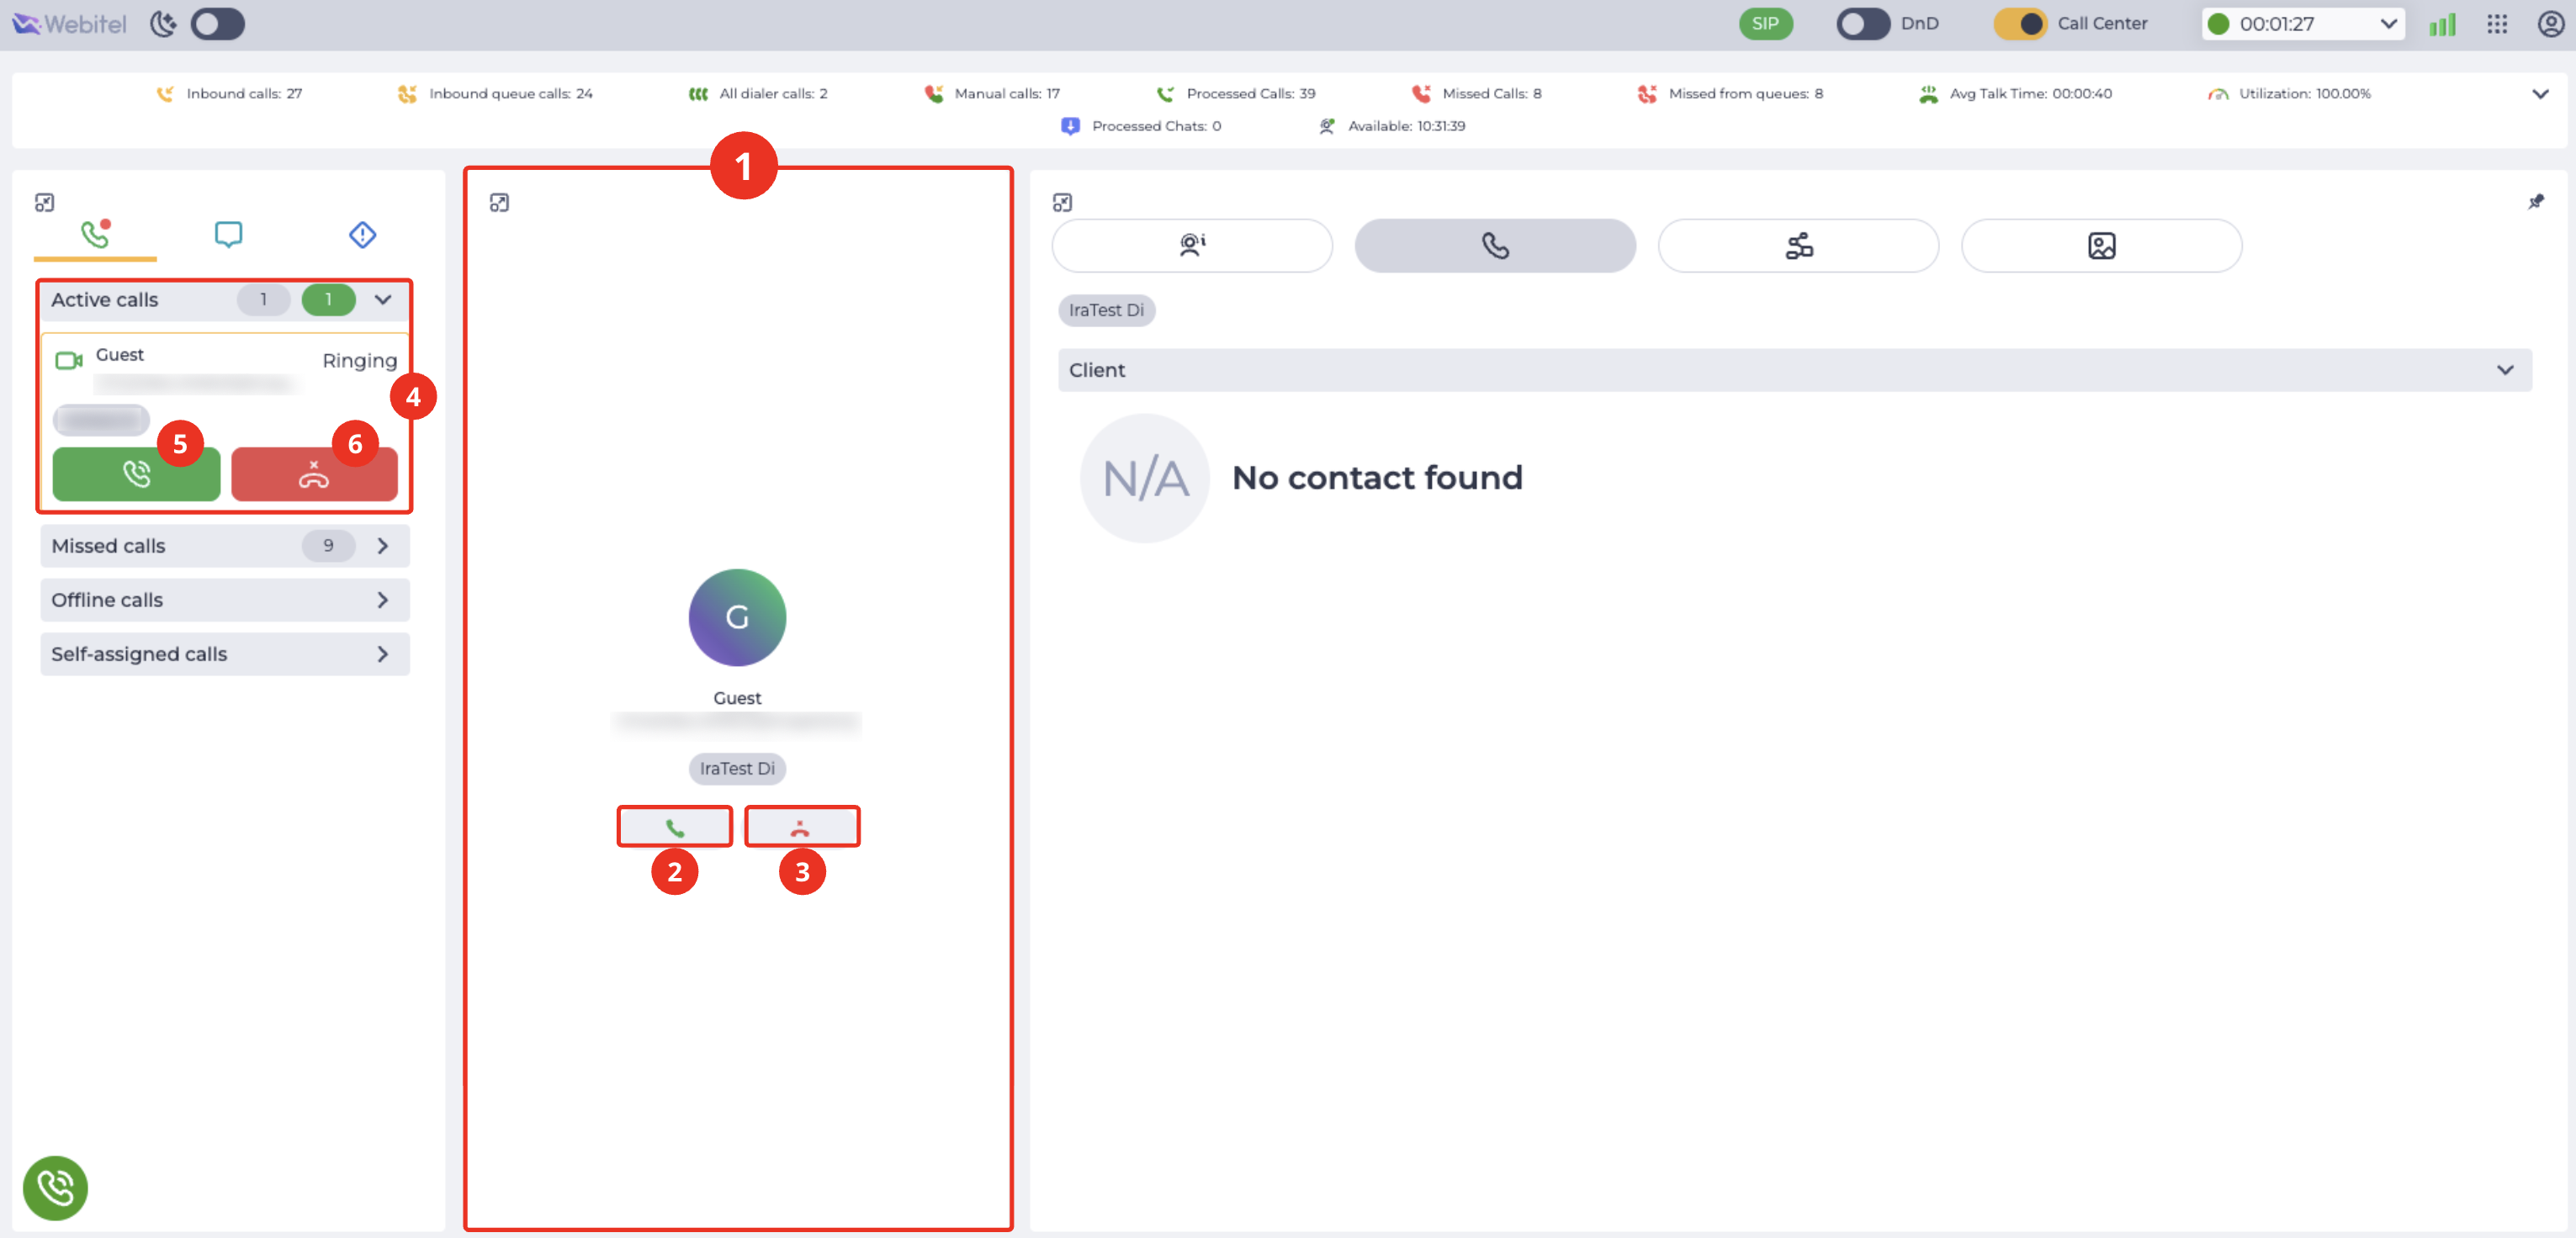
When the client follows the received link and initiates a video call, the agent receives an incoming call in "Workspace".
The incoming call is displayed in the central panel (Fig. 9.(1)) and the Active Calls block (Fig. 9.(4)), showing the client's name and call type.
To interact with the call, the agent can: accept the call (Fig. 9.(2)), (Fig. 9.(5)) or reject the call (Fig. 9.(3)), (Fig. 9.(6)).
3.2. Accepting a Video Call and the Video Call Interface
To accept the call, the agent clicks the accept call button (Fig. 9.(2)) or (Fig. 9.(5)).
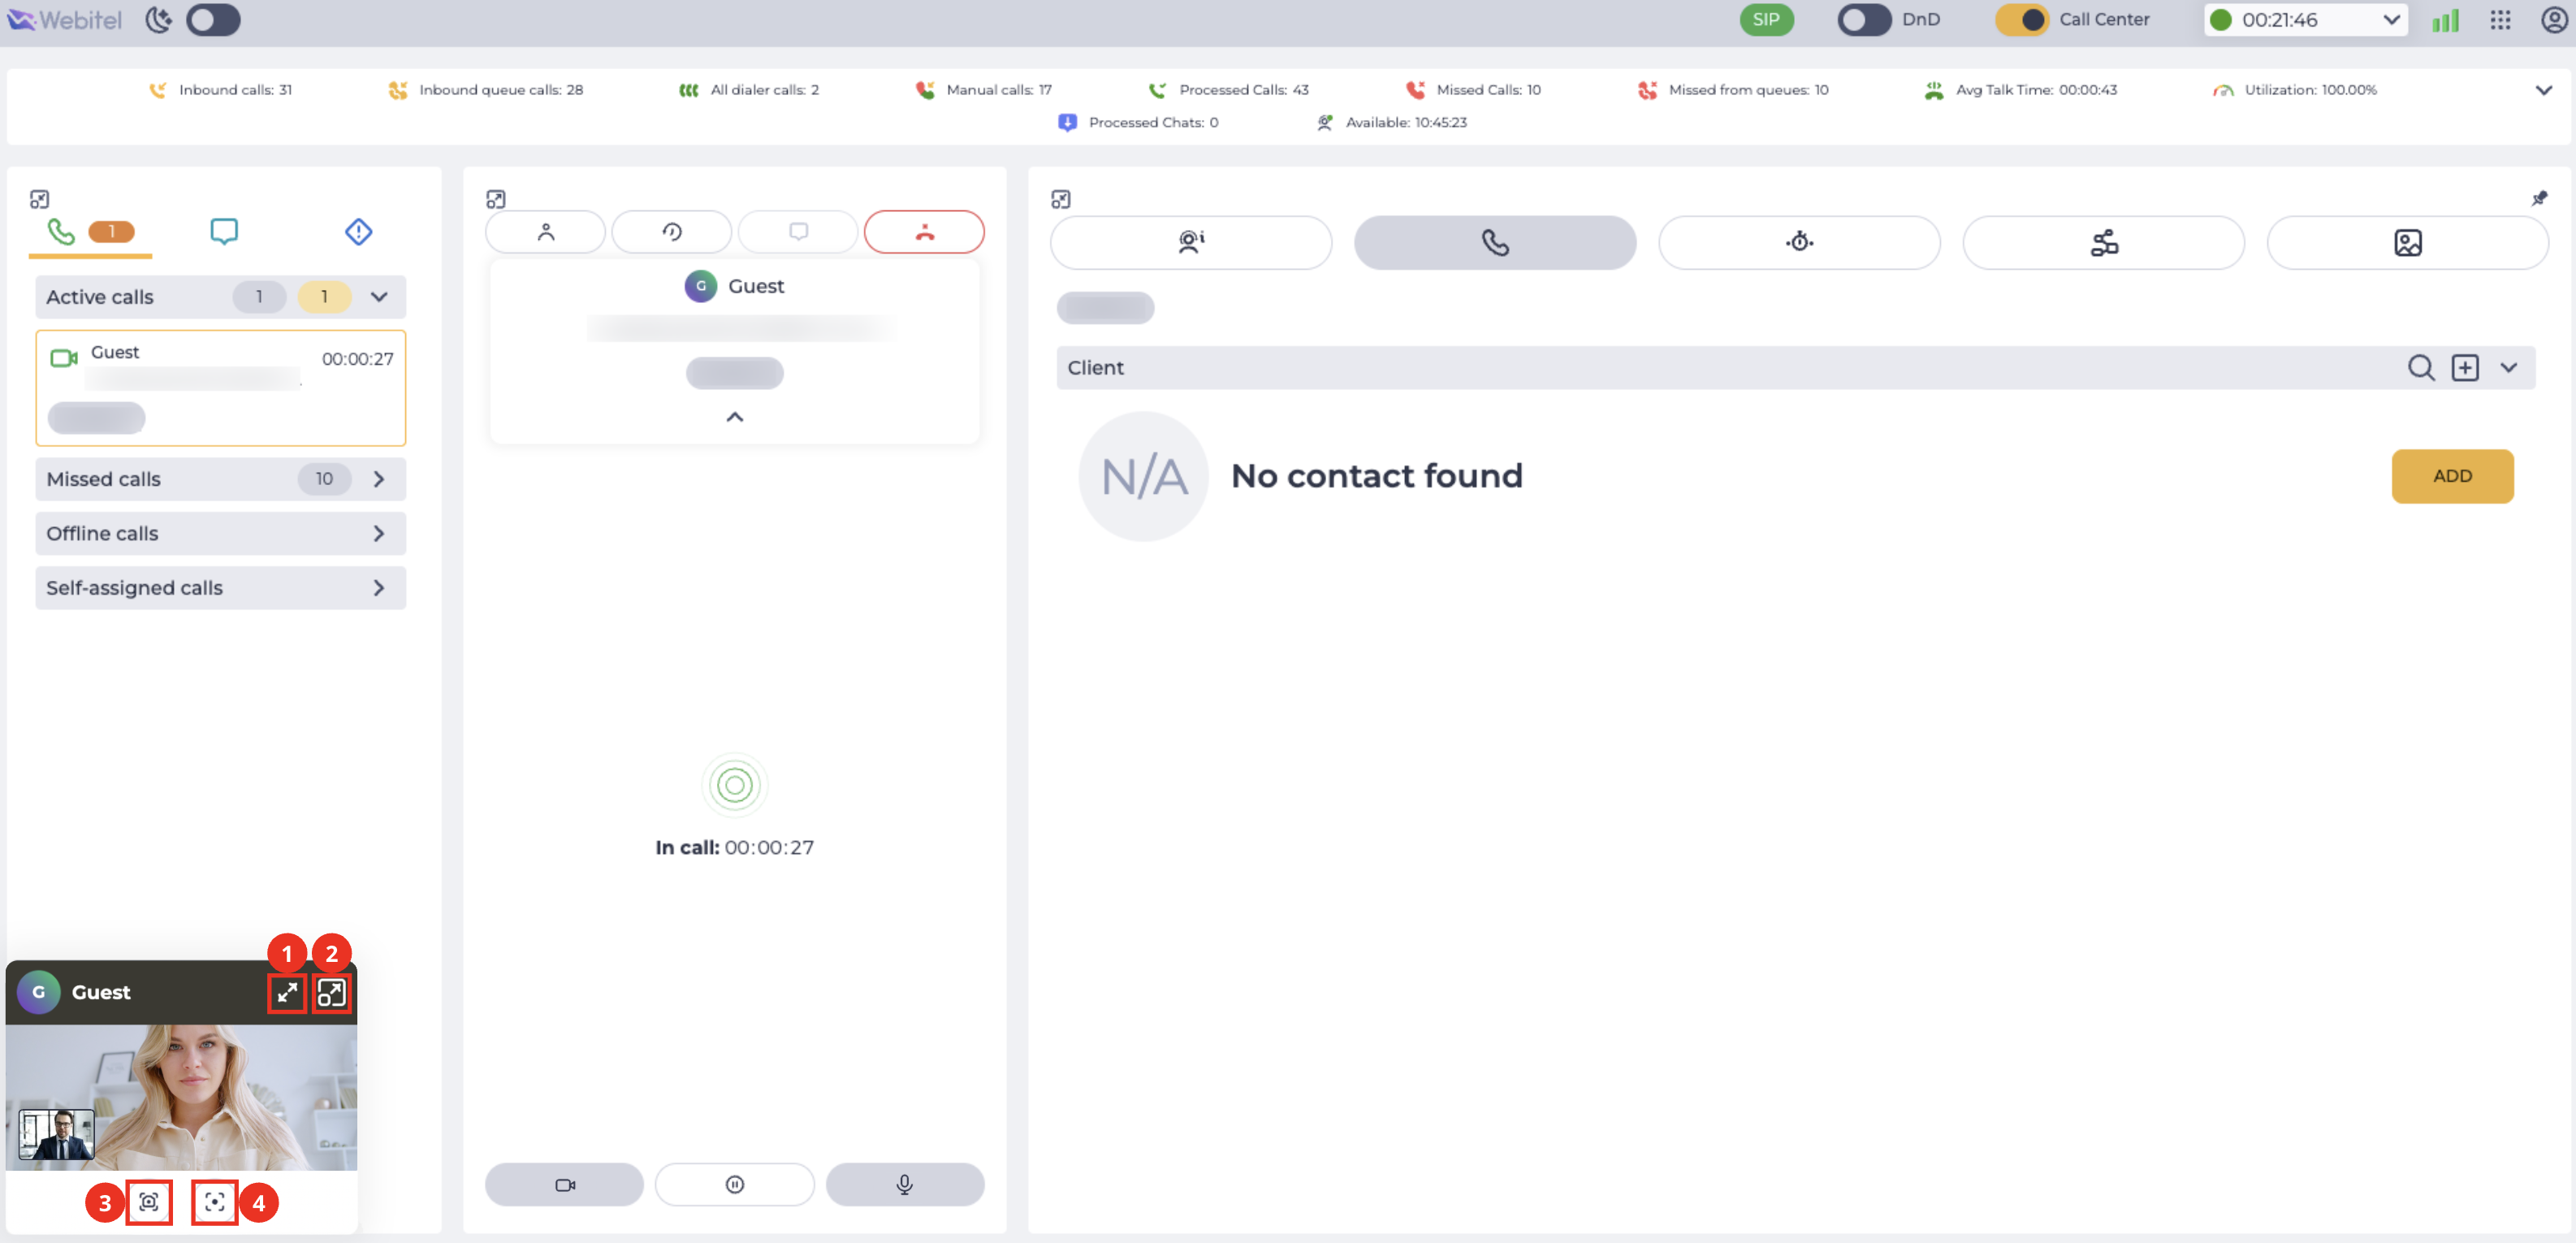
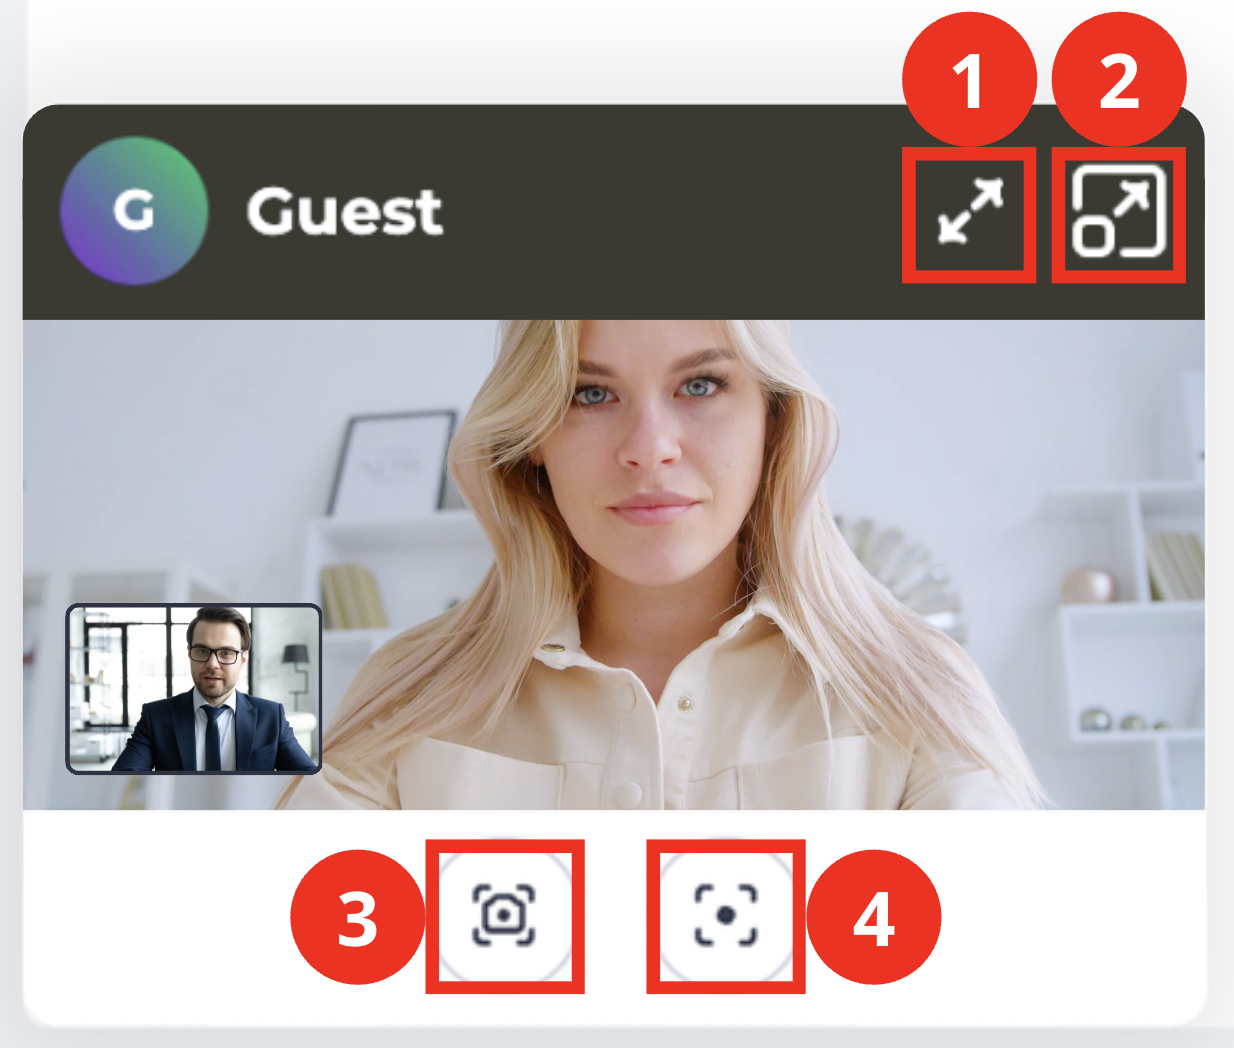
After this, the connection is established and the video call mini-window opens (Fig. 10).
3.2.1. Video Call Interface in the Mini-Window
In this mode, the agent sees:
-
the client's video;
-
the agent's video;
-
video call controls.
The following functions are available in the mini-window:
-
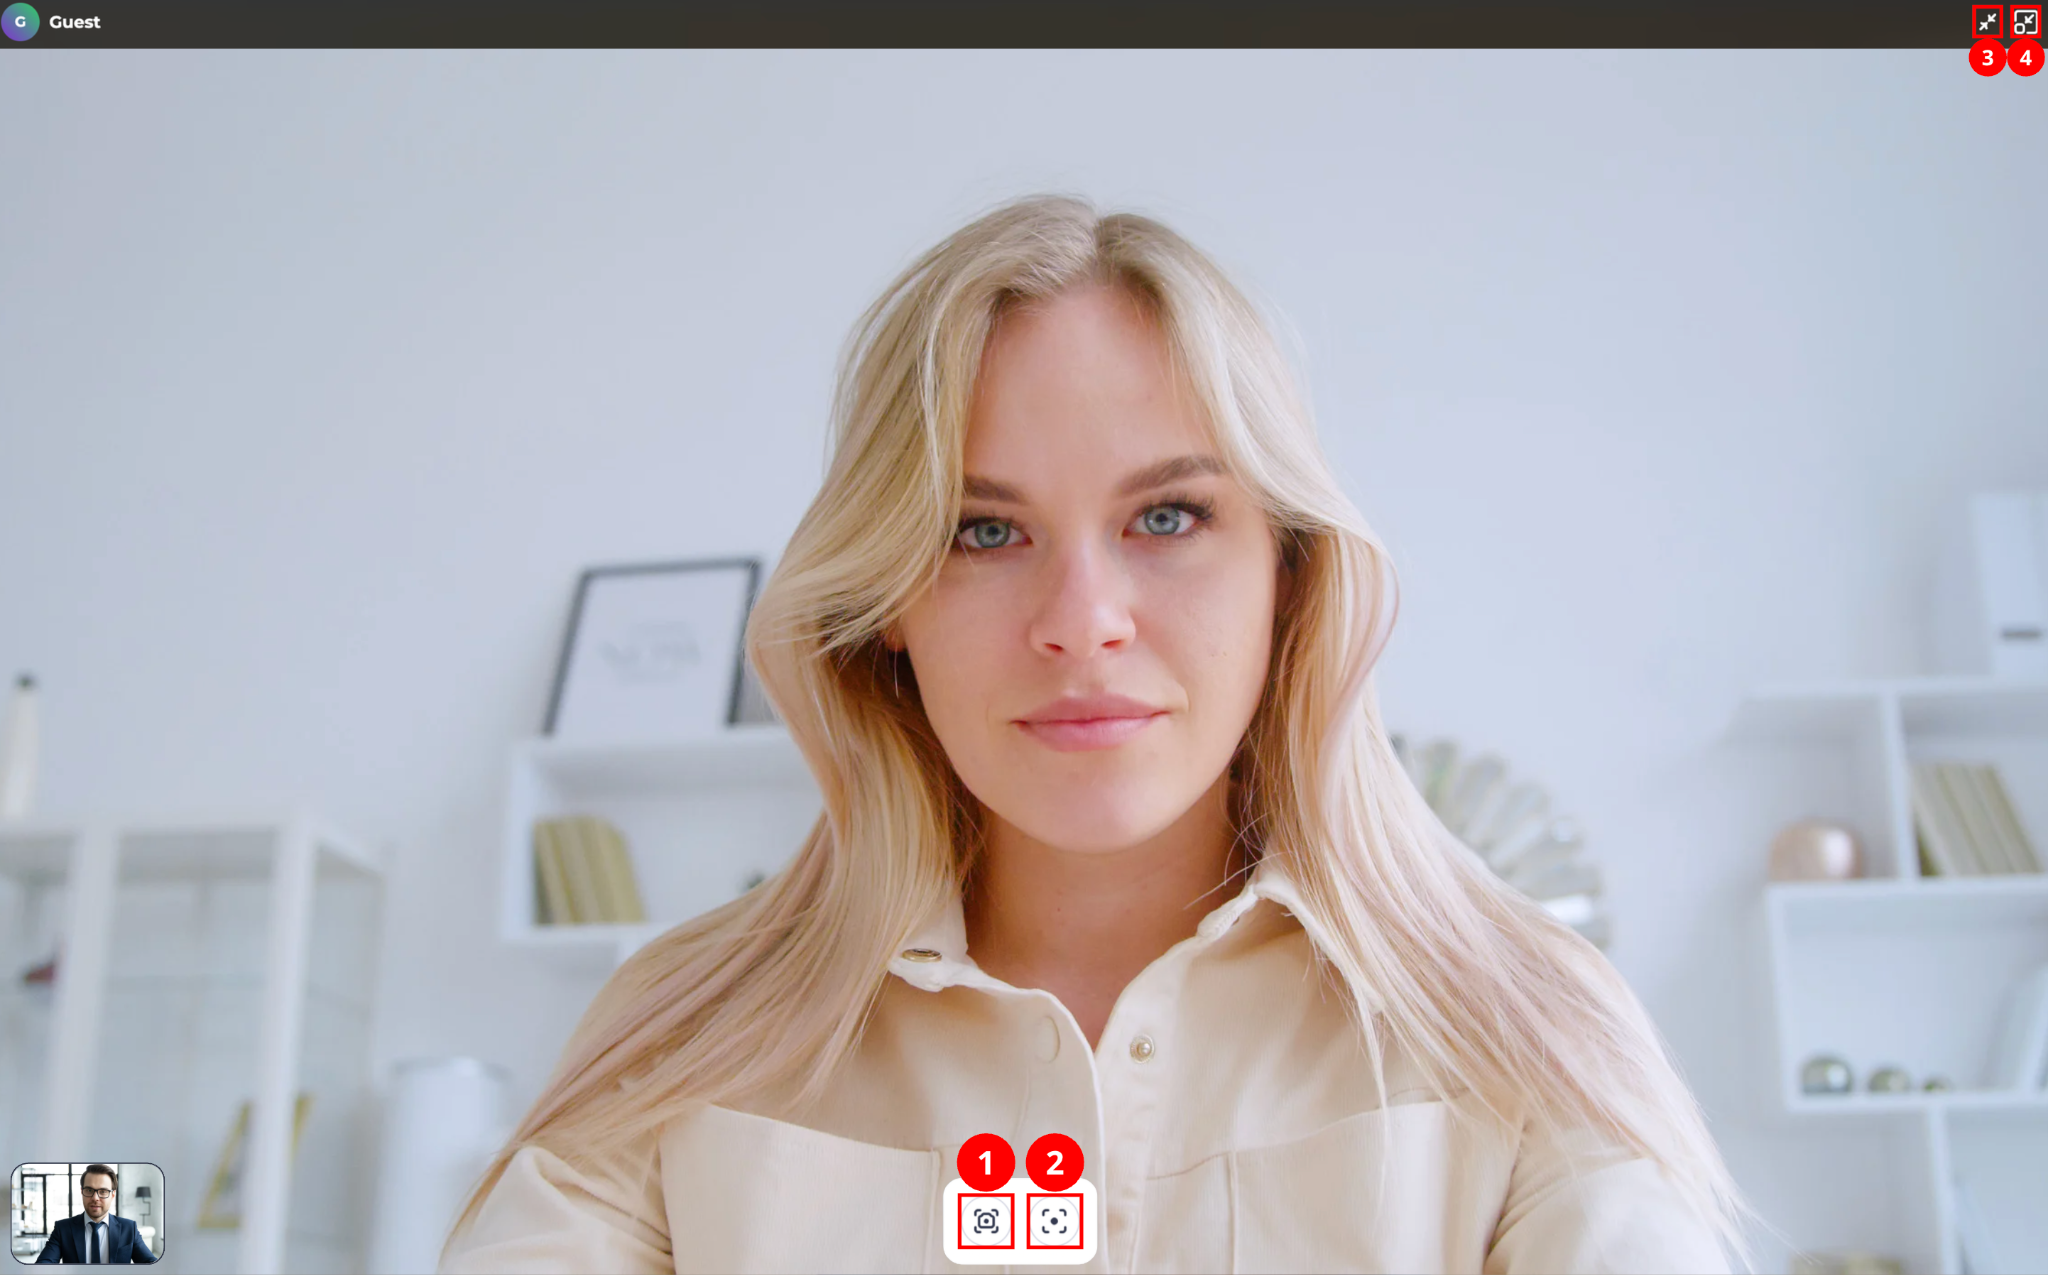
Expand the video call window to full screen (Fig. 11.(1)) — opens the video call in full-screen mode (Fig. 13).
-
Expand the video call window (Fig. 11.(2)) — opens the video call in expanded mode (Fig. 12).
-
Take a screenshot

-
Start a video call recording (Fig. 11.(4)).
3.2.2. Video Call Interface in the Medium-Size Window
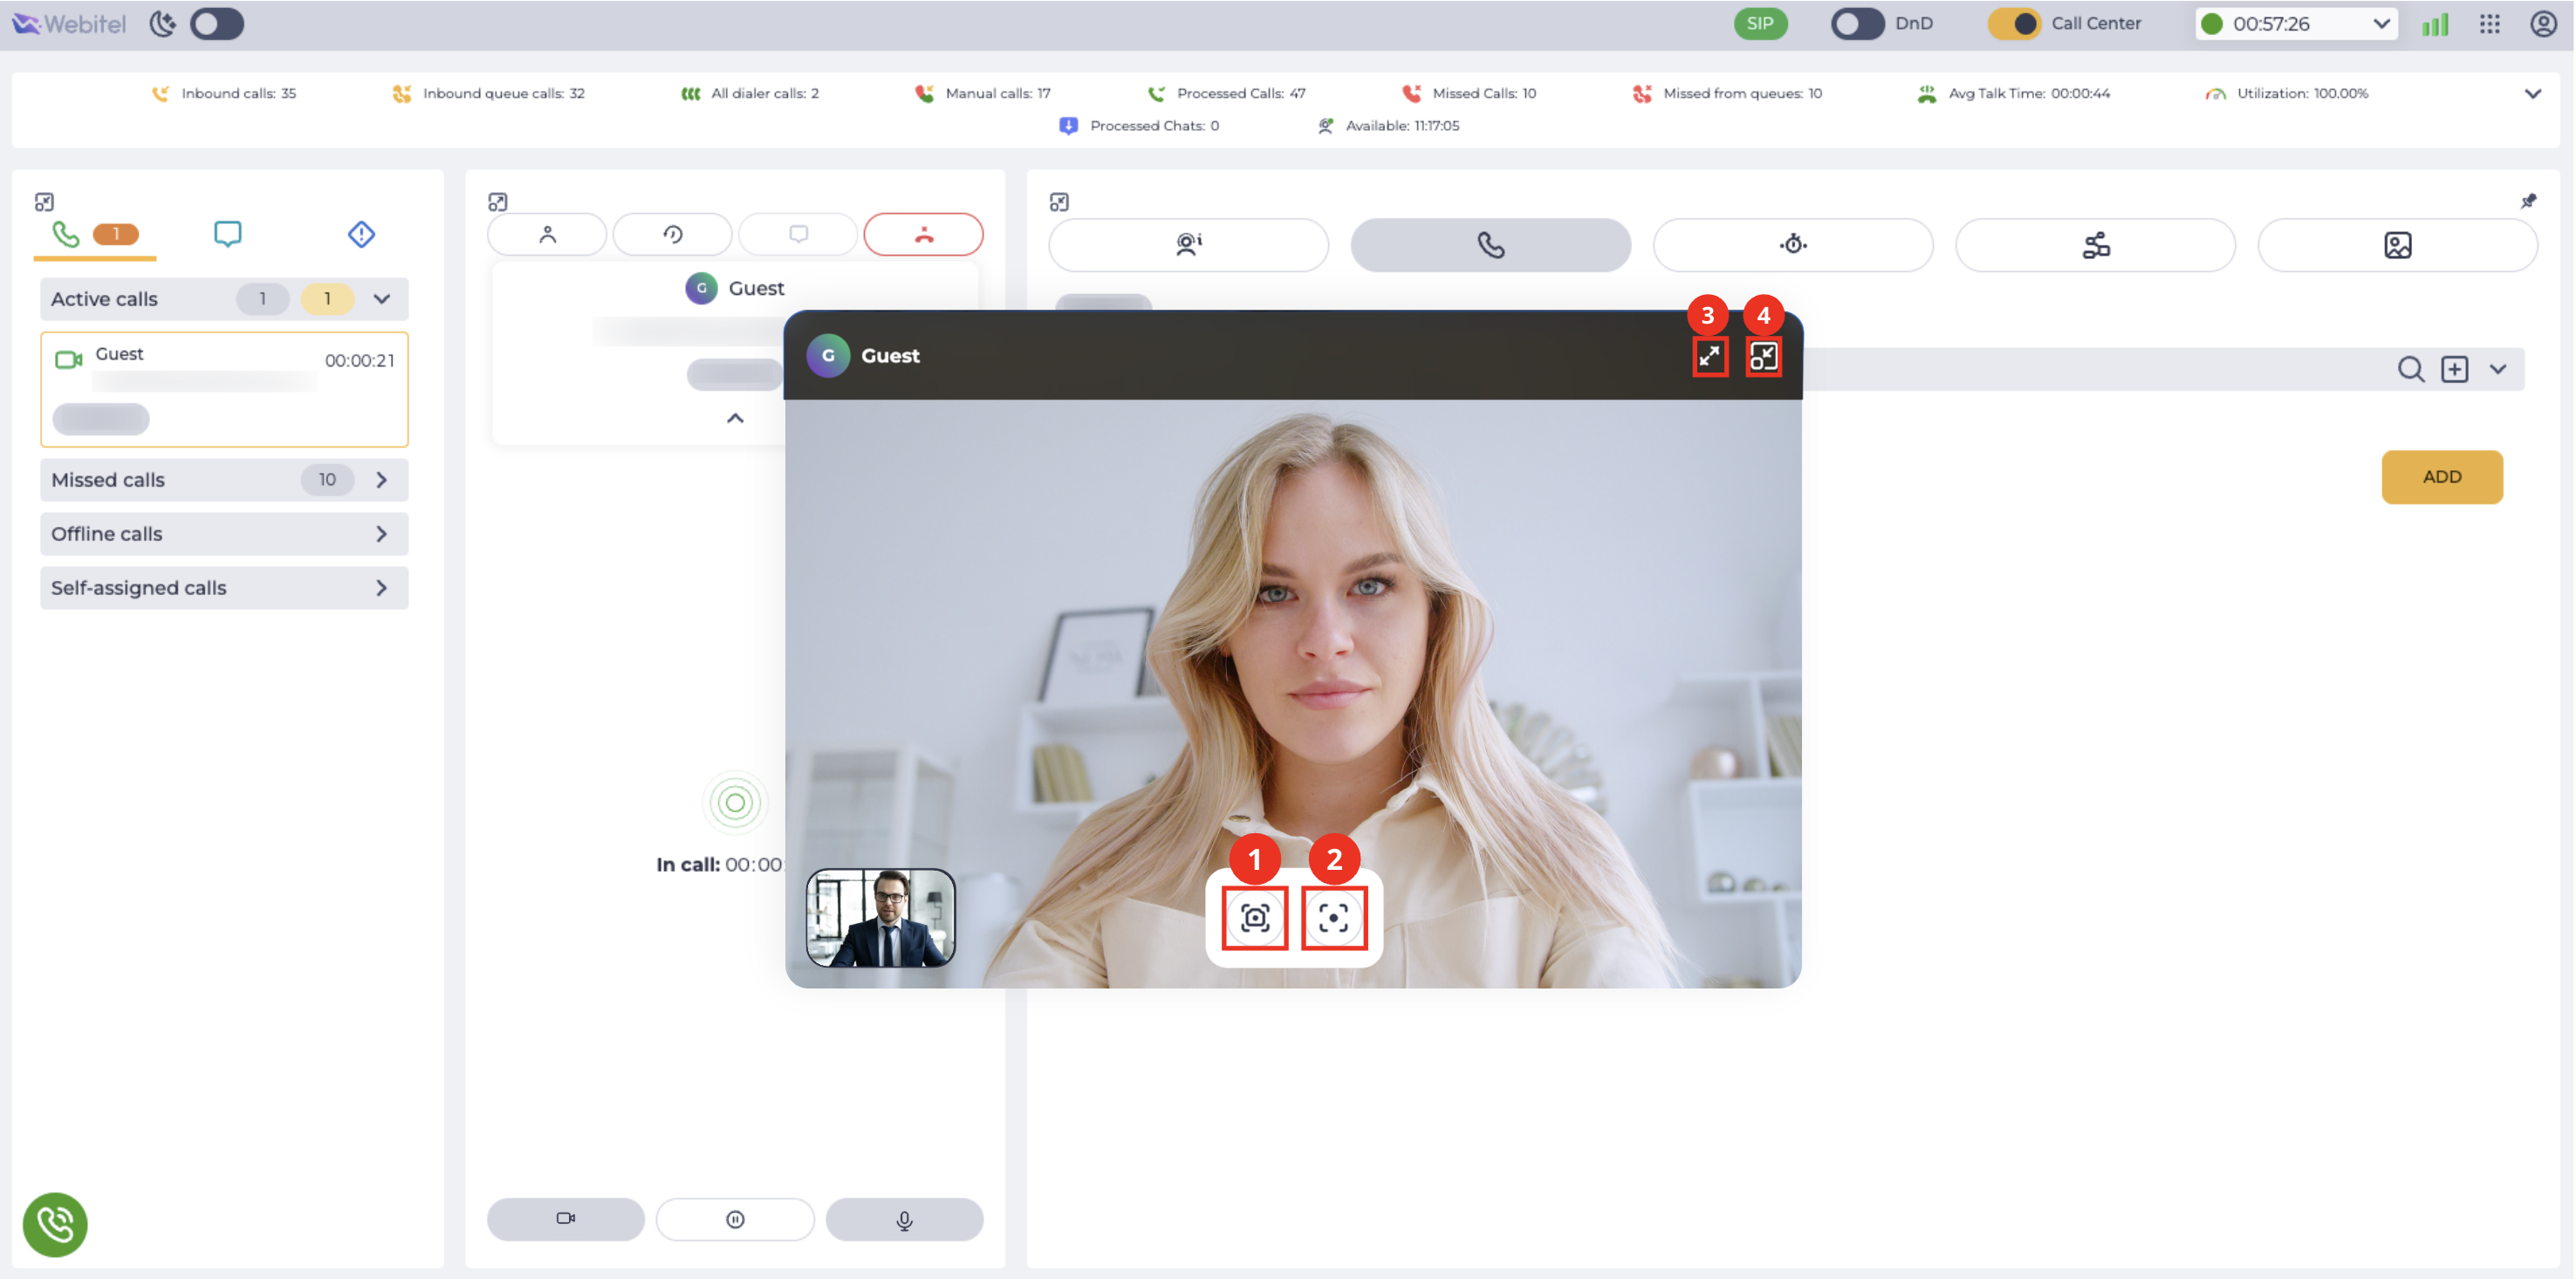
After clicking the expand button (Fig. 11.(2)), the medium-size video call window opens (Fig. 12), with the following functions available:
-
Take a screenshot
-
Start a video call recording

-
Expand the video call window to full screen

-
Return the video call window to mini-window
3.2.3. Full-Screen Mode
The agent can expand the video to full screen by clicking the full-screen button
The following functions are available in full-screen mode:
-
Take a screenshot
-
Start a video call recording
-
Return the video call window to mini-size

-
Return the video call window to medium size
3.3. Chat During a Video Call
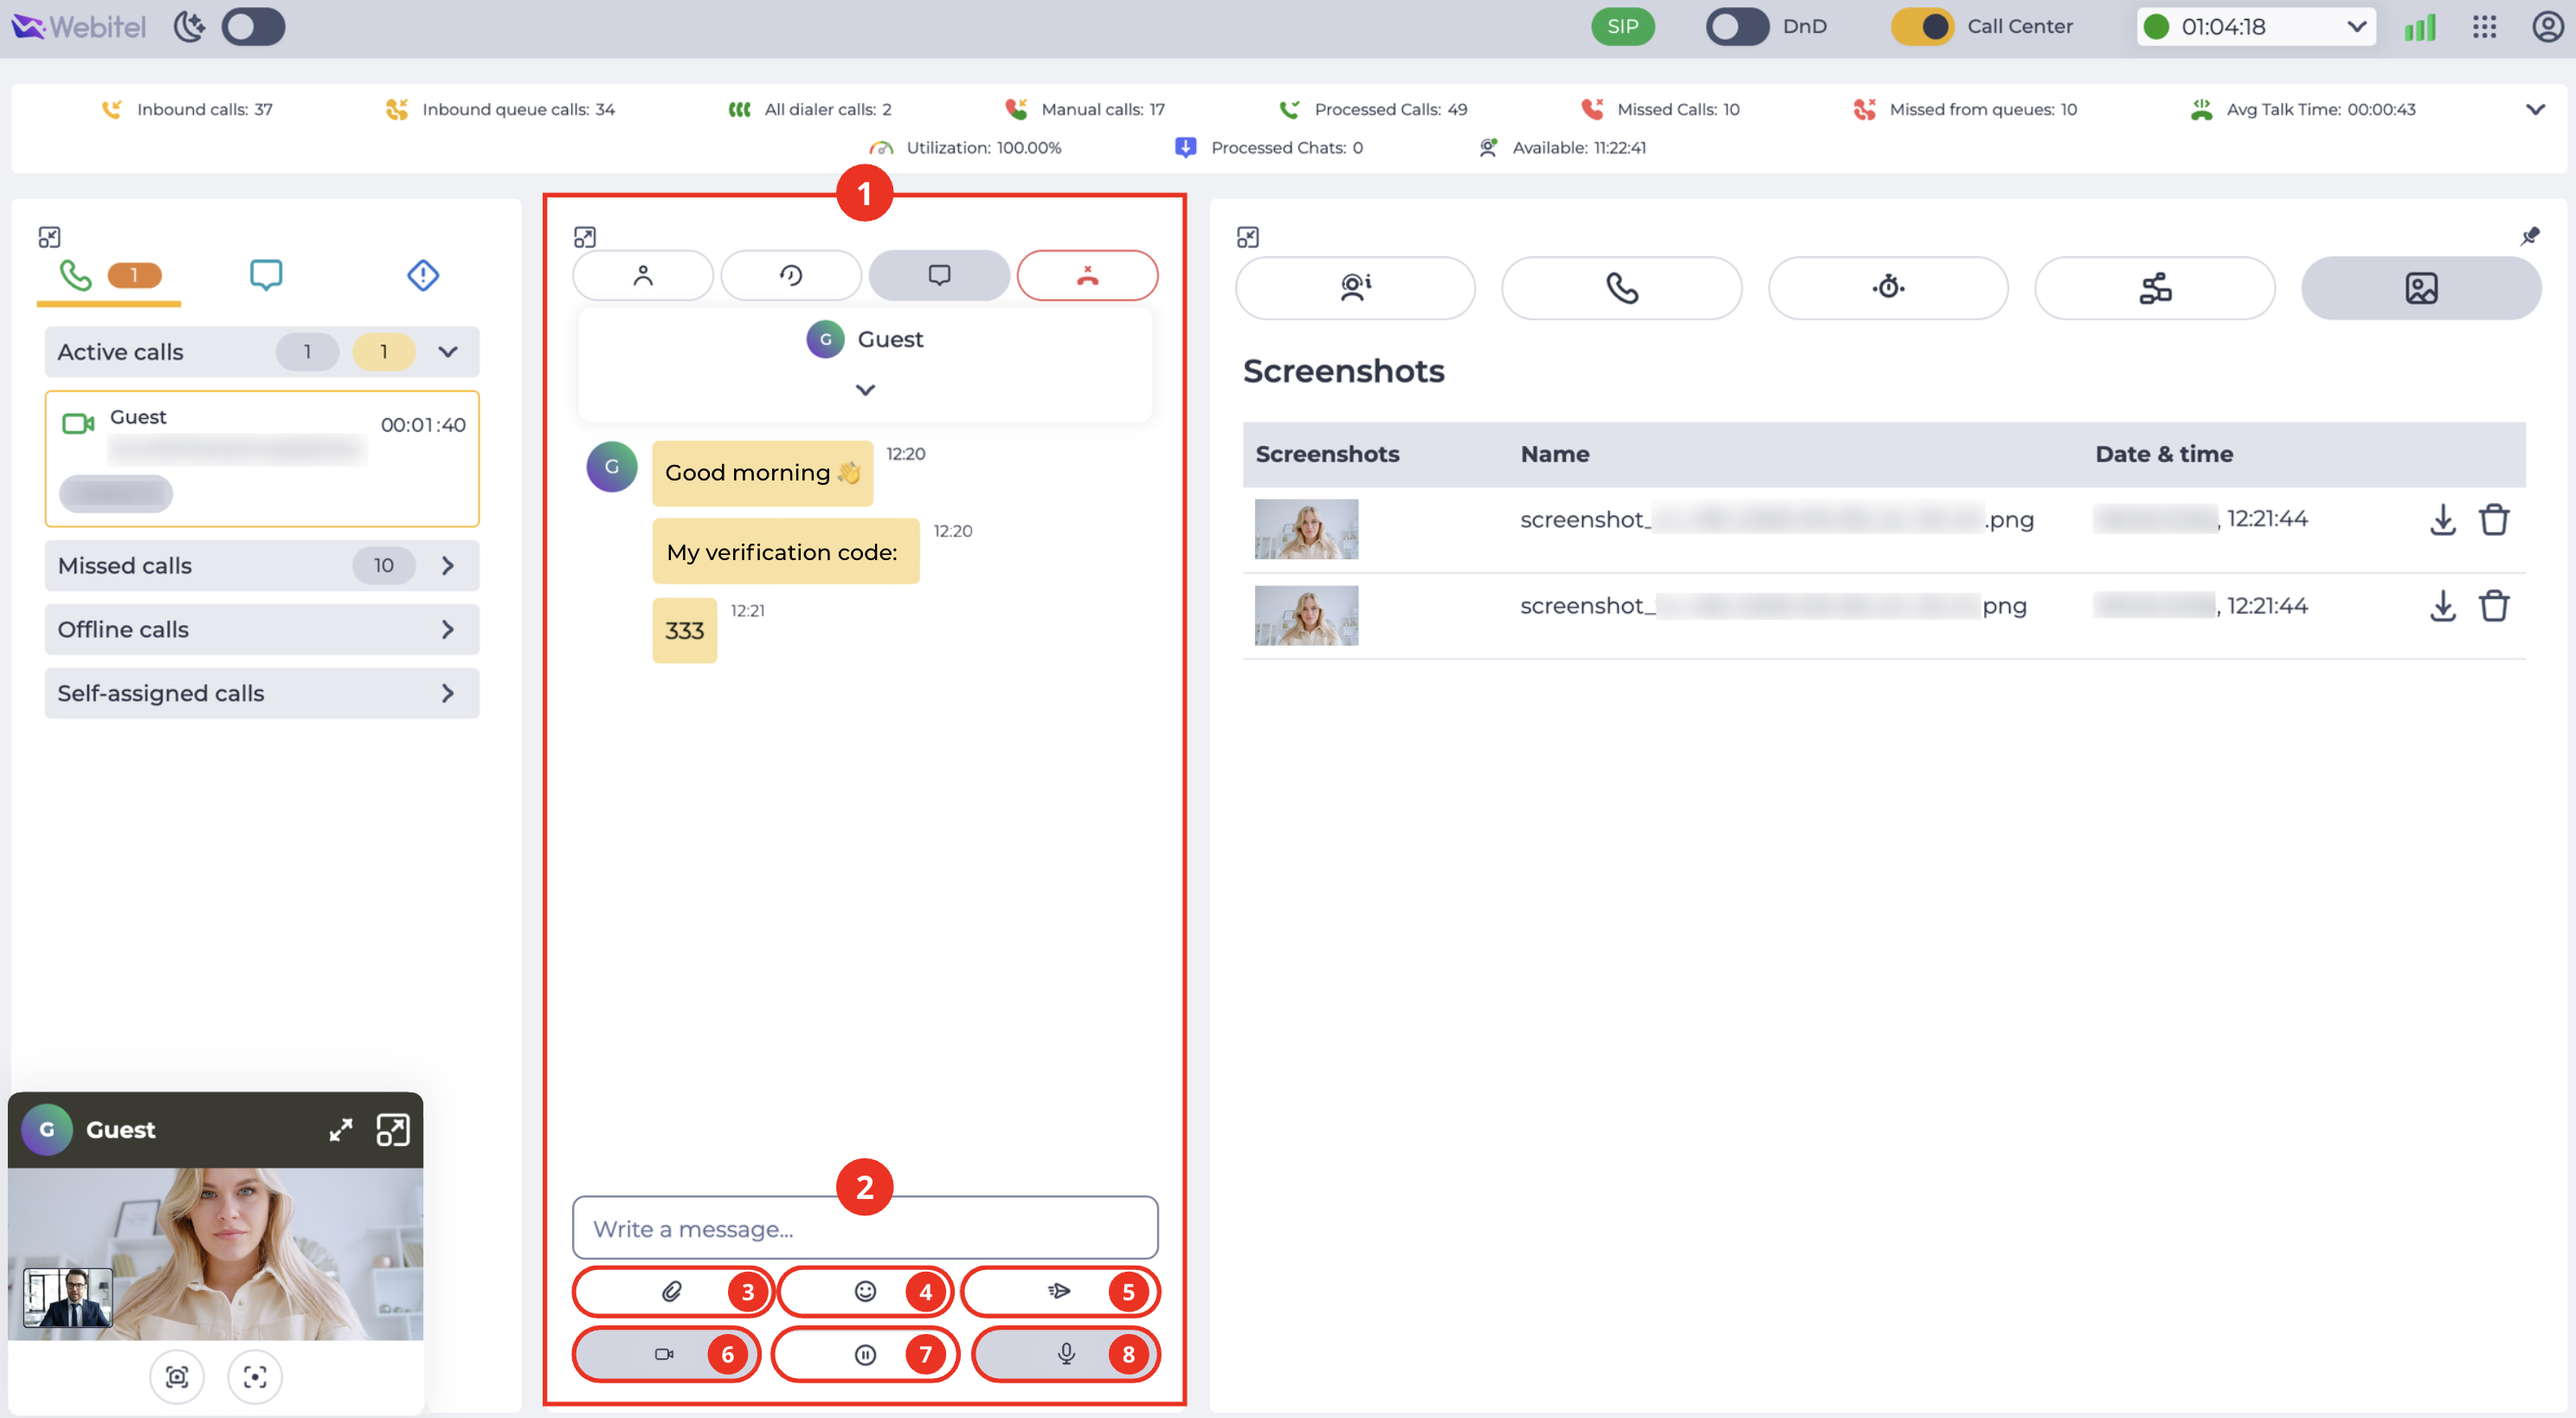
During a video call, the agent can use the chat to communicate with the client. The chat interface is displayed in the central part of Workspace (Fig. 14.(1)).
The chat opens automatically after the first message from the client. Until the first message is received, the chat remains unavailable to the agent.
The following features are available in the chat:
-
text message input (Fig. 14.(2));
-
file attachment (Fig. 14.(3));
-
emoji attachment (Fig. 14.(4));
-
send message (Fig. 14.(5));
-
camera icon (Fig. 14.(6)) — enables
-
hold icon (Fig. 14.(7)) — puts the video call on hold;
-
microphone icon (Fig. 14.(8)) — enables
3.4. Taking Screenshots
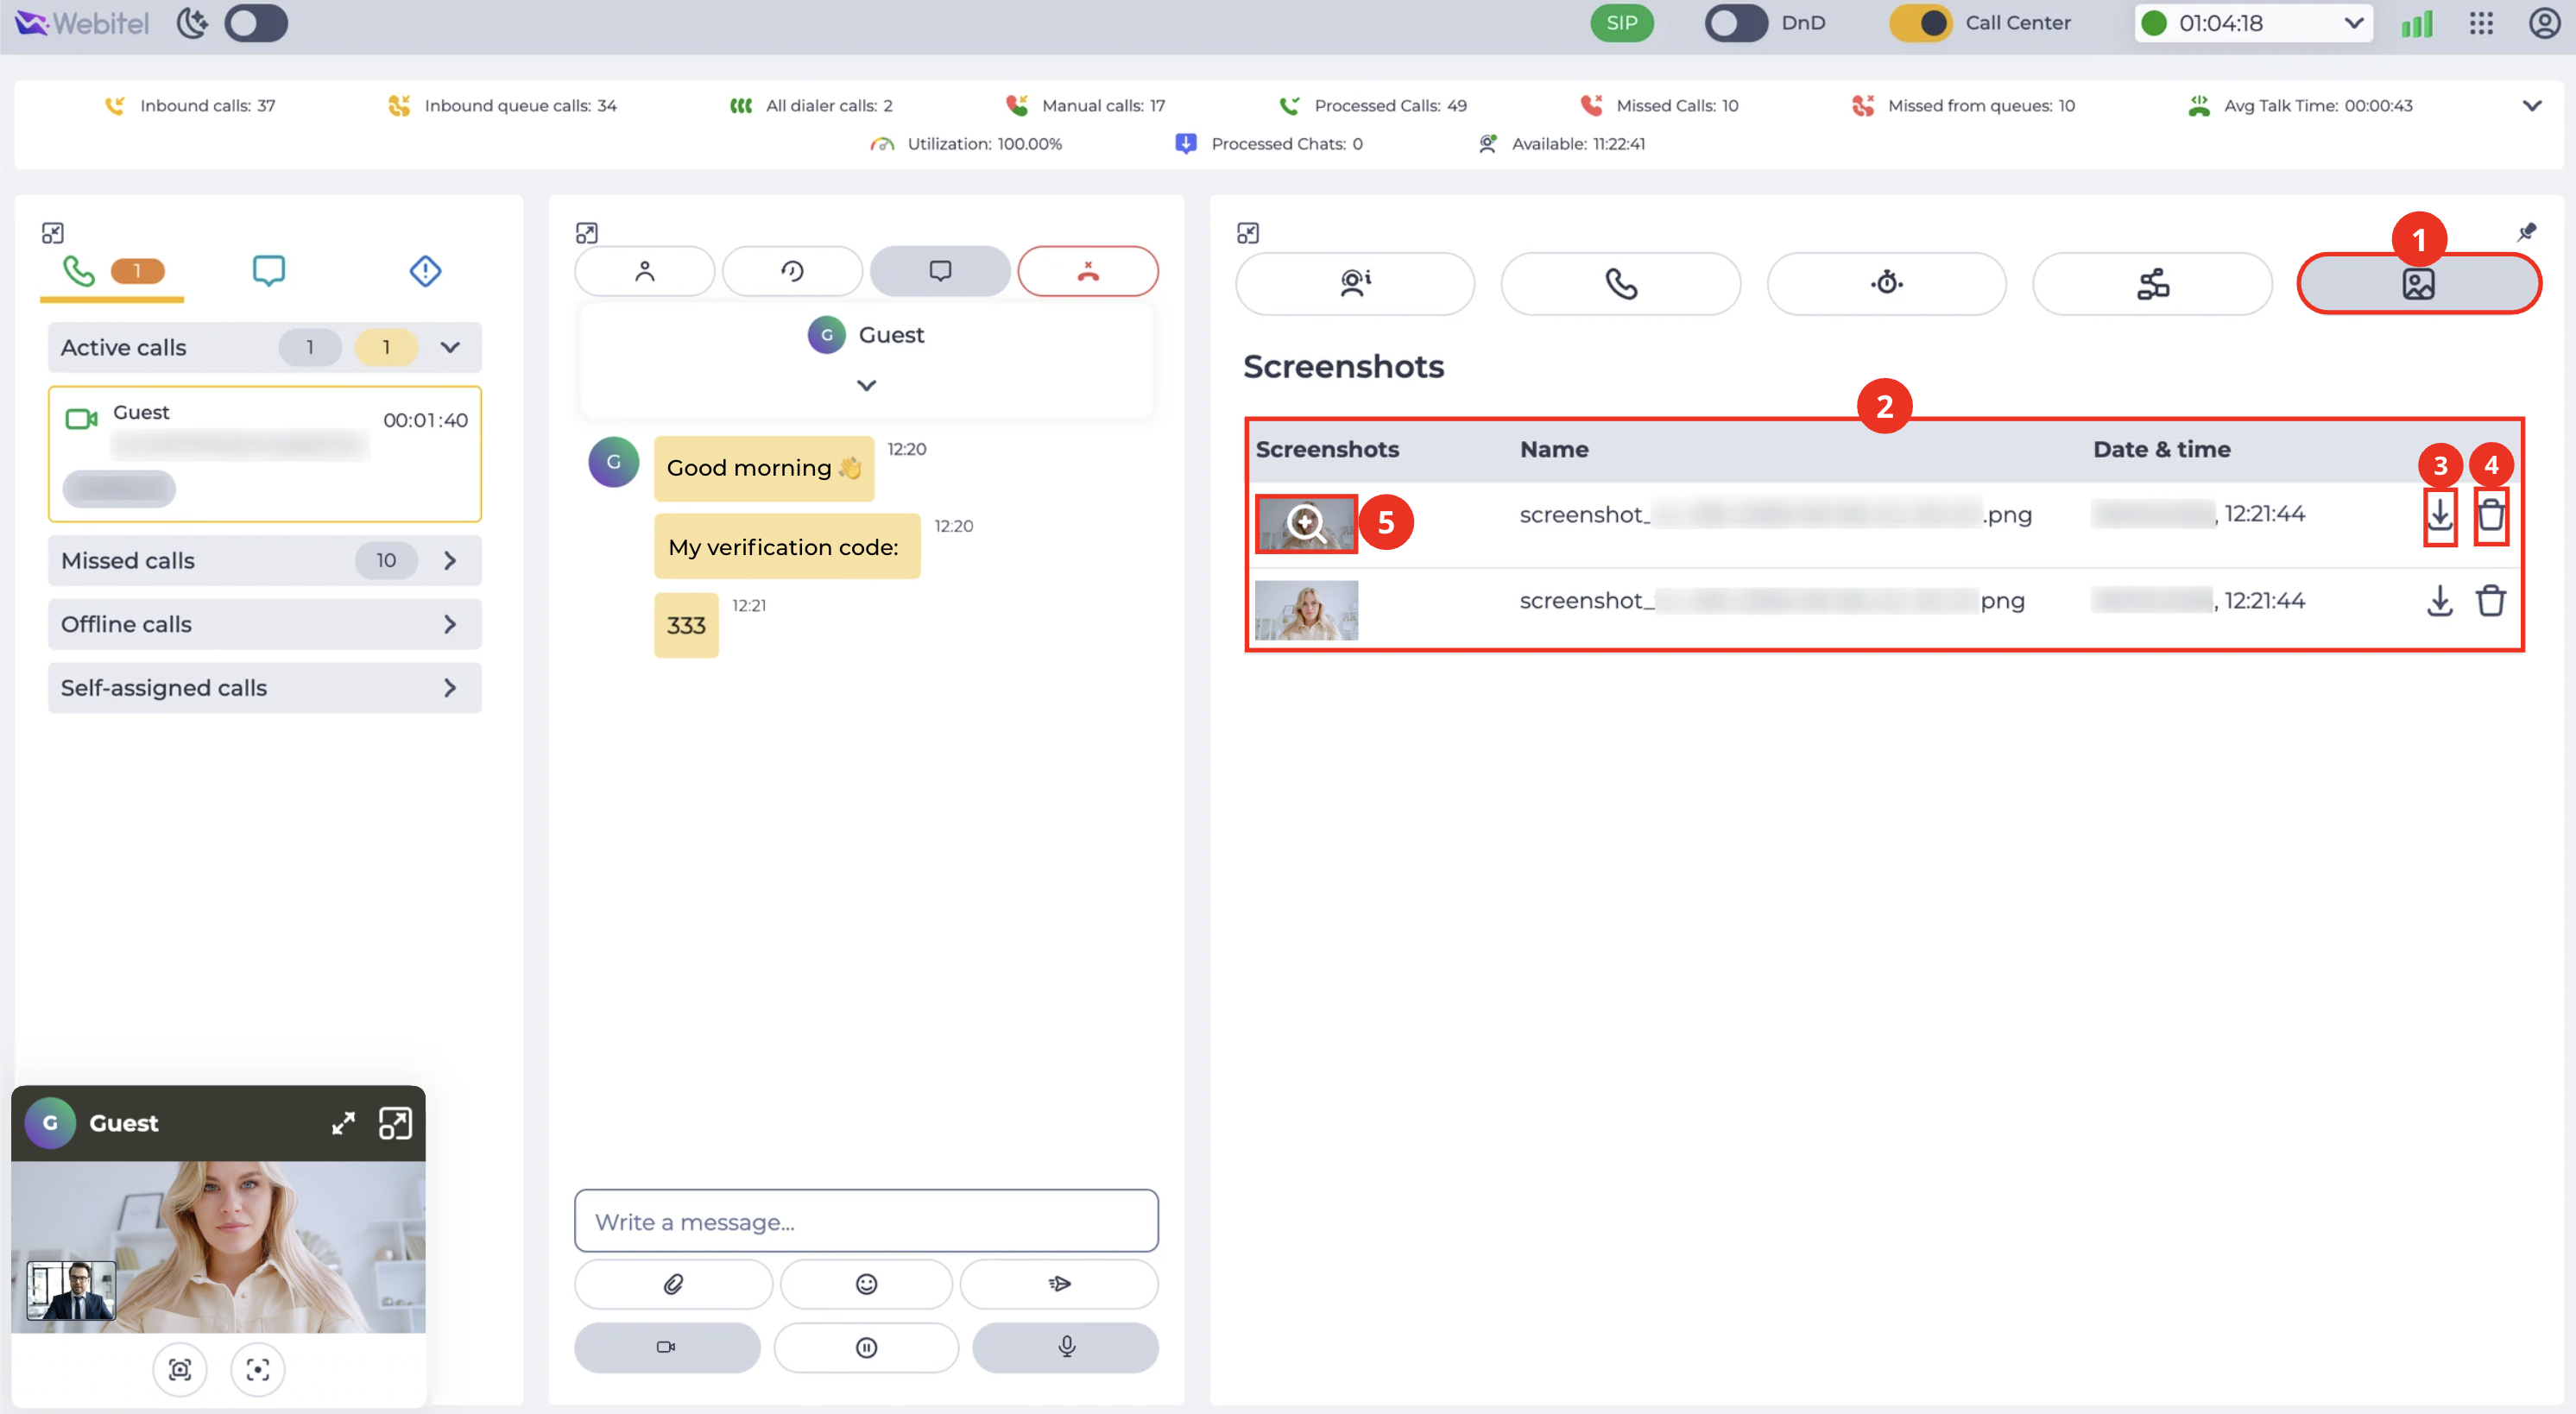
During a video call, the agent can take screenshots of the client's image.
The captured screenshots are displayed on the Screenshots tab, which opens after clicking the button 
The tab displays a list of all captured screenshots (Fig. 15.(2)), showing the name, date, and time of creation for each file.
The following actions are available for each screenshot:
-
download the file (Fig. 15.(3));
-
delete the file (Fig. 15.(4));
-
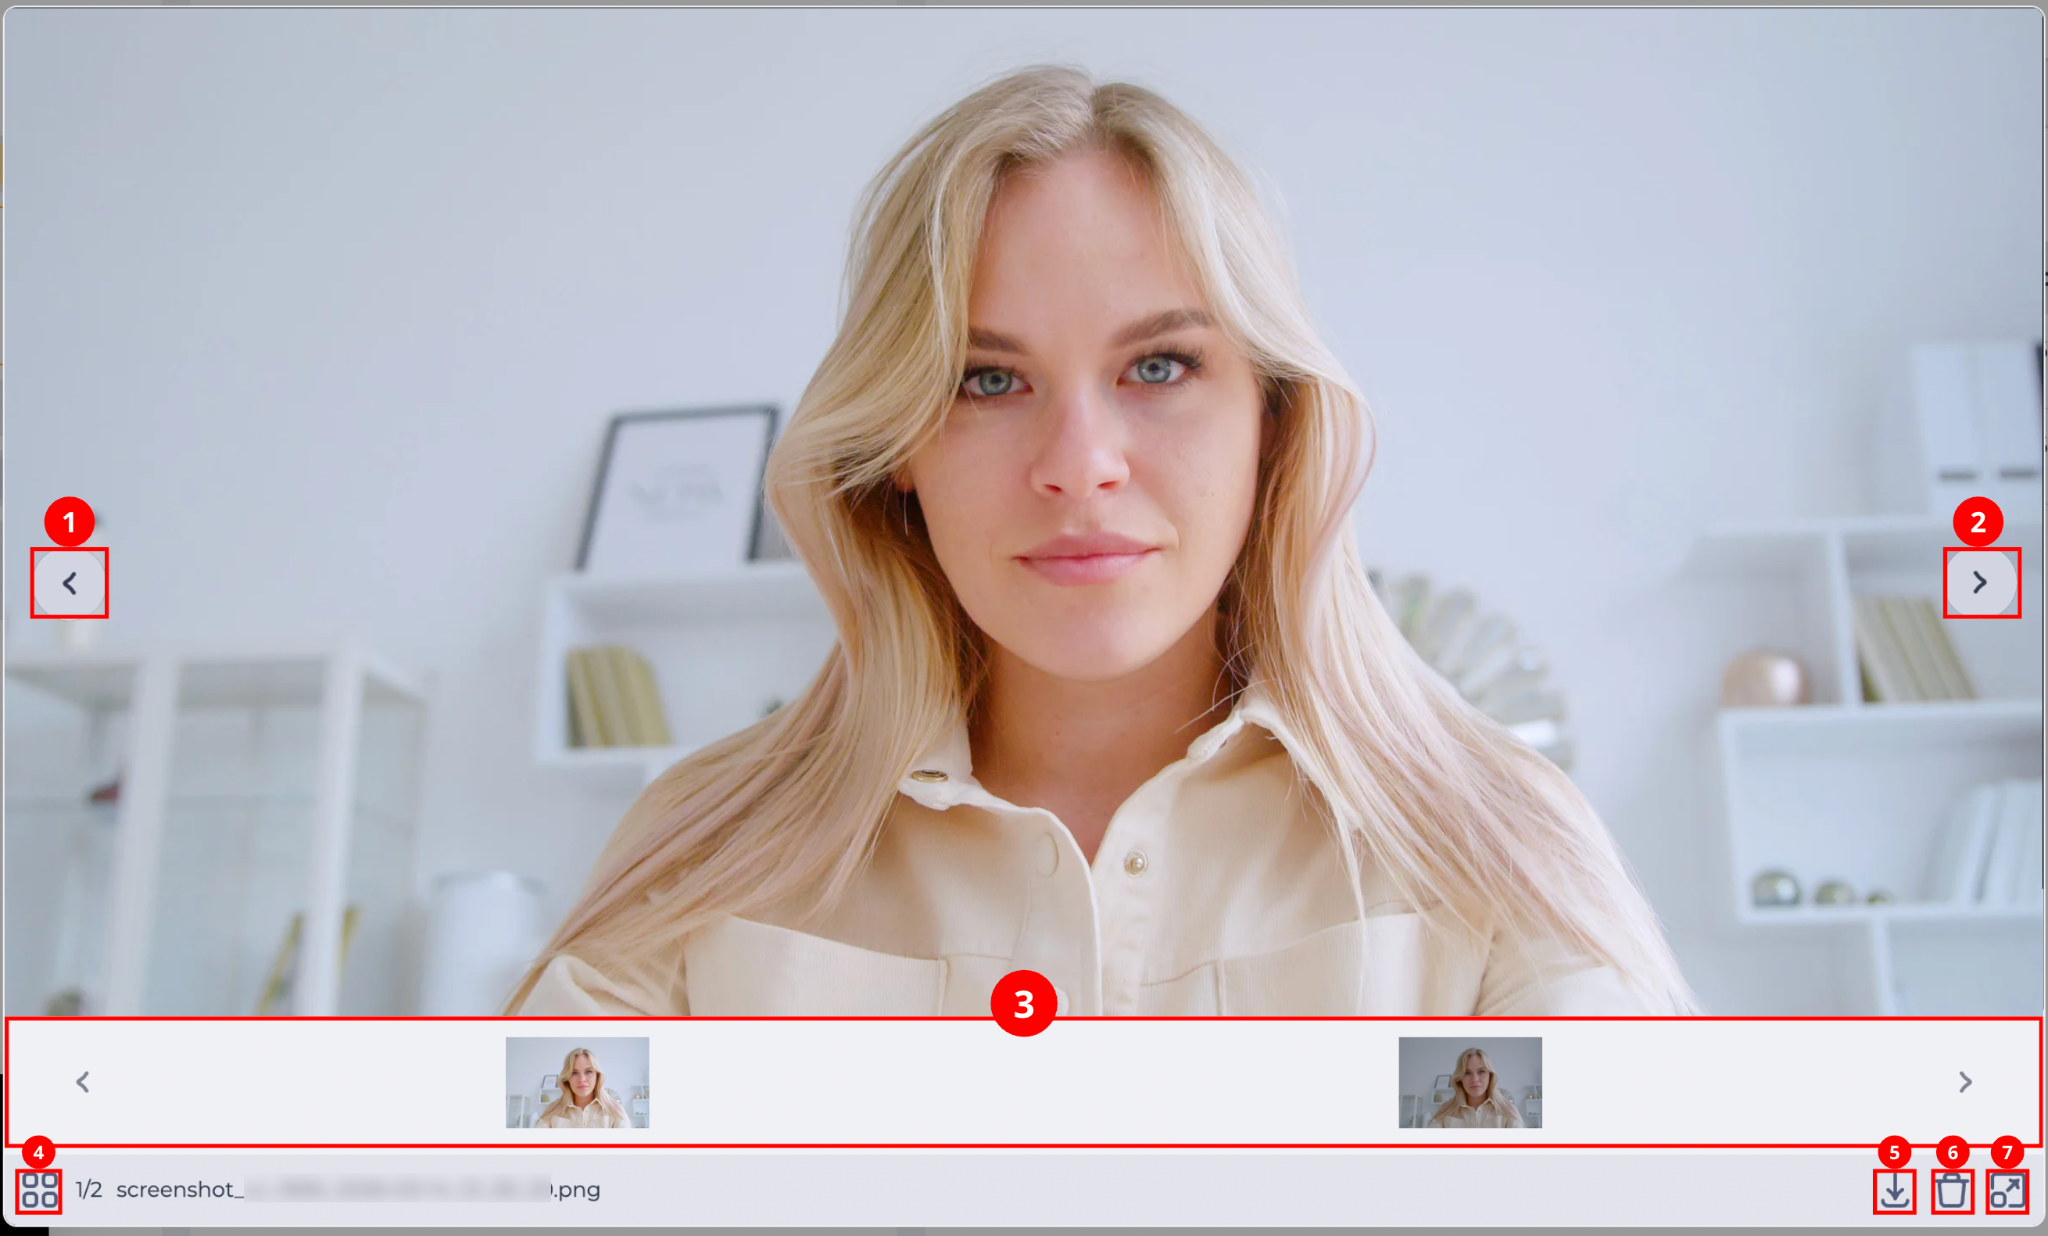
view the screenshot — after clicking the view icon (Fig. 15.(5)), the image viewer opens (Fig. 16).
The following elements are available in the screenshot viewer:
-
navigate to the previous image (Fig. 16.(1));
-
navigate to the next image (Fig. 16.(2));
-
screenshot thumbnail gallery (Fig. 16.(3));
-
open and close the thumbnail gallery (Fig. 16.(4));
-
download the image (Fig. 16.(5));
-
delete the image (Fig. 16.(6));
-
open the image in full-screen size (Fig. 16.(7)).
3.5. Ending the Call
To end the video call, the agent clicks the end call button 
After clicking the button, the connection with the client is terminated and the video call closes in Workspace.
4. Reviewing Video Calls ("History")
4.1. Finding a Video Call
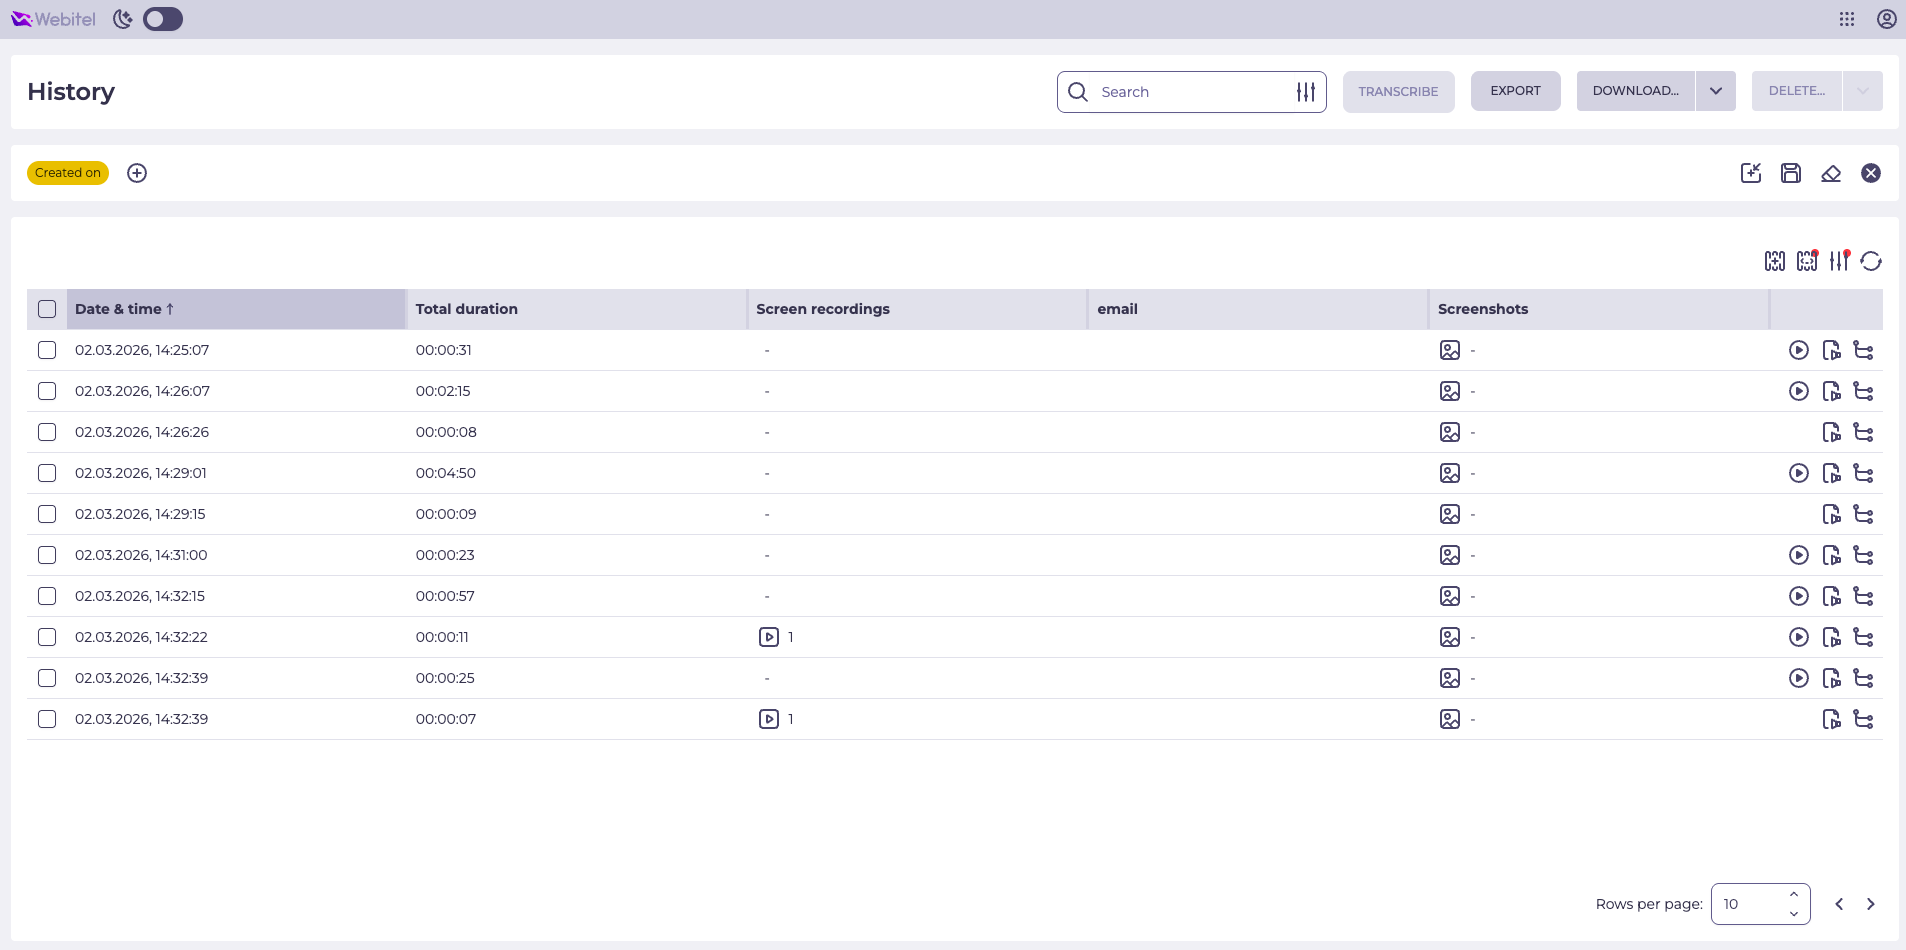
The History section displays a list of all completed calls (Fig. 17).
The following information is shown for each call in the table:
-
date and time of the call;
-
direction;
-
user;
-
total duration;
-
talk duration;
-
end reason.
The agent can find the required video call in the list and open its card to view detailed information.
4.2. Viewing the Client's Rating
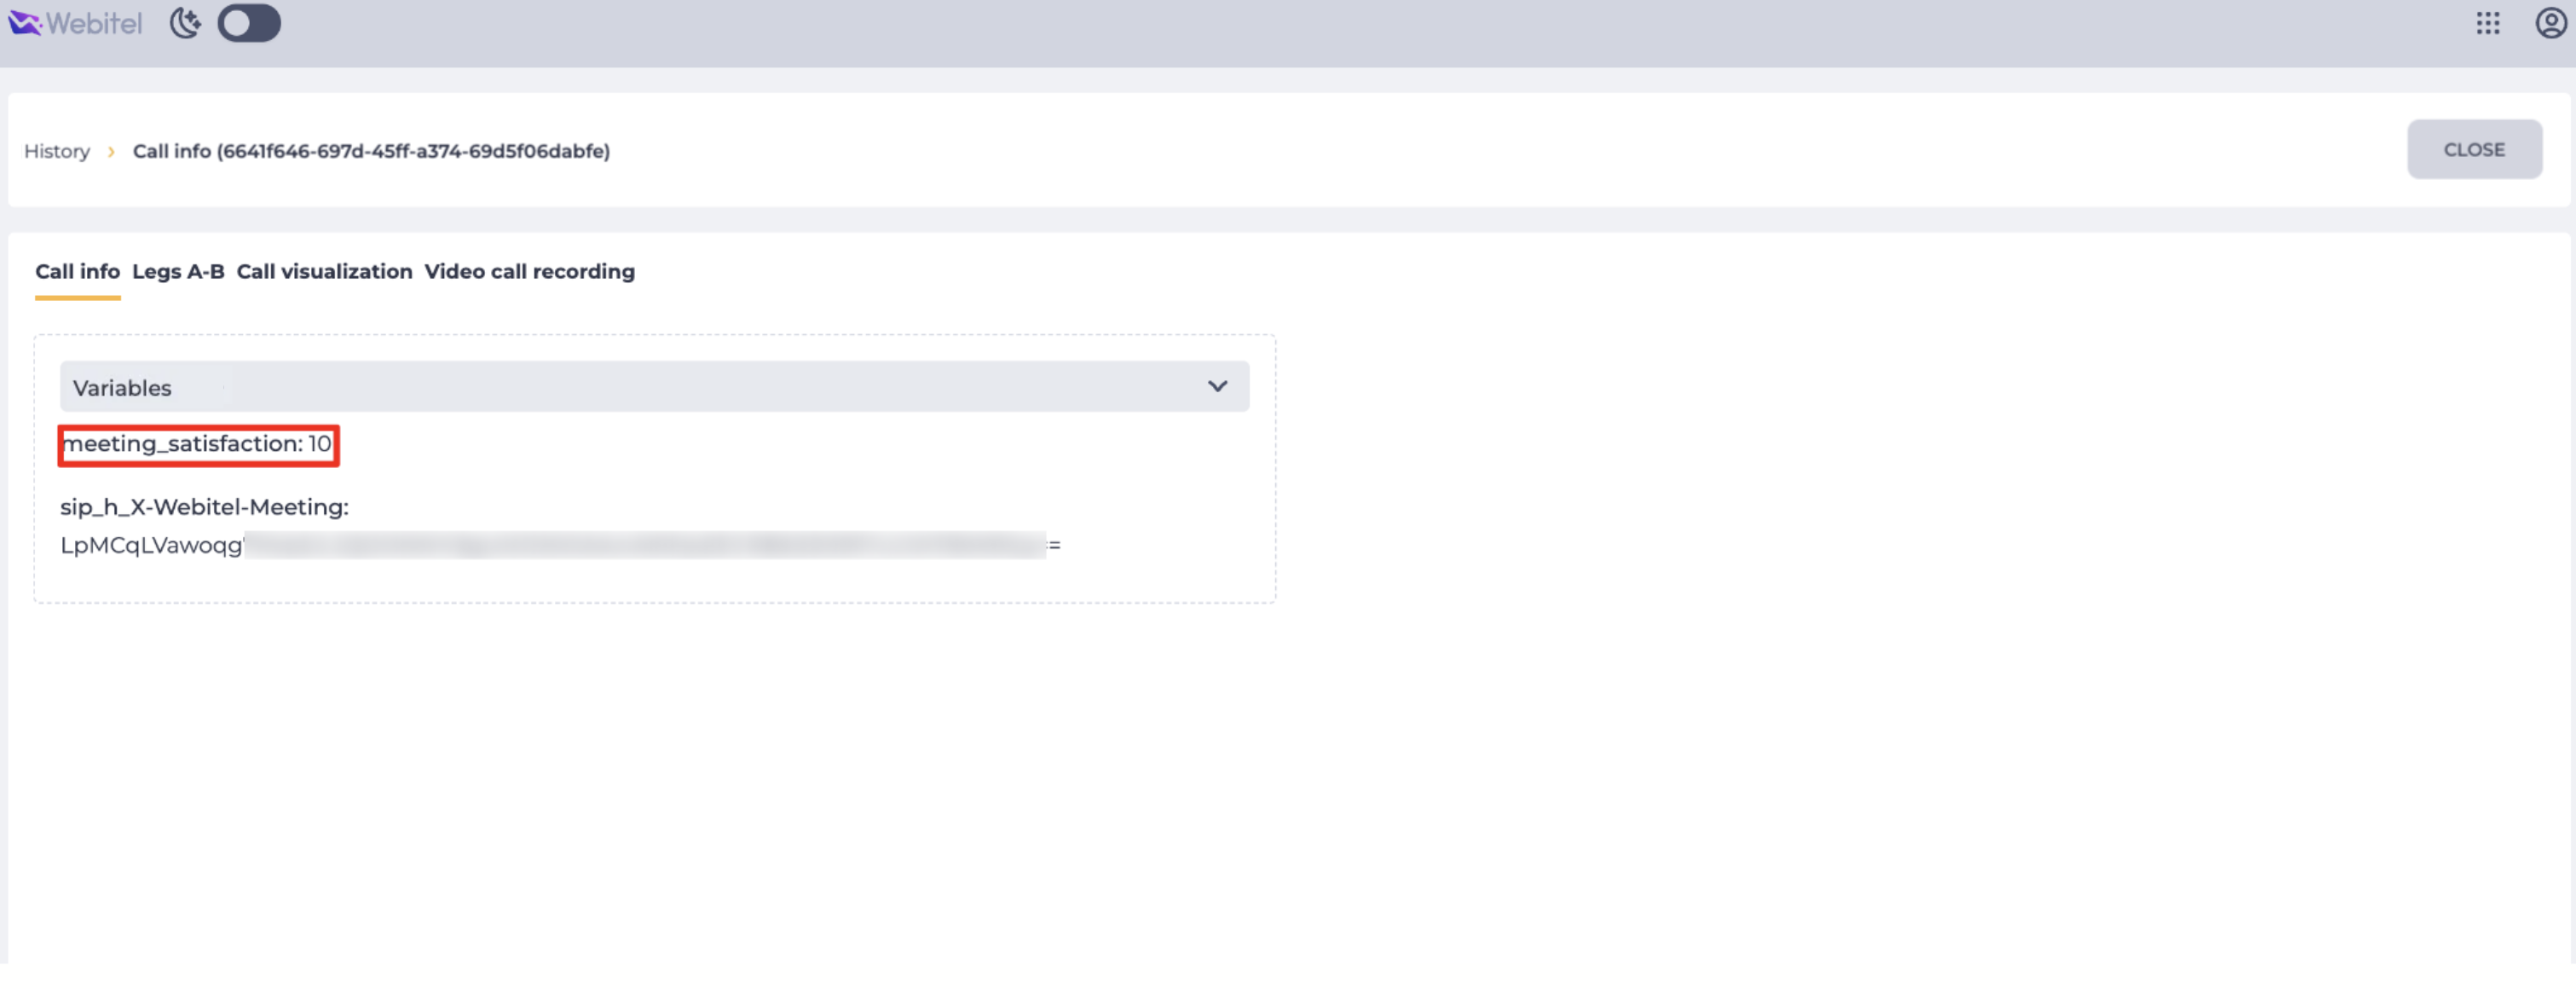
In the call card, on the Call info tab, in the Variables block, the rating left by the client after the video call is displayed (Fig. 18).
The rating is saved in the meeting_satisfaction variable.
The value of this variable corresponds to the rating the client left after the video call ended.
4.3. Viewing the Video Call Recording
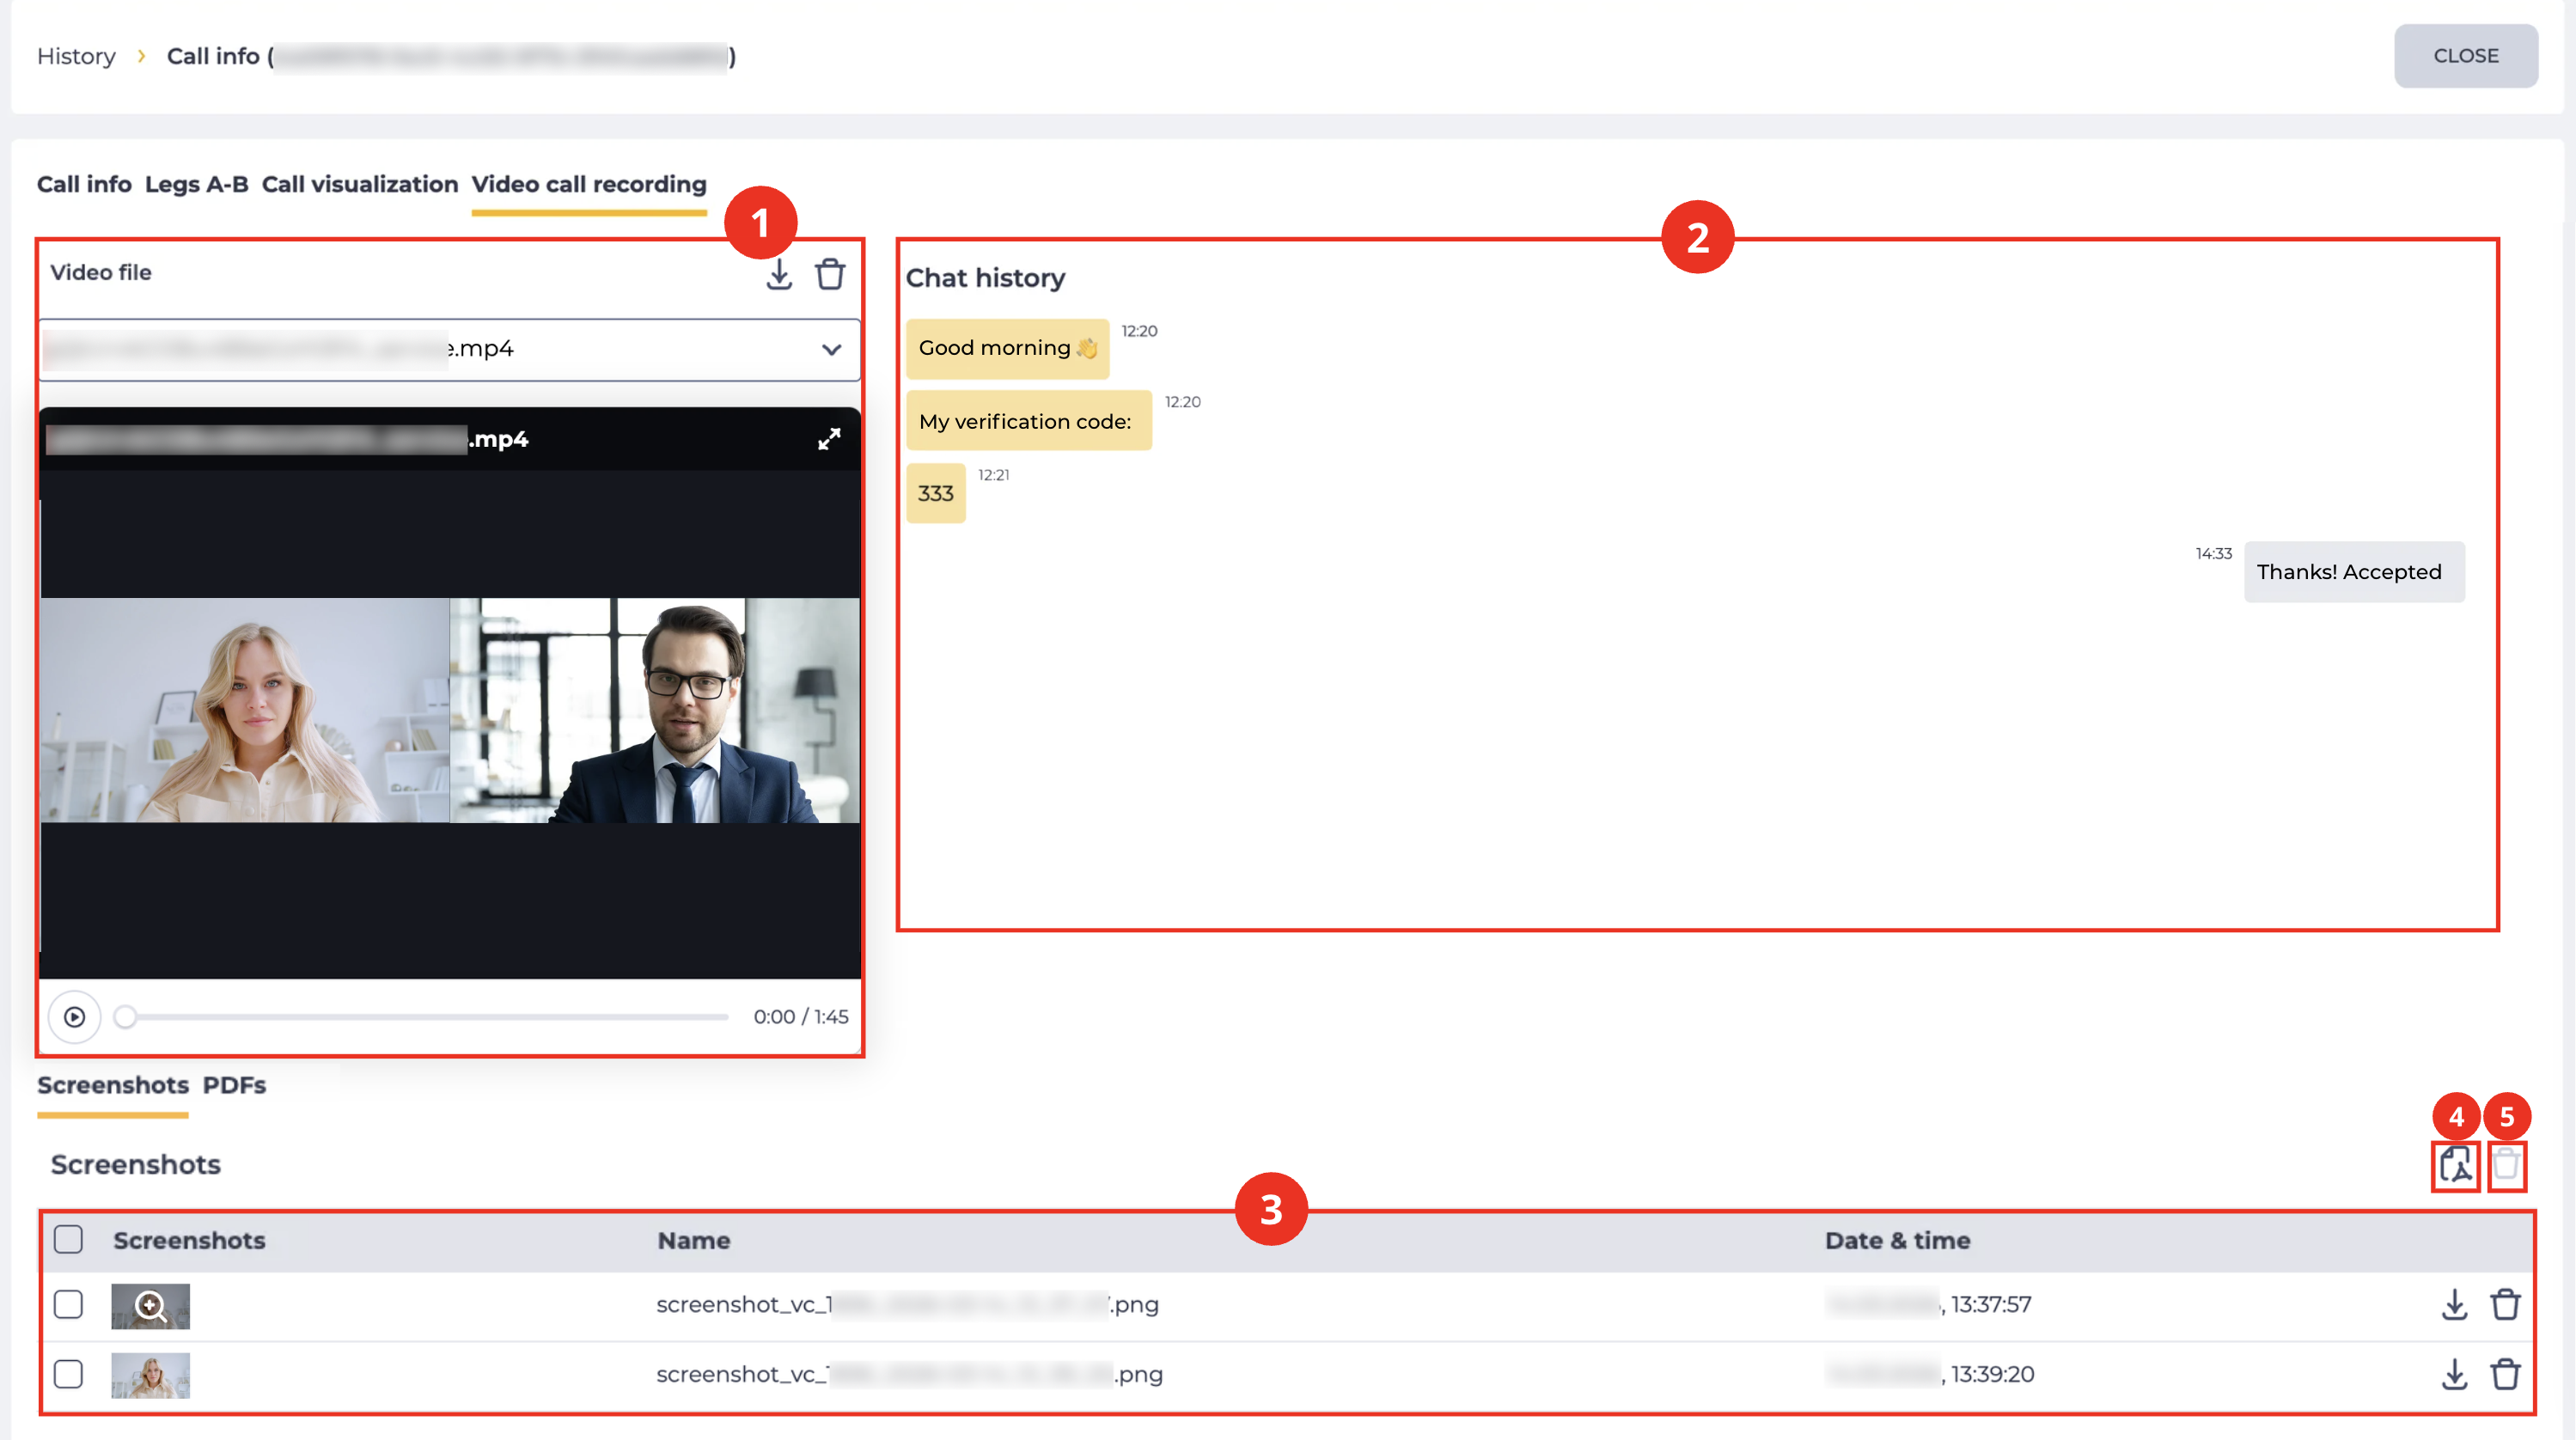
In the call card, on the Video Call Recording tab (Fig. 19), the following actions are available:
-
view, download, and delete the automatic and manual video call recording (Fig. 19.(1));
-
view the chat history (Fig. 19.(2));
-
view, download, or delete screenshots (Fig. 19.(3)) captured during the call;
-
generate a PDF file from screenshots captured during the call (Fig. 19.(4));
-
view, download, and delete PDF files generated from screenshots (Fig. 19.(5)).
4.3.1. Generating a PDF from Screenshots
On the PDFs tab, the system can automatically generate a PDF file from screenshots captured during the call.
The following information is displayed in the registry (Fig. 20.(1)):
-
PDF file name;
-
generation status;
-
date and time of creation;
-
user who created the file.
The following actions are available for PDF files:
-
refresh the registry to check the generation status (Fig. 20.(2));
-
bulk delete selected PDF files (Fig. 20.(3));
-
download a PDF file (Fig. 20.(4));
-
delete a PDF file (Fig. 20.(5)).
