
1. Description
The History app allows you to view the call history.
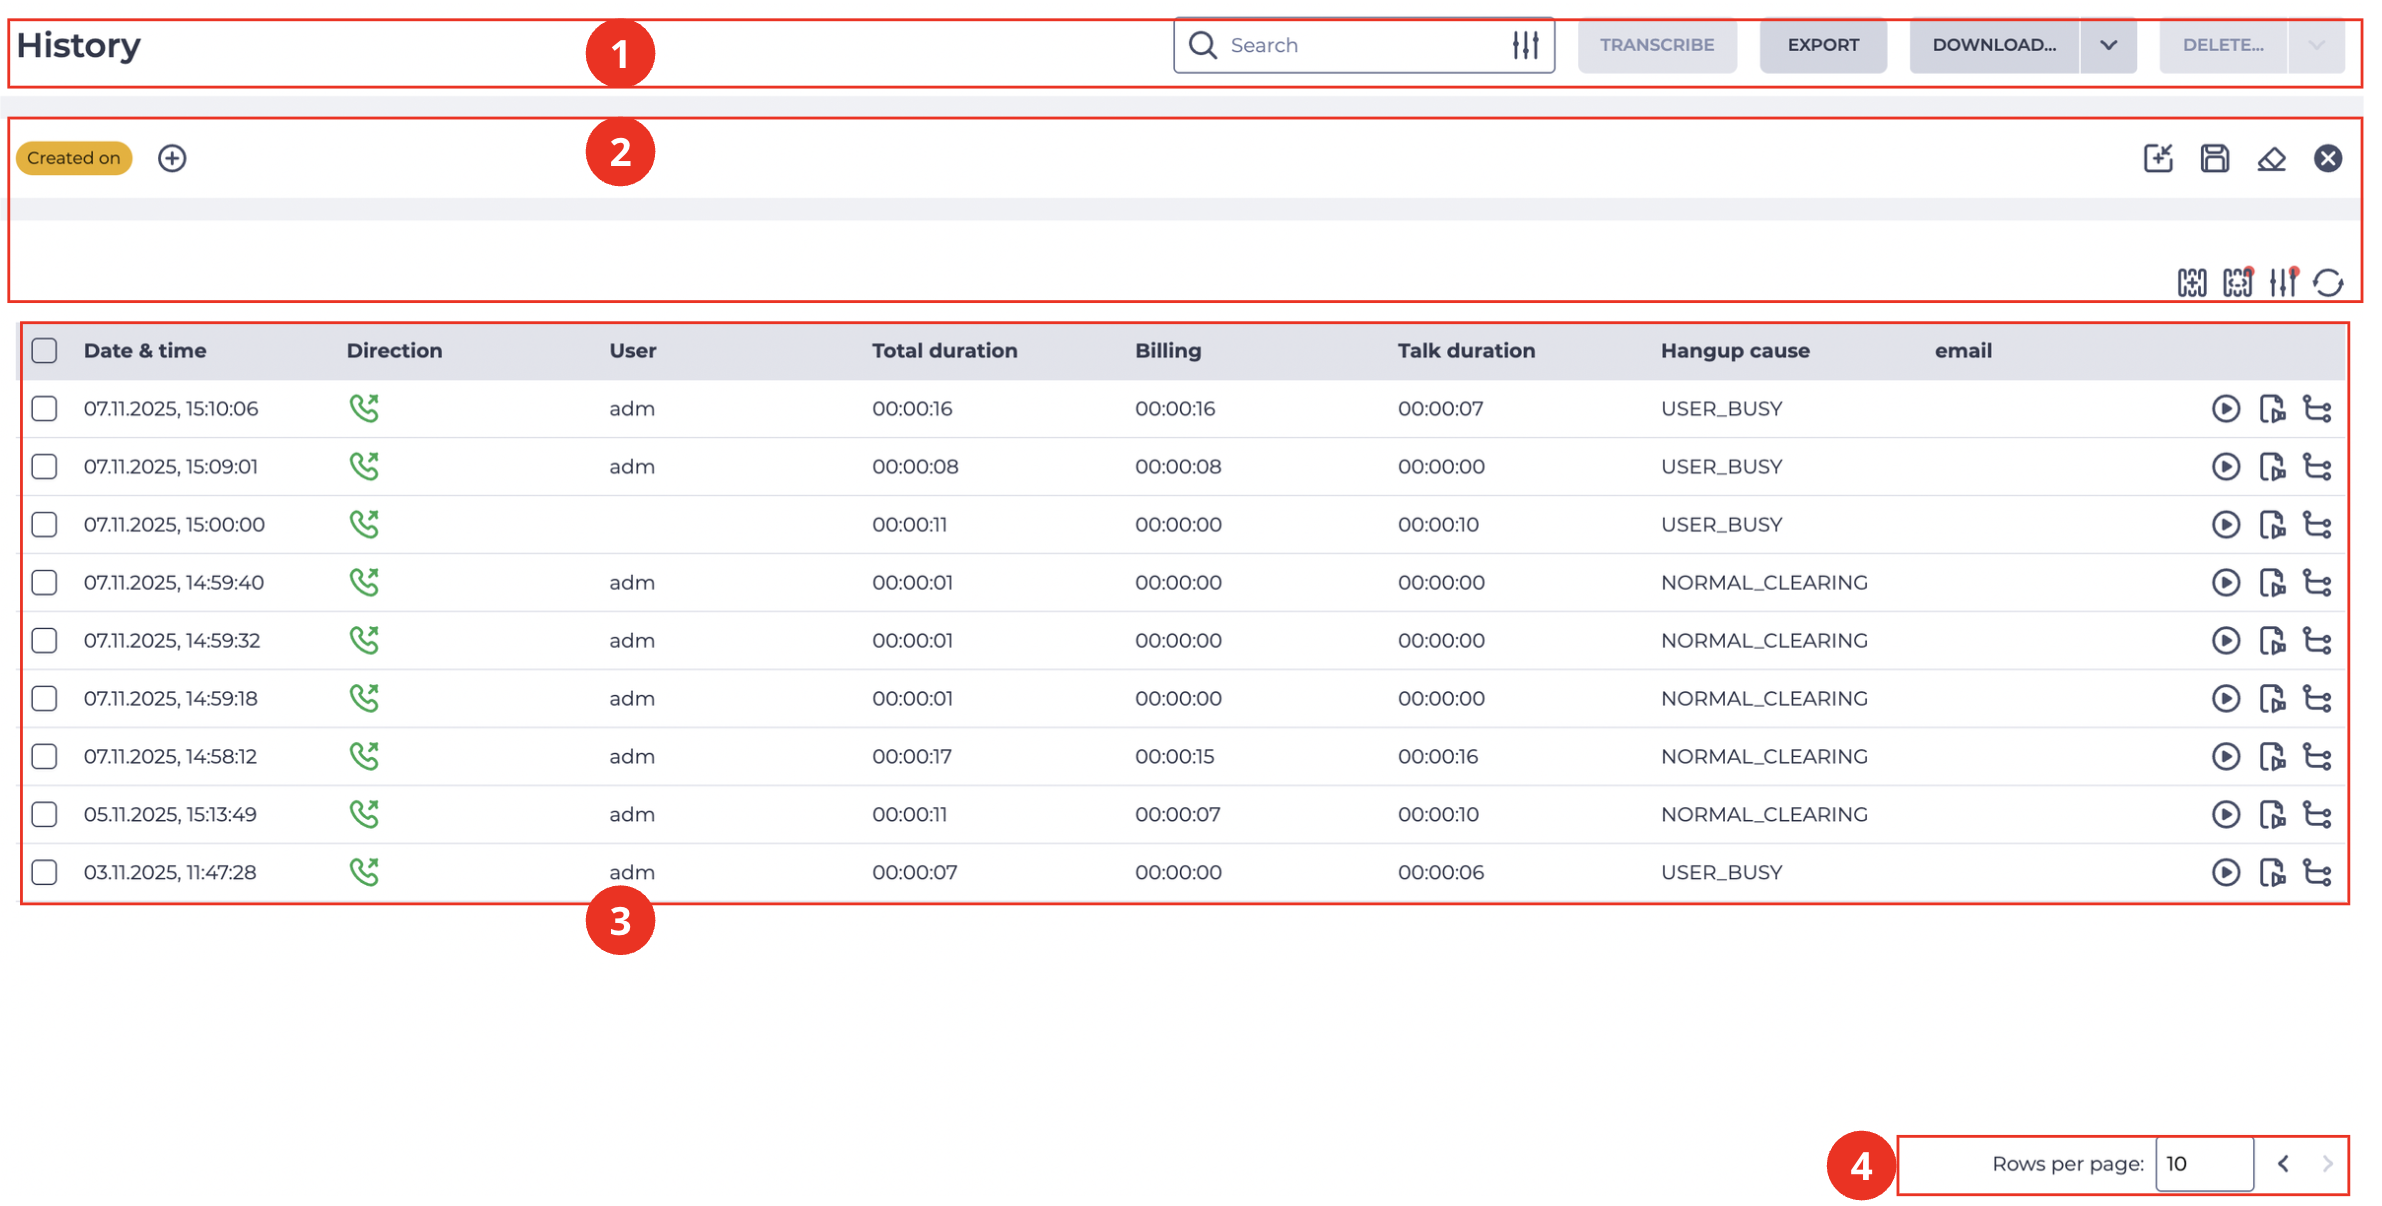
It consists of the following elements:
-
Top bar (Fig. 1.(1));
-
Filter block (Fig. 1.(2));
-
Registry (Fig. 1.(3));
-
Pagination (Fig. 1.(4)).
1.1. Top bar
The top bar consists of the following elements:
-
Search field;
-
Transcribe button;
-
Export;
-
Download button;
-
Delete button.
1.1.1. Search field
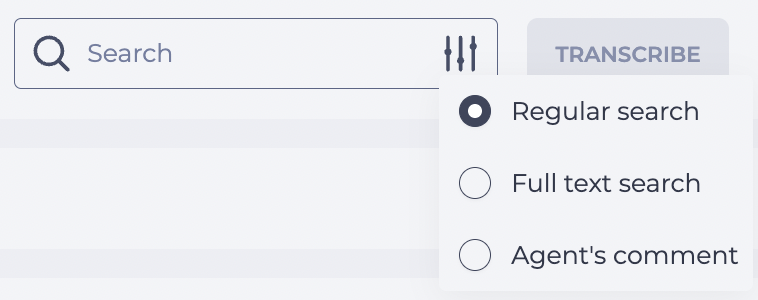
It consists of an input field and a search settings button — 
-
Regular search — search in the register;
-
Full text search — search through transcribed conversation records;
-
Agent's comment — search by comments left by Agents in processing.
To search by part of a word or number, use the * symbol.
Full text search
When searching conversation records, a single-word query displays records that contain that word.
To find a phrase, you must use the & symbol, for example:
I & can
If you need to find a record containing one word and not the second, then the following character set is used — &!
For example, the entry must contain the word good and not have the word credit. In this case, you should write:
good &! credit
For a selection of records containing at least one of the words, use |
Ok | agree | good
If an invalid query format is entered, or there is no match data for a correctly entered format, the message "Please check filters query" is displayed in the registry.
1.1.2. Transcribe button
Transcription is the conversion of speech into text. The button becomes active after selecting an entry, or entries, in the registry. The selected conversation records are translated into the text after clicking the Transcribe button, and the transcription tool in entries is changed.
Transcription is not possible if there is no recording of the conversation.
1.1.3. Export
It is designed to export data from the register.
When the Export button is clicked, a file is downloaded in the format specified by the export_settings parameter on the Configuration page.
If the parameter is not set, an Export modal window (Fig. 3) opens, allowing you to select the format.
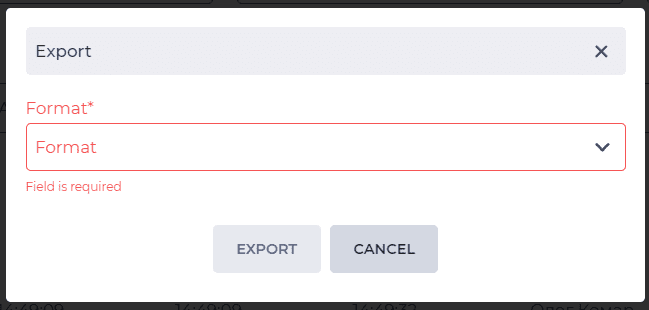
The following formats are available:
-
xls;
-
csv.
When selecting the csv format, you need to enter a delimiter in the Separator field.
The file contains data from the registry that matches the applied filters.
1.1.4. Download button
The button is used to download objects. Clicking this button opens a list with options (Fig. 4):
-
Recordings;
-
Transcriptions.
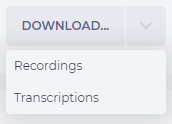
The file upload starts after selecting/clicking an option. The history-records archive file is downloaded when you choose the Recordings option. The transcripts archive file is downloaded when you select the Transcriptions option. Information about the number of downloaded files is displayed under the Download button.
1.1.5. Delete button
The button is used to delete objects using checkboxes. The button becomes active after selecting an entry, or entries, in the registry. Clicking this button opens a list with options (Fig. 5):
-
Recordings — deletes the conversation record;
-
Transcriptions — deletes the transcription of the conversation record;
-
Both — delete the recording and transcription of the conversation.
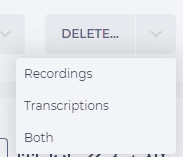
The modal window opens to confirm the deletion after selecting an option.
1.2. Filter block
It is designed to filter the data displayed in the registry.
It consists of the following elements:
-
Filter fields (Fig. 6.(1));
-
Apply preset tool (Fig. 6.(2));
-
Save preset tool (Fig. 6.(3));
-
Reset filters tool (Fig. 6.(4));
-
Close filter block tool (Fig. 6.(5));
-
Select visible columns tool (Fig. 6.(6));
-
Select variables columns tool (Fig. 6.(7));
-
Expand filters tool (Fig. 6.(8));
-
Refresh register tool (Fig. 6.(9)).

1.2.1. Filter fields
Available fields for filtering:
-
Created on;
-
Agent;
-
AMD result;
-
Contact;
-
Direction;
-
Rated;
-
Gateway;
-
Grantee;
-
Hangup cause;
-
Queue;
-
Rated by;
-
Recording;
-
Score:
-
From;
-
To.
-
-
Tag;
-
Talk duration (mm:ss):
-
From;
-
To;
-
-
Team;
-
Total duration (mm:ss):
-
From;
-
To;
-
-
Transcription;
-
User;
-
Variable.
The number of fields may vary depending on the User's rights to view the page.
1.2.2. Apply preset tool
It is designed to apply previously saved presets.
After clicking the Apply preset tool (Fig. 6.(2)), the “Apply preset” modal window opens (Fig. 7).
The window contains the following elements:
-
Search field (Fig. 7.(1)) — used to search among available presets.
-
Presets list (Fig. 7.(2)) — a list of all saved presets.
-
Checkbox (Fig. 7.(3)) — allows you to select one of the presets to apply.
-
Edit tool (Fig. 7.(4)) — opens the selected preset in edit mode.
-
Expand tool (Fig. 7.(5)) — opens preset details (name, columns, description).
At the bottom of the window are located:
-
"Apply" button (Fig. 7.(6)) — confirms the selection and applies the preset.
-
"Cancel" button (Fig. 7.(7)) or icon

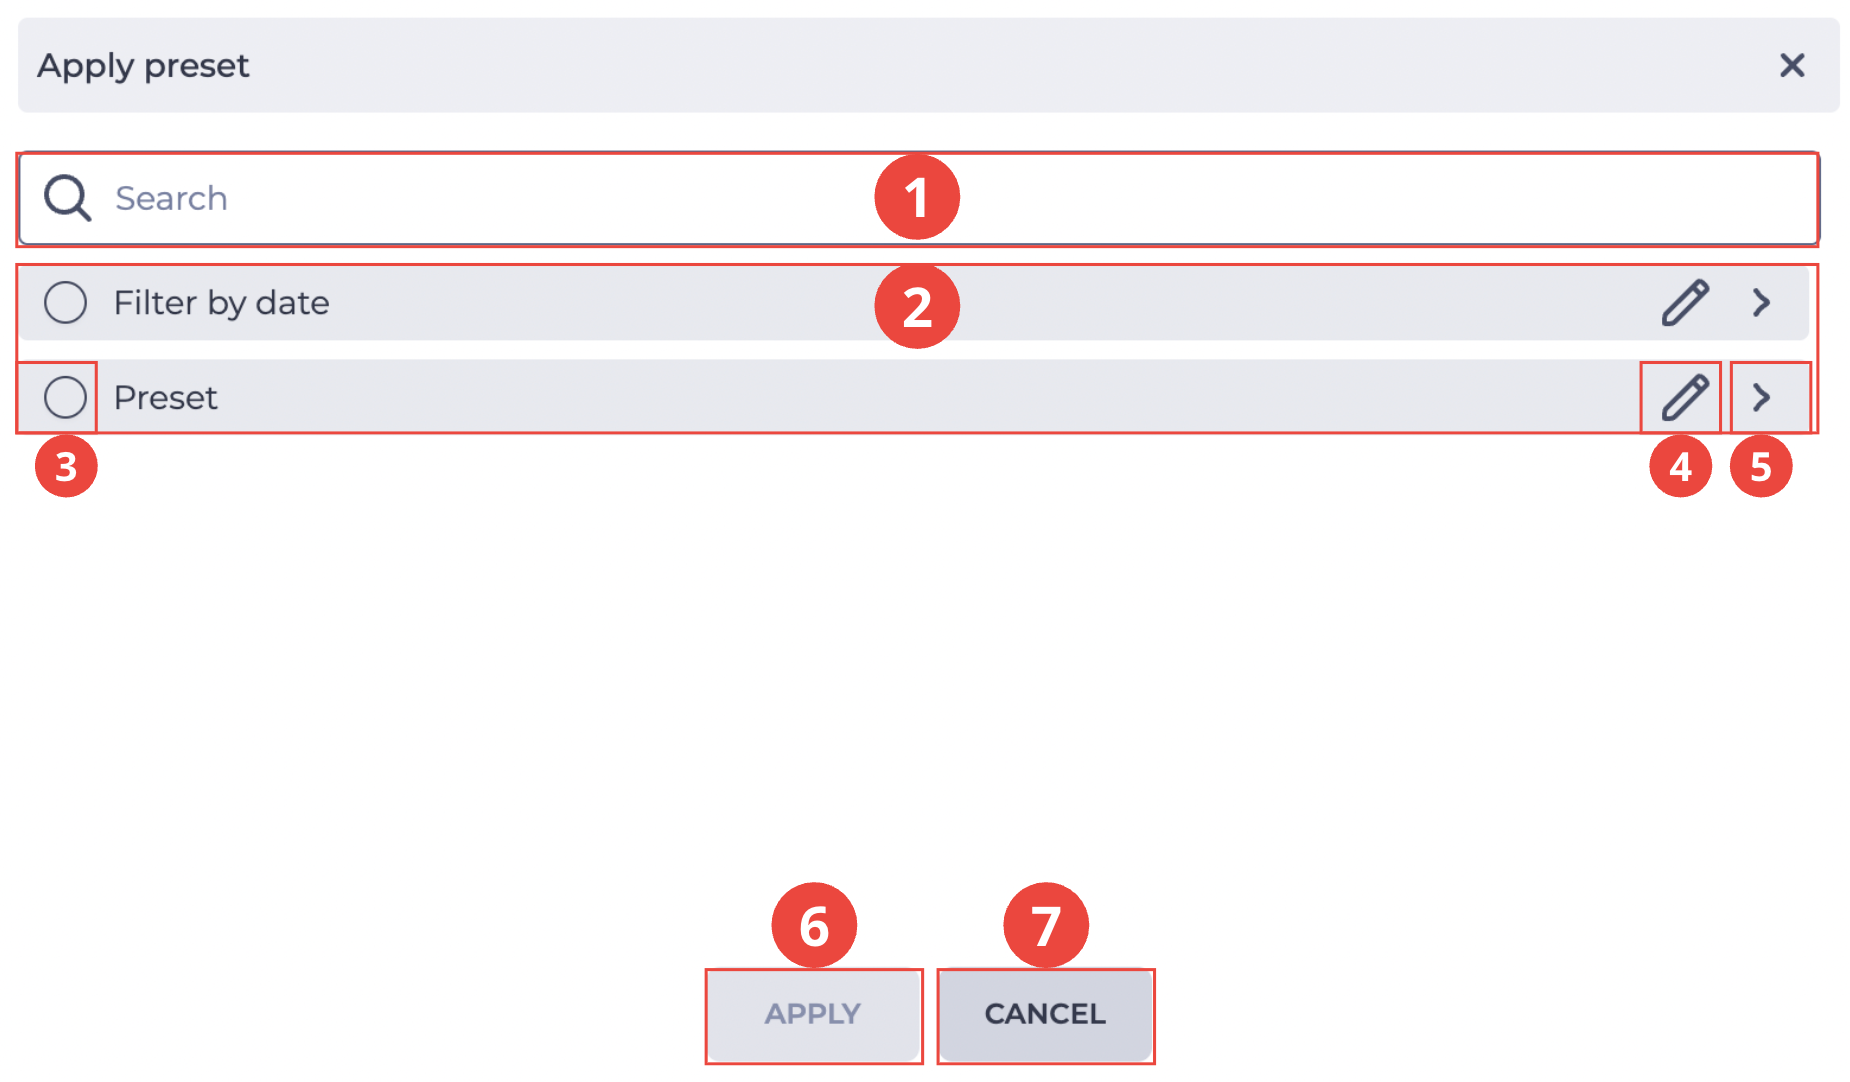
When the user selects a preset, the system substitutes the values from the saved preset into the filter fields and applies them to the list of calls displayed in the register.
1.2.3. Save preset tool
It is designed to create a new preset or edit an existing preset.
After clicking the Save tool (Fig. 6.(3)), the "Save preset" modal window opens (Fig. 8). It saves all the conditions set in the filter fields.
The window contains the following elements:
-
"Name" field (Fig. 8.(1)) — required to fill in, used to enter the preset name.
-
"Description" field (Fig. 8.(2)) — optional, used to provide additional information about the purpose of the preset.
-
"Column" field (Fig. 8.(3)) — displays the column by which the filter is built (for example, Created).
-
"Save" button (Fig. 8.(4)) — saves the filter conditions as a preset.
-
"Cancel" button (Fig. 8.(5)) or icon
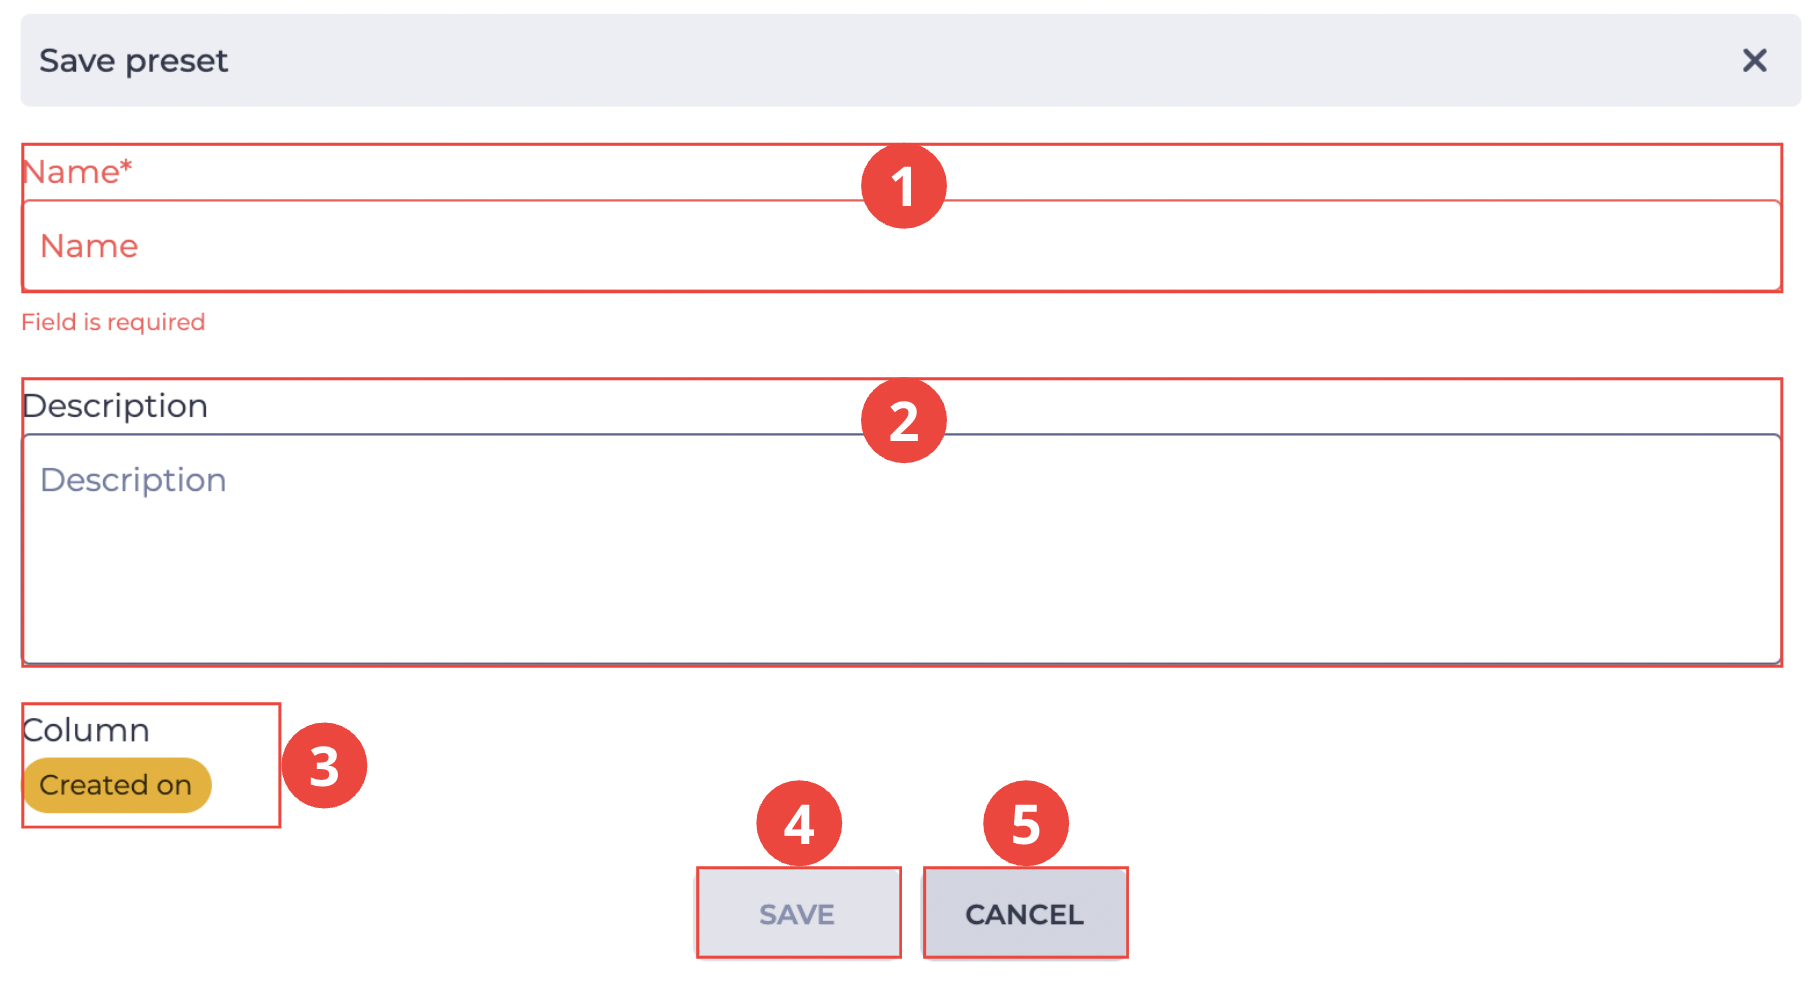
Preset names are unique within one user.
1.2.4. Reset filters tool
It is represented as an icon 
1.2.5. Close filter block tool
When you click the close tool (Fig. 6.(5)), the filter panel collapses and is no longer displayed on the page. Reopening the panel is possible through the expand filters tool (Fig. 6.(8)).
1.2.6. Select visible columns
It is designed to select the columns displayed in the records registry table, including variable columns added via the Select Variables Columns modal window.
The Select visible columns modal window to display opens (Fig. 7), when you click the 
.png?cb=2595bf9fb36978cb188d00dd8cbba3bb)
-
Select the checkbox (Fig. 9.(1)) — this column is displayed in the registry;
-
Clear checkbox (Fig. 9.(2)) — this column is not displayed in the registry.
1.2.7. Select variables columns
It is used to add call variable columns to the records registry. Clicking the button 
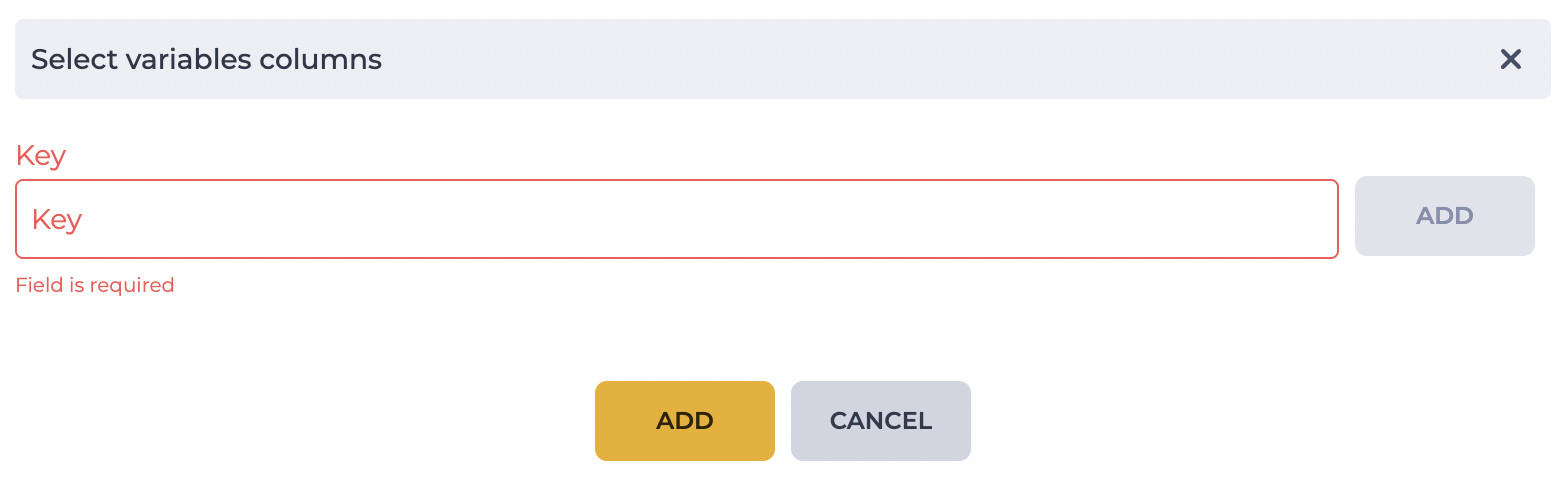
Enter the variable name in the Key field. It will be displayed in a new column in the records registry.
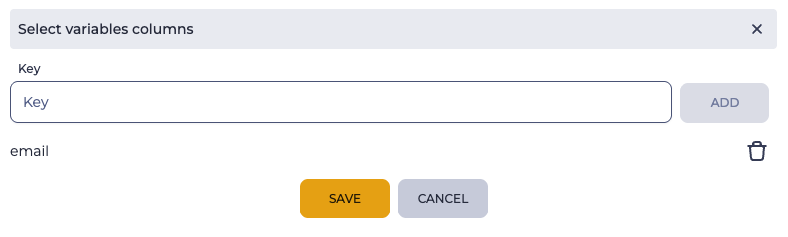
After entering the key, click the Add button — the variable is added to the list in the modal window. To save the changes, click the Save button. The modal window closes, and the corresponding column is automatically displayed in the records registry (Fig. 11b).
Click the 
The column displays the value of the corresponding variable if it exists in the call. If the variable is not present, the field remains empty.
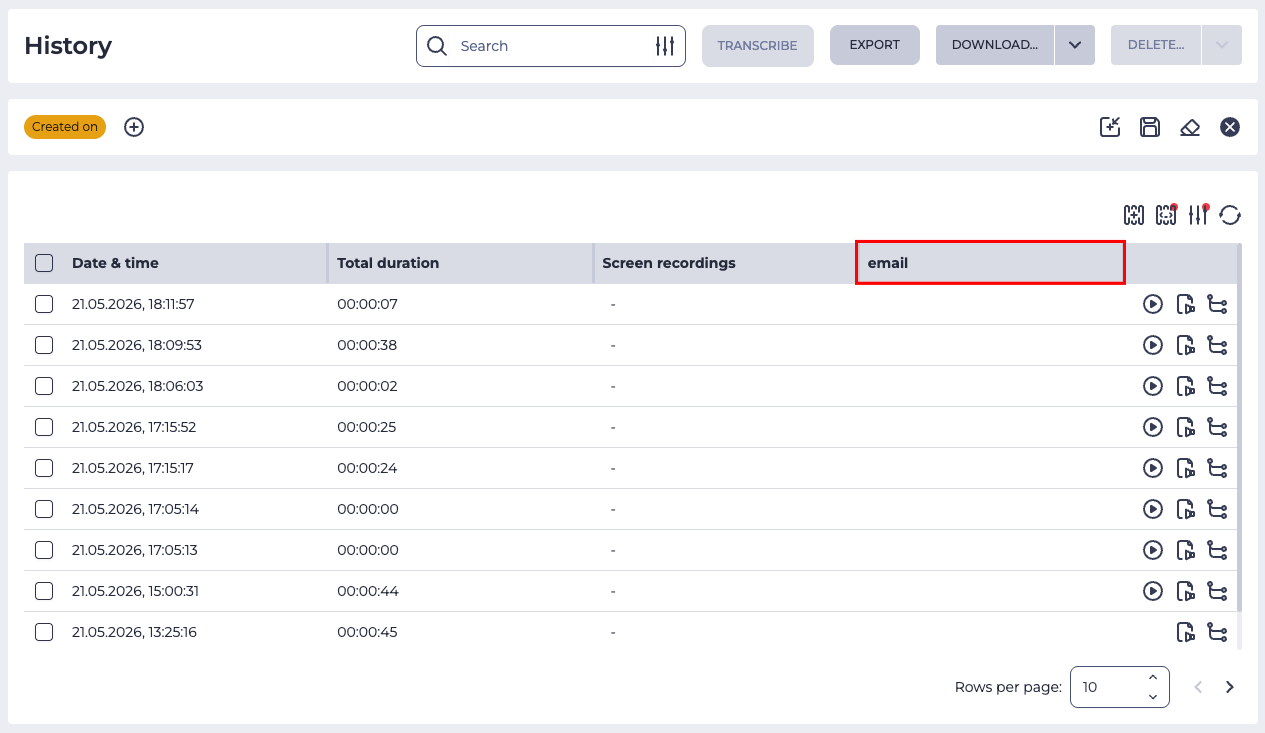
Several variables can be added. Visibility of the added columns in the registry is managed exclusively through the Select visible columns modal window (see section 1.2.6).
1.2.8. Expand filters tool
Represented as a 
Note
The number of fields displayed may vary depending on the browser window size. Use the
1.2.9. Refresh tool
Updating the register table is performed by clicking on the refresh icon - 
1.3. Registry
The following columns are available in the registry:
-
Checkbox;
-
Date;
-
Time;
-
Direction;
-
Answered at;
-
Bridged at;
-
Queue bridged at;
-
Joined at;
-
Leaving at;
-
Hangup at;
-
Hangup description;
-
Reporting at;
-
User;
-
Extension;
-
From;
-
To;
-
Destination;
-
Gateway;
-
Agent;
-
Team;
-
Queue;
-
Member;
-
Hangup by;
-
Total duration;
-
Tags;
-
Display;
-
Hold;
-
Wait;
-
Billing;
-
Talk duration;
-
Reporting;
-
Queue wait;
-
Queue duration;
-
Screen recordings;
-
Screenshots;
-
Result;
-
SIP code;
-
Hangup cause;
-
Hangup disposition;
-
AMD result;
-
Agent's comment;
-
Blind transfer;
-
Grantee;
-
Score;
-
Rated by;
-
Member Id;
-
Attempt Id;
-
Contact;
-
MOS;
-
Call recording listening tool;
-
Transcribe tool;
-
Call info tool.
You can add variable columns using the select variable columns tool.
By default, the user can see only their own calls. The visibility of calls for different roles depends on the state of the “Actions management” switch:
-
if the user has the “Select” permission, they can see all calls;
-
if the user is a supervisor or auditor, they can see the calls of their operators;
-
if the user has only the “Operator” role, they can see only their own calls.
1.3.1. Checkbox
Used to select one or more entries.
1.3.2. Date
Displays the date the call was made.
1.3.3. Time
Displays the time the call was made.
1.3.4. Direction
Displays call directions:
-

-

1.3.5. Answered at
The time is displayed when the connection with the subscriber took place — calls began to come to the subscriber.
1.3.6. Bridged at
Displays the connection time of the subscriber, or another Webitel User, with the Agent.
1.3.7. Queue bridged at
Displays the connection time of the Agent with the Subscriber.
The difference between Bridged at and Queue bridged at is that Bridged at displays the time for both calls from the Queue and internal calls, while Queue bridged at only displays the time for calls from Queues.
1.3.8. Joined at
Displays the time when the subscriber got into the Queue.
1.3.9. Leaving at
Displays the time when the subscriber left the Queue. The exit from the Queue is the connection with the Agent or the end of the call.
1.3.10. Hangup at
Displays the time the call ended.
1.3.11. Hangup description
The error text received from the provider is displayed.
1.3.12. Reporting at
Displays the time when Postprocessing started.
Since processing starts immediately after the end of the call, the time specified in the Hangup at field and in the Reporting at field can be the same.
1.3.13. User
Displays the username.
1.3.14. Extension
Displays the user's Extension. Depending on the type of call, it has different meanings (see Tab. 1).
1.3.15. From
Displays the number from which the call originated. Depending on the type of call, it has different meanings (see Tab. 1).
1.3.16. To
Displays the number of the called party. Depending on the type of call, it has different meanings (see Tab. 1).
1.3.17. Destination
The number being called is displayed. Depending on the type of call, it has different meanings (see Tab. 1).
|
|
Columns |
|||
|---|---|---|---|---|
|
Call type |
From |
To |
Destination |
Extension |
|
Inbound |
Subscriber number |
Webitel User number (filled in after the User has picked up the phone) |
The number dialled by the Subscriber |
|
|
Outbound IVR |
The number that is entered in the settings of the Resource through which the call is made |
The number of the Subscriber to whom the call is being made (after modification, if digits were taken away or added) |
Subscriber number |
|
|
Preview dialer |
User Extension (Webitel) |
The number of the Subscriber to whom the call is being made (after modification, if digits were taken away or added) |
Subscriber number |
User Extension (Webitel) |
|
Progressive dialer |
The number that is entered in the settings of the Resource through which the call is made
|
|
Subscriber number |
|
|
Predictive dialer |
The number that is entered in the settings of the Resource through which the call is made
|
|
Subscriber number |
|
|
Outbound |
User Extension (Webitel) |
The number of the Subscriber to whom the call is being made (after modification, if digits were taken away or added) |
The number dialled by Webitel User/Agent |
User Extension (Webitel) |
|
Internal between Users |
User Extension (initiator of the call) |
User Extension (recipient of the call) |
User Extension (recipient of the call) |
User Extension (initiator of the call) |
Tab. 1. Display data depending on the type of call
1.3.18. Gateway
Displays information on the Gateway that was used in this case.
1.3.19. Agent
The Webitel User login is displayed.
1.3.20. Team
Displays the Agent's Team.
1.3.21. Queue
Displays the Queue that the call came from.
1.3.22. Member
Subscriber information is displayed.
1.3.23. Hangup by
Displays the Leg that initiated the call termination (Leg A or B). Depending on the type of Call, the Leg may change (see Table 2)
|
Type of Call |
Leg A |
Leg B |
|---|---|---|
|
Inbound |
Subscriber |
Agent |
|
Outbound IVR |
|
Subscriber |
|
Preview dialer |
Agent |
Subscriber |
|
Progressive dialer |
Subscriber |
Agent |
|
Predictive dialer |
Subscriber |
Agent |
|
Outbound |
Agent |
Subscriber |
|
Internal between Users |
Call initiator |
The User who received the call |
Tab. 2. Legs A-B depending on the type of call
1.3.24. Total duration
Displays the amount of time spent on the call.
1.3.25. Tags
It is present in the records of calls in which an answering machine is configured in the routing with the ability to record a voice message.
1.3.26. Display
The number that is entered in the Resource settings is called through.
1.3.27. Hold
Displays the amount of time the call has been on hold. If there is no hold, the field is empty.
1.3.28. Wait
Displays the connection timeout.
1.3.29. Billing
Displays the amount of time the Subscriber has been connected to the Agent. The time when the charge was charged - call billing.
1.3.30. Talk duration
Displays the amount of time the Subscriber has been connected to an Agent.
1.3.31. Reporting
Displays the amount of time the Agent spent on post-processing.
1.3.32. Queue wait
Displays the time spent by the Subscriber in the Queue, from entering the Queue until the moment of connection with the Agent or until the end of the call in the case when the Subscriber ended the call without waiting for the Agent.
1.3.33. Queue duration
Displays the time spent by the Agent in the Queue from the moment they enter the Queue until the end of the call.
1.3.34. Screen Recordings
Displays the number of agent screen recordings made during the call.
The column consists of:
-
Screen recording icon

-
Numeric value — the number of available screen recordings.
The presence and number of recordings are determined by the enabled Agent screen control switch for the agent or team, as well as the value of the "wbt_record_screen" variable at the time of the call.
If no screen recording was made, "—" is displayed instead of a number.
Clicking the icon
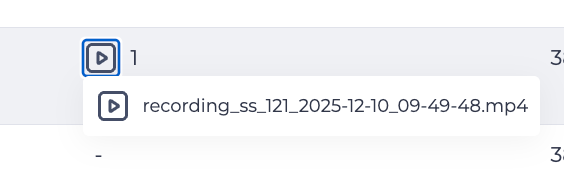
Clicking a row with a recording name opens the screen recording mini-window (Fig. 12).
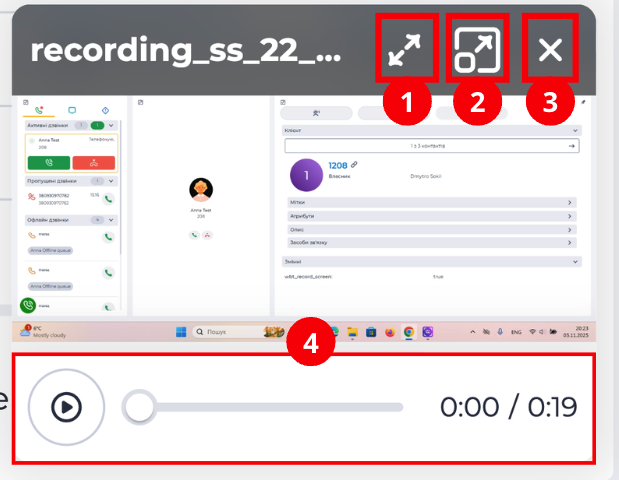
When hovering over the mini-window, the following controls are displayed:
-
expand to full screen icon (Fig. 12.(1));
-
expand to medium window size icon (Fig. 12.(2));
-
close window icon (Fig. 12.(3)).
At the bottom of the mini-window, a player with a play/pause button and a timeline is displayed (Fig. 12.(4)). Clicking the button starts or stops video playback.
When switching to medium or full-screen mode, the corresponding expand icon is replaced by a collapse icon 
1.3.35. Screenshots
Displays the number of agent screenshots taken during the video call.
The column consists of an icon and a numeric value showing the number of available screenshots (Fig. 13).
If no screenshots were taken, "—" is displayed instead of a number.
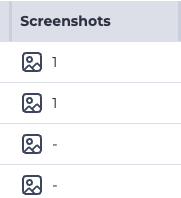
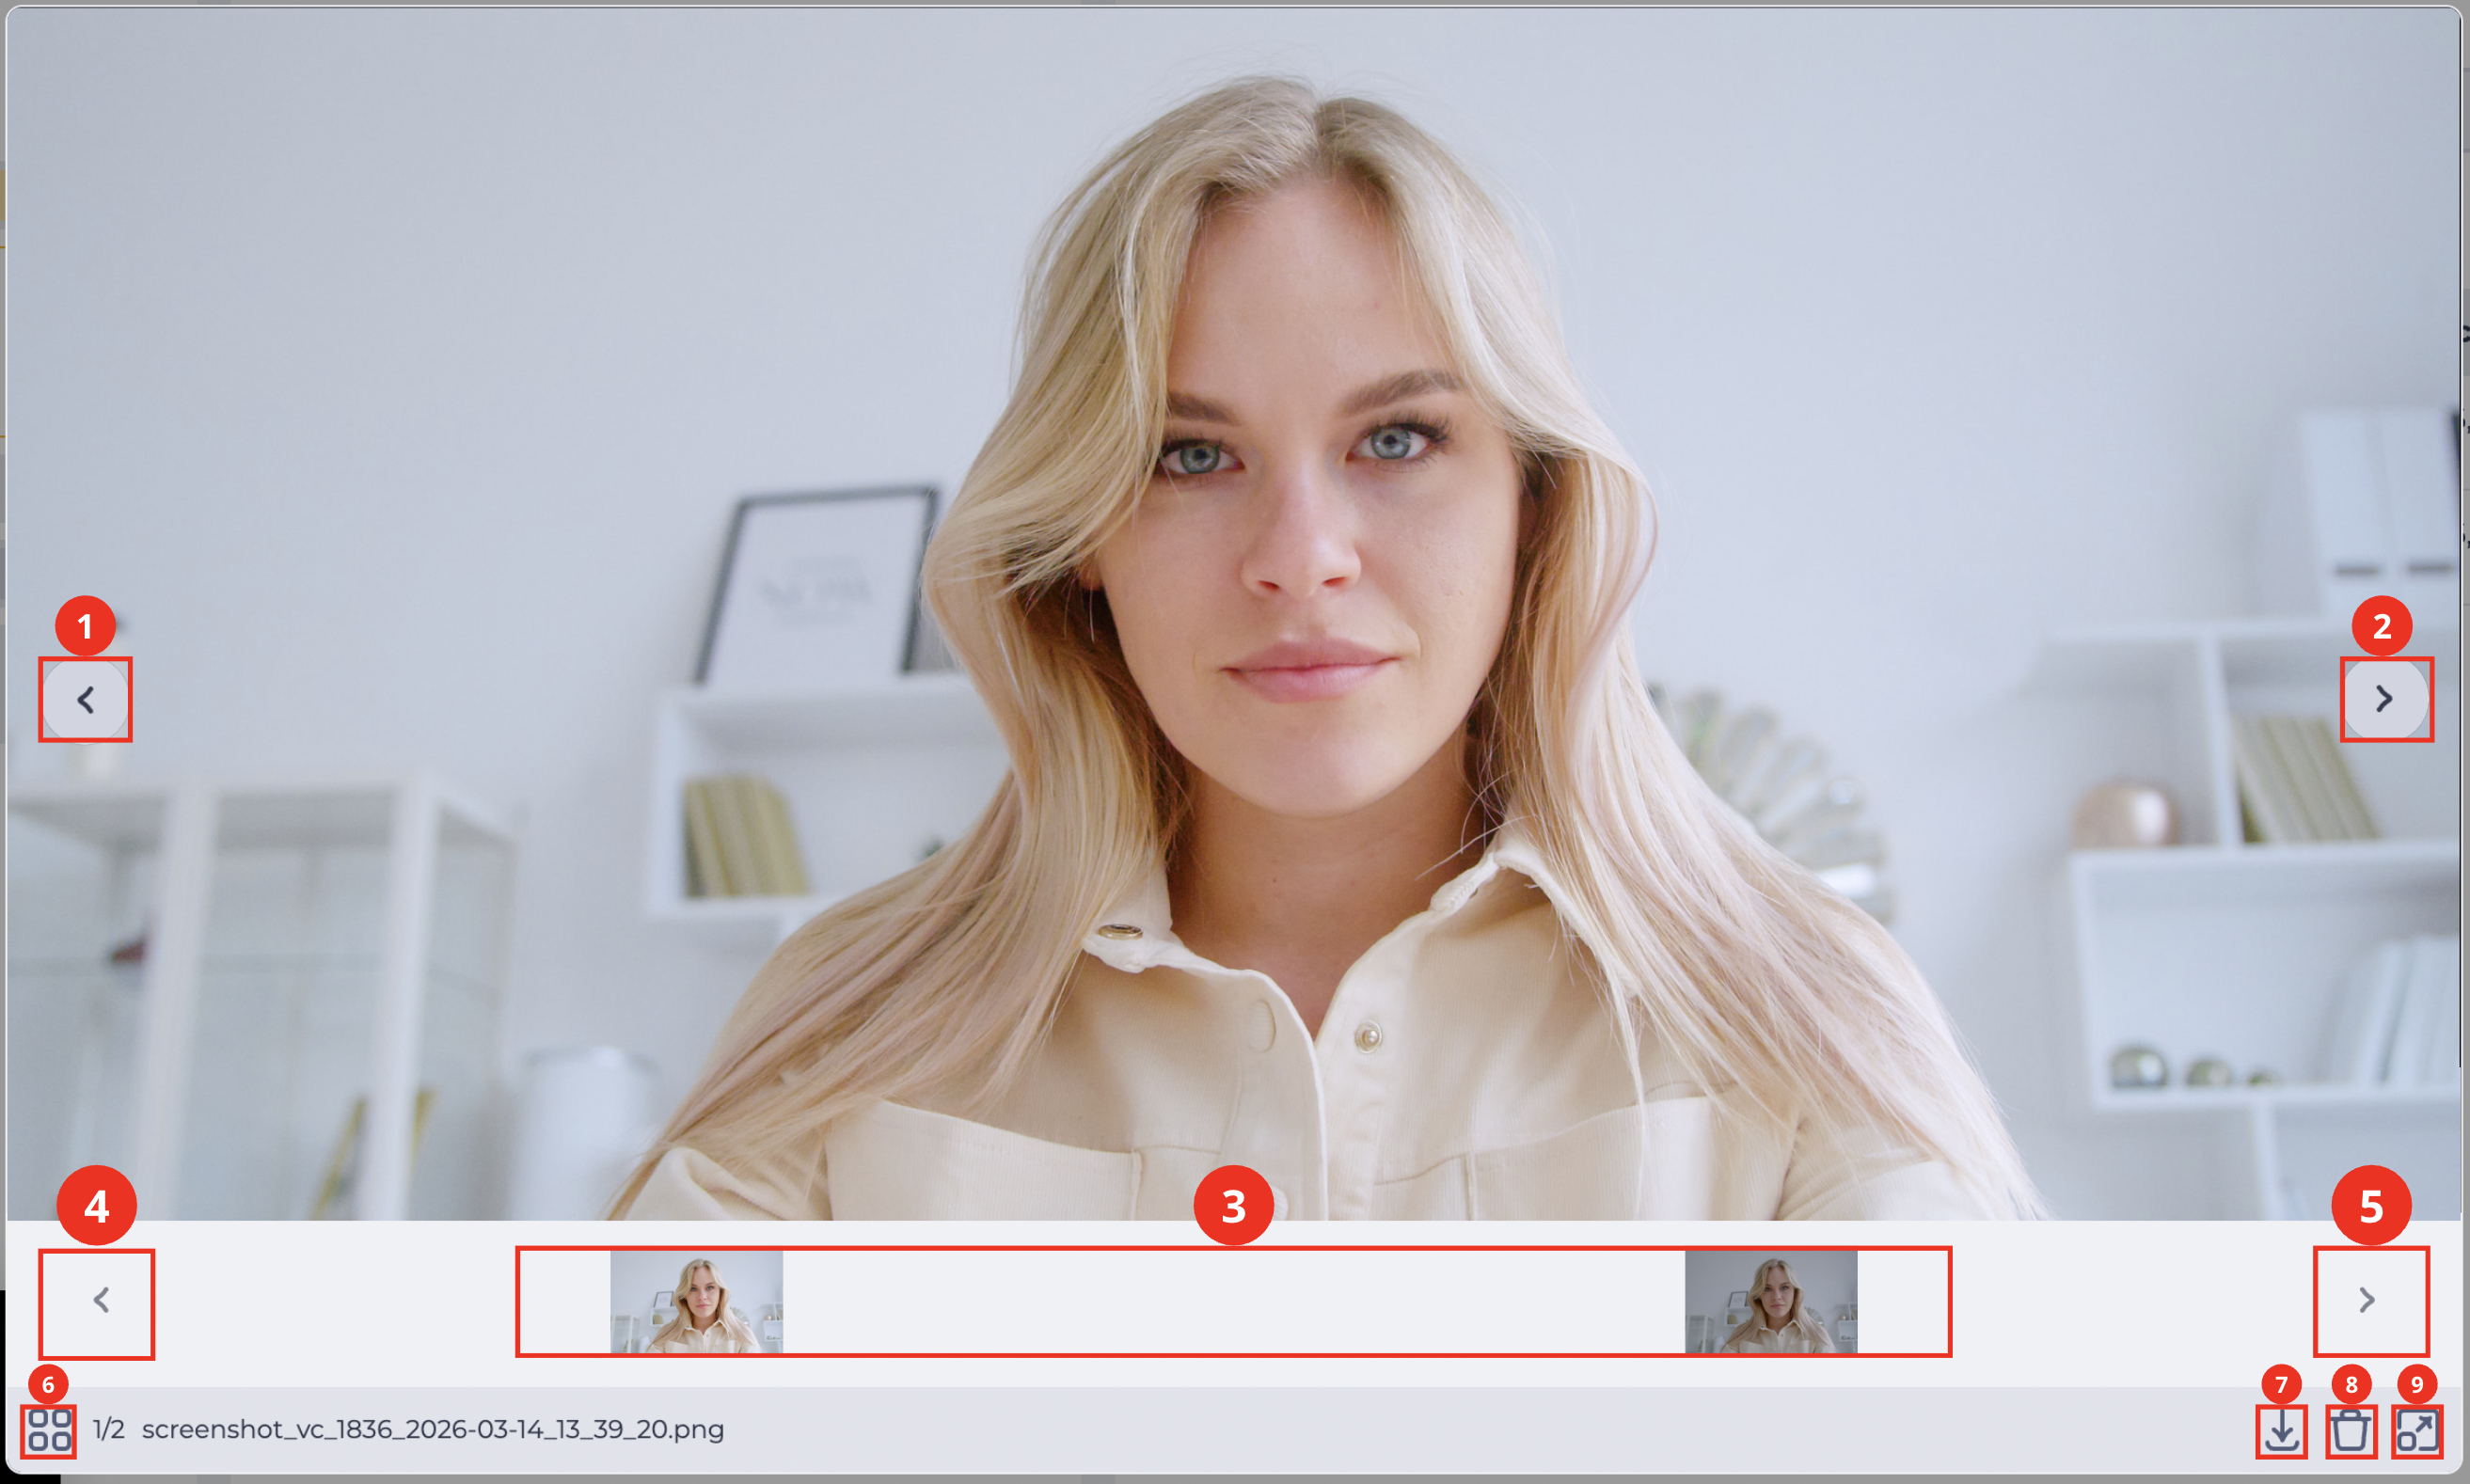
Clicking the icon opens the viewer (Fig. 14), which contains the following controls:
-
Back button (Fig. 14.(1));
-
Forward button (Fig. 14.(2));
-
screenshot thumbnail panel (Fig. 14.(3));
-
scroll left tool (Fig. 14.(4));
-
scroll right tool (Fig. 14.(5));
-
collapse/expand thumbnail panel tool (Fig. 14.(6));
-
download tool (Fig. 14.(7));
-
delete tool (Fig. 14.(8));
-
expand image tool (Fig. 14.(9));
-
close tool (Fig. 14.(10)).
1.3.35.1. Back Button
Switches the view to the previous screenshot.
1.3.35.2. Forward Button
Switches the view to the next screenshot.
1.3.35.3. Screenshot Thumbnail Panel
Displays thumbnails of all screenshots taken during the call.
1.3.35.4. Scroll Thumbnails Left Tool
Scrolls the thumbnail strip to the left.
1.3.35.5. Scroll Thumbnails Right Tool
Scrolls the thumbnail strip to the right.
1.3.35.6. Collapse/Expand Thumbnail Panel Tool
Collapses the thumbnail panel to increase the image viewing area. After collapsing, the icon changes to an expand tool, which restores the thumbnail panel to its previous state.
1.3.35.7. Download Tool
Downloads the current screenshot to the device in .png format.
1.3.35.8. Delete Tool
Clicking the icon 
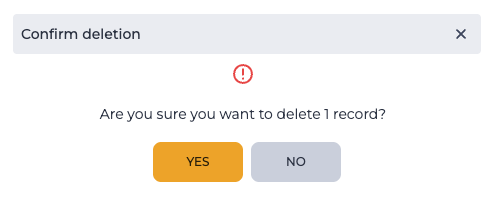
1.3.35.9. Expand Image Tool
Expands the image to full screen. After expanding, the icon is replaced by a collapse tool
1.3.35.10. Close Tool
Closes the viewer and returns the user to the table.
1.3.36. Result
Displays the result. There are the following result options:
-
missed - missed by the Agent, present only in the Preview, when the Dialer did not reach the Agent and, accordingly, does not dial the Subscriber;
-
timeout - present in calls that have processing configured. It is set if the Agent did not have an opportunity to finish processing in time;
-
failed - did not get through to the Subscriber;
-
abandoned - got through to the Subscriber, but there was no connection with the Agent;
-
success - successful result;
-
cancel - cancelled.
1.3.37. SIP code
Displays the SIP call termination code. Possible reasons can be found in Table 3.
1.3.38. Hangup cause
Displays the reason for ending the call. Possible reasons can be found in Table 3.
When receiving/sending a HangUp event, we receive/send Cause Code, i.e., the reason the call ends and the subscriber leaves the queue.
In the table below you can view all Cause Codes used in ISDN telephony that correspond to the Q.850 protocol.
|
ITU-T Q.850 Code |
SIP answer |
Cause |
Description |
|---|---|---|---|
|
0 |
— |
UNSPECIFIED
|
It is issued by the router when none of the other codes fit. This cause usually occurs in situations similar to causes 1, 88, and 100. |
|
1 |
404 |
UNALLOCATED_NUMBER
|
This cause indicates that called side cannot be reached because although the called side number possesses a valid format, currently it is not assigned (assigned). |
|
2 |
404 |
NO_ROUTE_TRANSIT_NET
|
This cause indicates that the equipment sending this cause has received a request for call routing through a particular transit network which it does not recognize. The equipment sending this cause does not recognize the transit network for the following reasons: the transit network does not exist or that particular transit network, although it exists, does not maintain the equipment sending this cause. |
|
3 |
404 |
NO_ROUTE_DESTINATION
|
This cause indicates that called side cannot be reached because a network through which the call has been routed doesn’t maintain a desirable destination. This cause is supported depending on the network. |
|
6 |
— |
CHANNEL_UNACCEPTABLE
|
This cause indicates that the last identified channel is not acceptable for the sending object to use in this call. |
|
7 |
— |
CALL_AWARDED_DELIVERED
|
A user has been given an incoming call, and the incoming call connects to the channel already set for that user for similar calls (for example, x.25 virtual calls in a package mode). |
|
16 |
— |
NORMAL_CLEARING
|
Normal call termination |
|
17 |
486 |
USER_BUSY
|
The called side cannot take another call because the user's busy state has been detected. This cause value can be created by a called user or network. In case when the user is detected as busy, it is noted that the user’s equipment is compatible with the call. |
|
18 |
408 |
NO_USER_RESPONSE
|
The called side doesn't respond to a message of call establishing, warning, or connection indication during an established period. |
|
19 |
480 |
NO_ANSWER
|
This cause is used when a called side has been warned but is not answering with a connection indication during the prescribed period. A note: this cause is not necessarily generated by the Q.931 procedures but can be caused by the internal network timers. |
|
20 |
480 |
SUBSCRIBER_ABSENT
|
This cause value is used when the mobile station has logged out of the system, the radio connection with the mobile station has not been established, or the personal radio connection user temporary does not possess the address on any user network interface |
|
21 |
603 |
CALL_REJECTED
|
This cause indicates that the equipment sending this cause does not wish to receive this call although it may have accepted this call because the equipment sending this cause is not busy or incompatible. A network also can generate this reason indicating that the call has been rejected due to the restrictions of additional service. The diagnostics field may include additional information about the additional service and the reason for denying. |
|
22 |
410 |
NUMBER_CHANGED
|
This cause is returned to the calling side when the called side’s number specified by the calling side is no longer assigned. The new calling side number may be optionally included in the diagnostics field. When the network does not support this cause, it means the reason №1: unallocated (unassigned) number must be used. |
|
23 |
410 |
REDIRECTION_TO_NEW_DESTINATION
|
This cause is used by the general ISUP protocol mechanism which can be launched by the commutator that decides to establish a call to another called number. This exchange may cause a redirection mechanism that uses this cause value to request a previous exchange participating in the call to route the call to the new number. |
|
25 |
483 |
EXCHANGE_ROUTING_ERROR
|
This cause indicates that the destination point specified by the user cannot be reached because the intermediate commutator has disabled the call due to reaching the limit while executing the hop counter procedure. This cause is generated by the intermediate node that produces a result of 0 when the hop counter value is decreasing. |
|
27 |
502 |
DESTINATION_OUT_OF_ORDER
|
This cause indicates that the destination point specified by the user cannot be reached because the interface of the destination point does not work properly. The ‘does not work properly’ term means that the signaling message could not be delivered to the remote side; for example, physical level failure, level of data transmission channel on the remote side, or the disabled user’s equipment. |
|
28 |
484 |
INVALID_NUMBER_FORMAT
|
This cause indicates that a called side cannot be reached because the called side number has an invalid or incomplete format. |
|
29 |
501 |
FACILITY_REJECTED
|
This cause returns when an additional service requested by the user cannot be provided by the network. |
|
30 |
|
RESPONSE_TO_STATUS_ENQUIRY
|
This cause is included in the STATUS message when the prior receipt of the STATUS INQUIRY was a reason for generating the STATUS message. |
|
31 |
480 |
NORMAL_UNSPECIFIED
|
This reason is used to report a normal event only when none of the other reasons in the normal class apply. |
|
34 |
503 |
NORMAL_CIRCUIT_CONGESTION
|
This cause indicates that all lines are busy — the provider does not have enough available lines to handle the call. |
|
38 |
503 |
NETWORK_OUT_OF_ORDER
|
This cause indicates that a network is not working properly, and this state is likely to last for a long time so the immediate call retry is unlikely to be successful . |
|
41 |
503 |
NORMAL_TEMPORARY_FAILURE
|
This cause indicates that a network is not working properly, and this state is unlikely to last for a long time; so the user may want to make one more call attempt almost immediately. |
|
42 |
503 |
SWITCH_CONGESTION
|
This cause indicates that the switching equipment generating this cause is experiencing a high traffic period |
|
43 |
— |
ACCESS_INFO_DISCARDED
|
This cause indicates that a network couldn’t deliver to the remote user information about access according to the request, i.e the information between users, low-level compatibility, high-level compatibility, or subaddress as specified in the diagnostics. |
|
44 |
503 |
REQUESTED_CHAN_UNAVAIL
|
This cause comes back when another side of the interface cannot provide the scheme or channel indicated by the requesting object. |
|
50 |
— |
FACILITY_NOT_SUBSCRIBED
|
This cause indicates that a user has requested an additional service that is available but the user is not authorized to use. |
|
52 |
403 |
OUTGOING_CALL_BARRED
|
This cause indicates that although the calling side is a subscriber of the CUG outbound call, the outbound calls are not allowed for this CUG subscriber. |
|
54 |
403 |
INCOMING_CALL_BARRED
|
This cause indicates that although the called side is a CUG subscriber for the inbound call, the inbound calls are not allowed for this CUG subscriber. |
|
57 |
403 |
BEARERCAPABILITY_NOTAUTH
|
This cause indicates that a user has requested a transfer capability that is implemented by the equipment that generated this cause but the user is not authorized to use. |
|
58 |
503 |
BEARERCAPABILITY_NOTAVAIL
|
This cause indicates that a user has requested a transfer capability that is implemented by the equipment that generated this cause but which is currently unavailable. |
|
63 |
— |
SERVICE_UNAVAILABLE
|
This cause is used for informing about the cause of service or parameter unavailability only when none of the other reasons in the service class or parameter unavailability apply. |
|
65 |
488 |
BEARERCAPABILITY_NOTIMPL
|
This cause indicates that the equipment sending this cause does not support the requested transfer capability. |
|
66 |
|
CHAN_NOT_IMPLEMENTED
|
This cause indicates that the equipment sending this cause does not support the requested channel type. |
|
69 |
501 |
FACILITY_NOT_IMPLEMENTED
|
This cause indicates that the equipment sending this cause does not support the requested additional services |
|
79 |
501 |
SERVICE_NOT_IMPLEMENTED
|
This cause is used for informing about the cause that is related to the unimplemented service or parameter only if none of the other reasons in the class of unimplemented service or parameter apply. |
|
81 |
— |
INVALID_CALL_REFERENCE
|
This cause indicates that the equipment sending this cause received a message with a link to a call that is not currently used in the user-network. |
|
88 |
488 |
INCOMPATIBLE_DESTINATION
|
This cause indicates that the equipment sending this cause has received a request to establish a call that has low-level compatibility, high-level compatibility, or other compatibility attributes (for example, data transmission speed) which cannot be implemented. |
|
95 |
— |
INVALID_MSG_UNSPECIFIED
|
This reason is used for informing about invalid message cause only if any other reason in the invalid message class does not apply. |
|
96 |
— |
MANDATORY_IE_MISSING
|
This cause indicates that the equipment sending this cause has received a message without an information element that must be present in the message before this message can be processed. |
|
97 |
— |
MESSAGE_TYPE_NONEXIST
|
This cause indicates that the equipment sending this cause has received a message with a message type it does not recognize because this message is not defined or defined but not implemented by the equipment sending this cause. |
|
98 |
— |
WRONG_MESSAGE
|
This cause indicates that the equipment sending this cause has received a message that the procedures do not indicate that it is a valid message to receive in the call state, or that a STATUS message was received indicating the incompatible call state. |
|
99 |
— |
IE_NONEXIST
|
This cause indicates that the equipment sending this cause has received a message including unrecognizable information element (s) because the information element (s) / parameter (s) name (s) is (are) not defined or defined but not implemented by the equipment sending this cause. This reason indicates that the information element (s) has (have) been discarded. However, the information element is not obligated to be present in the message to allow the equipment sending this cause to process the message. |
|
100 |
— |
INVALID_IE_CONTENTS
|
This cause indicates that the equipment sending this cause has received the information element that was implemented by it. However, one or several fields in the I.E. are encoded in a way that hasn’t been implemented by the equipment sending this cause |
|
101 |
— |
WRONG_CALL_STATE
|
This cause indicates that a message non-compliant with the call state has been received. |
|
102 |
504 |
RECOVERY_ON_TIMER_EXPIRE
|
This reason indicates that a procedure was initiated by timer expiration connected with error processing procedures. This is often caused by NAT issues. Make sure «NAT Mapping Enable» is activated in your ATA. If it isn’t concerning NAT, sometimes it refers to a provider. Check if another outbound provider can solve a problem. |
|
103 |
— |
MANDATORY_IE_LENGTH_ERROR
|
This cause indicates that the equipment sending this cause has received a message including parameters that are not recognized because parameters are not defined or defined but not implemented by the equipment sending this cause. The reason indicates that the parameters have been ignored. Besides, if the equipment sending this cause is an intermediate point thus this cause indicates that the parameter (parameters) was (were) transmitted without changes. |
|
111 |
— |
PROTOCOL_ERROR
|
This reason is used for informing about protocol error cause only in case when none of the other causes in the protocol error class apply. |
|
127 |
— |
INTERWORKING
|
This reason indicates that an internetwork call (usually an SW56 service call) has ended. |
|
503 |
— |
MANAGER_REQUEST
|
This cause is used when you send an API command to end the call. |
|
605 |
— |
PICKED_OFF
|
This cause means that the call was picked up from another added number. |
|
606 |
— |
USER_NOT_REGISTERED
|
This means you tried to call a SIP user that has not been registered. |
|
609 |
— |
GATEWAY_DOWN
|
Gateway is down (does not respond to OPTIONS or SUBSCRIBE) |
|
687 |
— |
ABANDONED
|
This means that the call was canceled by the dialer |
|
— |
— |
ORIGINATOR_CANCEL
|
The call originator (agent or client) ended the call before receiving the answer (Answer) |
|
— |
— |
SYSTEM_SHUTDOWN
|
This cause indicates that the call was terminated due to a system shutdown or restart during active calls. |
Tab. 3. Hangup cause
1.3.39. Hangup disposition
Displays the reason for ending the call. List of possible termination reasons:
-
Client dropped;
-
Agent dropped;
-
Cancelled;
-
Not answered;
-
Error;
-
Ended by system.
1.3.40. AMD result
If there is a setting for this parameter, it displays who answered the call - a machine or a person.
With AMD functionality enabled, the following options are possible:
-
NOTSURE - not sure;
-
HUMAN - a person;
-
MACHINE - voice recording, for example, an answering device;
-
CANCEL - the Member cancelled the call while the recognition occurred.
With the Artificial Intelligence (AI AMD) functionality enabled, the following options are possible:
-
human - a person;
-
silence - silence;
-
ringback - beeps;
-
voicemail - voice recording, for example, an answering device.
AMD is available for Outbound IVR Queue, Progressive Dialer and Predictive Dialer.
If auto-detection is disabled, the field will be empty.
1.3.41. Agent's comment
Displays the agent's comment about the call in processing, if it is configured.
1.3.42. Blind transfer
The number to which the blind transfer was made is displayed here. When there is no blind translation, the field remains empty.
1.3.43. Grantee
Displays the Role assigned to the Queue within which the call occurred.
The recipient is entered on the General tab of the Queue.
If the call passes along the route of several Roles, then only the last Role will be displayed in the History.
1.3.44. Score
The dialogue score is displayed here.
Calls with transfers are not evaluated.
Only a call that has a call recording or transcription can be evaluated.
One call can only be evaluated once.
1.3.45. Rated by
The name of the User who graded the call is displayed here.
1.3.46. Member Id
The Member id is displayed here.
1.3.47. Attempt Id
The Attempt id is displayed here.
1.3.48. Contact
The name of the contact is displayed here.
1.3.49. MOS
Displays the network quality indicator during the call. The indicator color is determined by the value of the MOS parameter:
|
Color |
MOS value |
|---|---|
|
Green ( |
≥ 4.0 |
|
Yellow ( |
3.5–4.0 |
|
Red ( |
< 3.5 |


If the call lasted less than 10 seconds, the parameter will not be displayed, and the column will remain empty.
1.3.50. Call recording listening tool
When you click on the 

The call recording playback panel opens by clicking on the name (Fig. 17).

It consists of the following elements:
-
Play/Pause button;
-
File playback track;
-
File playback volume control tool;
-
Settings button — used to set the playback speed of the file;
-
File download tool;
-
Playback close button.
1.3.51. Transcribe tool
When you click on the 

The Transcription modal window (Fig. 18) when click on the
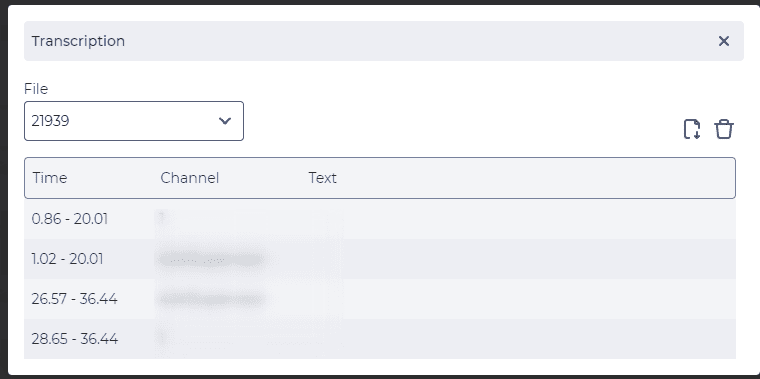
1.3.51.1. Transcription modal window
The modal window consists of the following elements:
-
File drop-down list - the transcribed file of a particular conversation is selected here;
-

-

-
The body of the conversation - here it is indicated:
-
Time - indicates the time interval in which the phrase was spoken. The count is in milliseconds, where 0 is the beginning of the conversation;
-
Channel - indicated by whom the phrase was uttered;
-
Text - the phrase that was spoken.
-
1.3.52. Call info tool
Clicking on the 
The card of a call can have the following tabs:
1.4. Pagination
It consists of the Rows per page field, which indicates the number of entries (it is possible to set from 1 to 1000) per page, and forward and backward buttons for switching pages.
2. Opportunities
2.1. Select of displayed columns in the registry
|
Goal |
Select of displayed columns in the registry |
|---|---|
|
Preconditions |
|
|
Steps
|
|
|
Result |
The modal window closes. The selected columns are displayed in the registry. |

2.2. Export of Call data
|
Goal |
Export of Call data |
|---|---|
|
Preconditions |
|
|
Steps |
|
|
Result |
The history.csv file is downloaded, which call information. |
2.3. Filter the displayed data in the Registry
|
Goal |
Select to display calls from the Orders Queue |
|---|---|
|
Preconditions |
|
|
Steps |
|
|
Result |
The data registry is reloaded, and the data for the selected filter is displayed. |
2.4. Download the record of the call
|
Goal |
Download the record of the call |
|---|---|
|
Preconditions |
|
|
Steps: |
|
|
Result |
A zip file is downloaded in which the call recording is located. |

2.5. Listen to a call recording
|
Goal |
Listen to a call recording |
|---|---|
|
Preconditions |
|
|
Steps: |
|
|
Result |
The call recording is played. |

2.6. View information about a call.
|
Goal |
View information about a call. |
|---|---|
|
Preconditions |
|
|
Steps: |
|
|
Result |
The Call info tab opens. |
